If you are looking for the best tool to create a blog or an online store, Hostinger Website Builder is the right answer. This site builder is one of the most intuitive tools for beginners, making it easy to set up a website without any coding knowledge or design skills. It uses what we refer to as the point-and-click or the drag-and-drop model. This allows you to design your site on the What You See Is What You Get (WYSIWYG) level without the nitty-gritty.
Thanks to its SEO-ready platform, Hostinger Website Builder is great for creating responsive sites that will excel greatly in search engine rankings. Is it an online store you want to build? It has many website templates to set it up with many royalty-free stock images. Its blogging and commerce dashboards are also well-packed with features.
We could go on and on about what it can do, but since that is not the purpose of this article, please go to our Hostinger Website Builder review for more details. Now, let’s take a look at how to create a site with Hostinger Website Builder.
How to Build a Site With Hostinger Website Builder (Tutorial)
You can create any blog or eCommerce site in minutes with Hostinger Website Builder if you follow this step-by-step guide. Let’s begin!
Purchase the Package/Create Account
When you want to build a site with Hostinger Website Builder, the first step is to create an account by purchasing the tool. If you have not done that already, just click on the button below:
Visit Hostinger Website Builder
Navigate to the Hosting link at the top-right menu and click it. Once the submenu drops, click the Website Builder link.

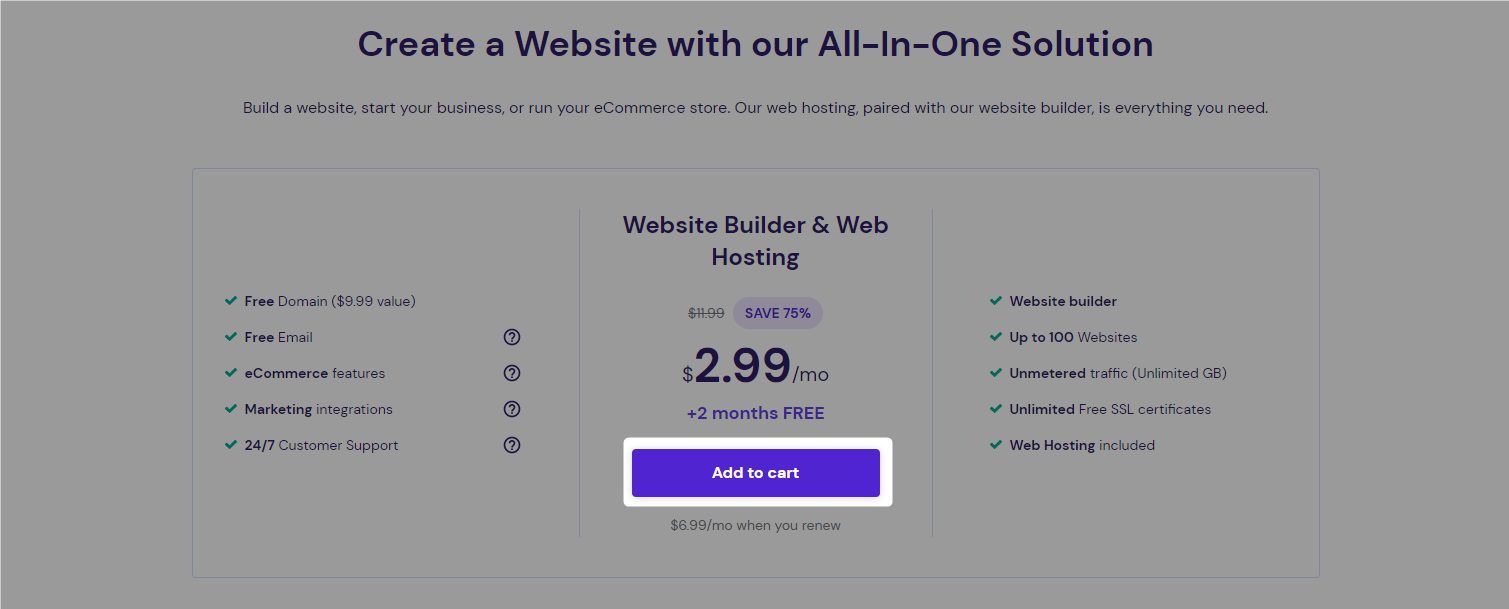
Click the Add to cart button under the Website Builder & Web Hosting plan.
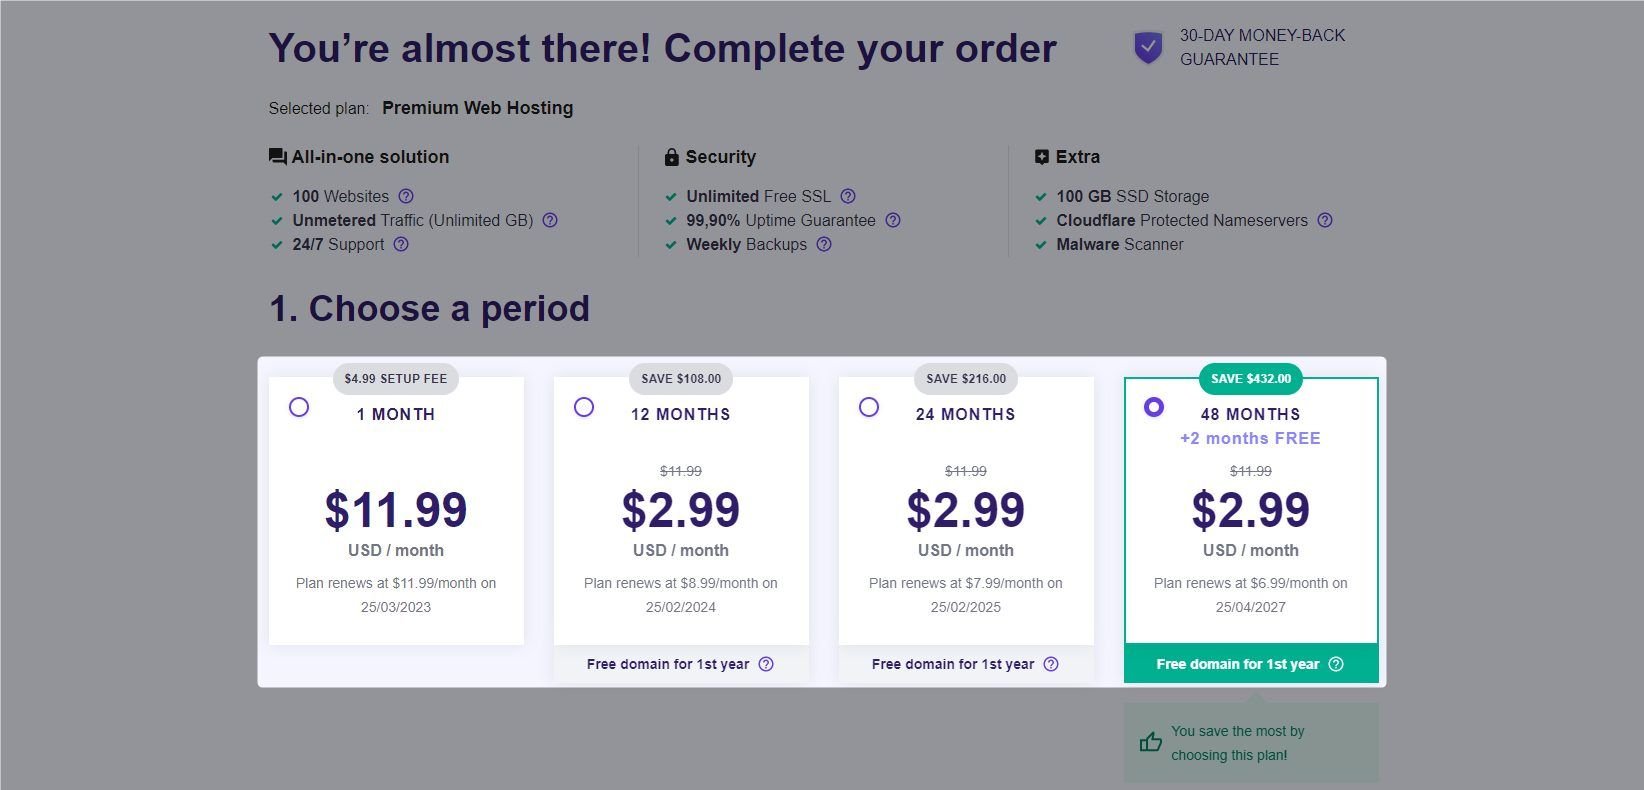
Choose a subscription period by clicking on the card. We recommend choosing the 24 or 48-month period because each gives better discounts. Well, that’s if you plan on sticking with the tool for a long time which is just right.
Scroll down and provide your email address in the box or link your Facebook or Google account instead.

Click the Have a coupon code? link. Then input our Hostinger coupon in the box for an extra 10% discount. Click the Apply button afterward.

Then, choose your payment method, and fill in your address and details. Afterward, click the Submit Secure Payment button.

Set your password on the next page and log in to your account.
Create a website with Hostinger
Add Your Domain
The next step in creating a site with Hostinger Website Builder is to add your domain.
On your hPanel dashboard, navigate to the Websites link and click it.

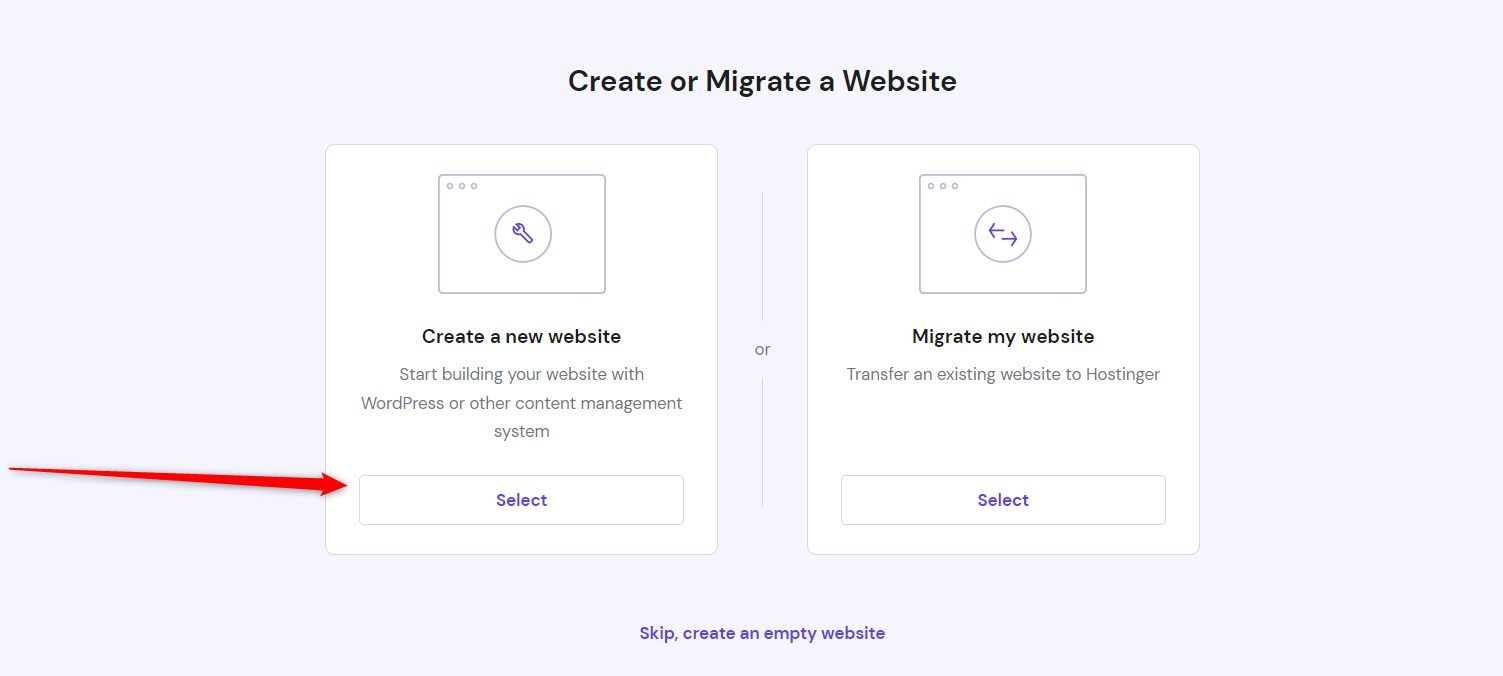
Now, click the Create or migrate a website box.

Click the SELECT button under the Create a new website box.
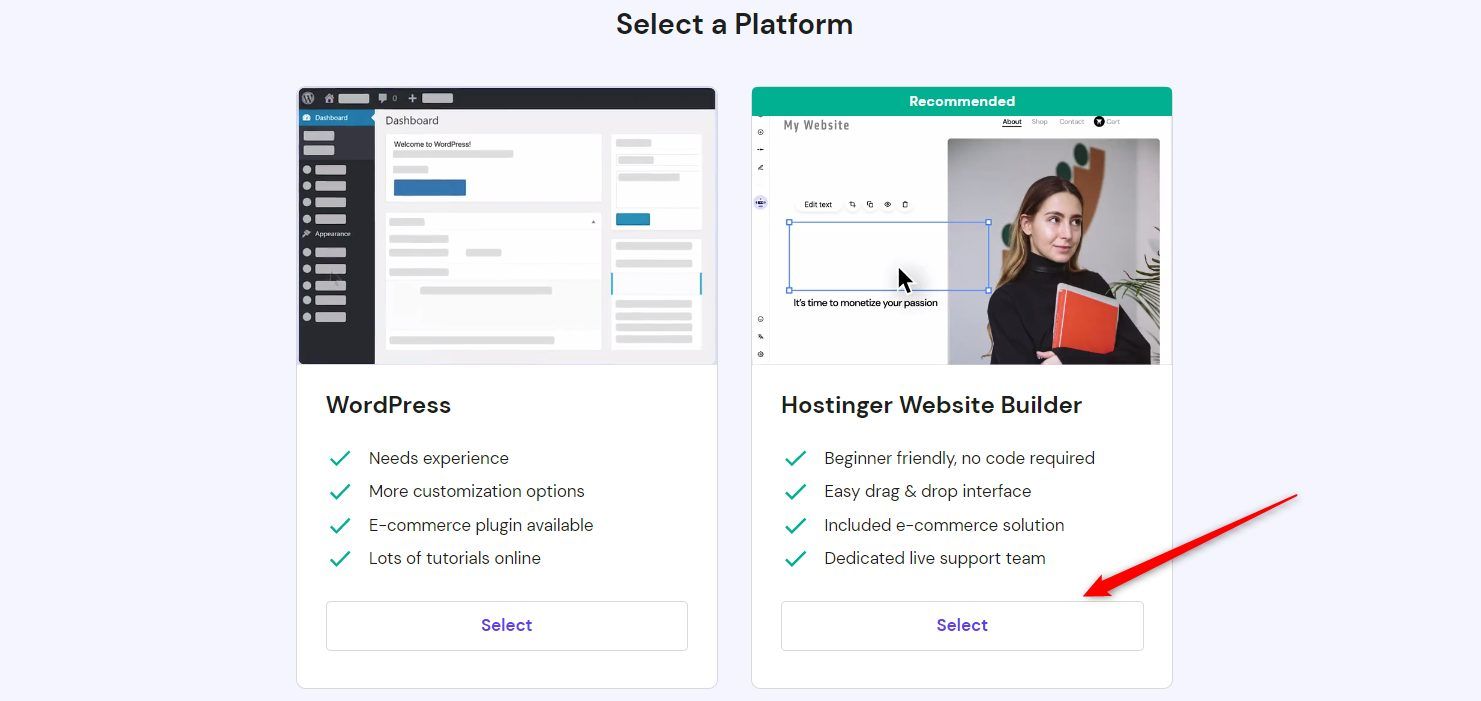
Click the SELECT button under the Hostinger Website Builder tab.
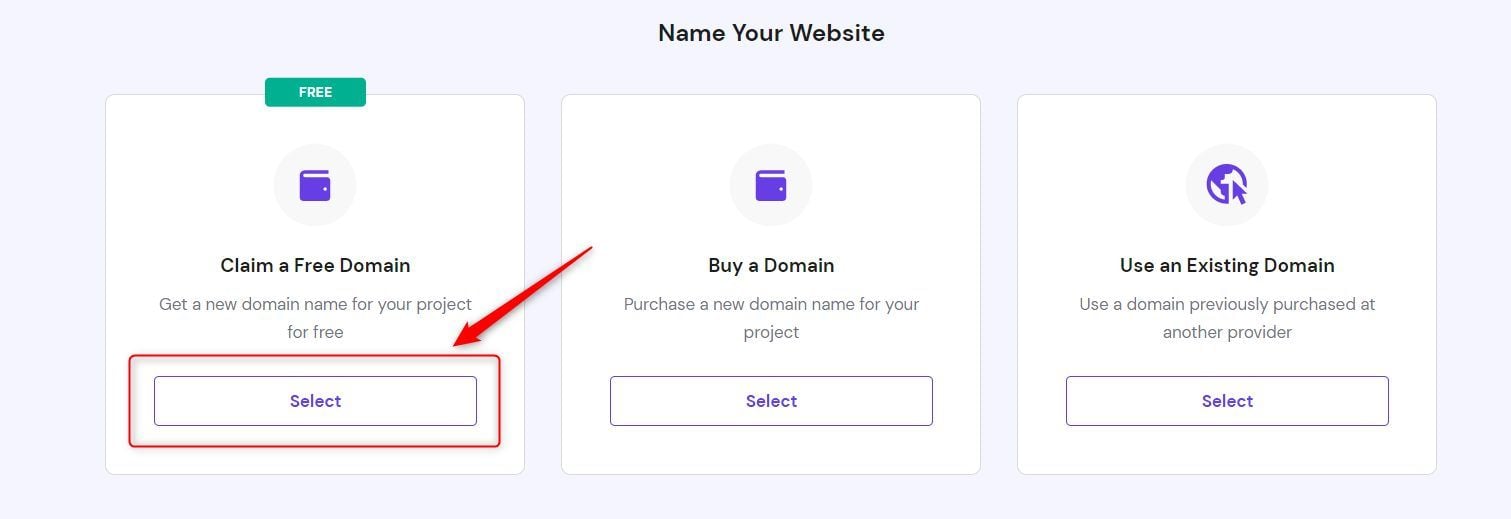
If you don’t have a domain, click the SELECT button under the Claim a Free Domain box. Because yes, creating a site with Hostinger Website Builder allows you to get a free domain name for 1 year.
Type your desired domain name in the large text box. Then click the mini box beside it to choose an extension from the drop-down. Click the Search button afterward. If the domain is unavailable, you must redo this step to continue.
If it is available, as shown below, click the Continue button. You should follow the on-screen instructions to complete the claim.

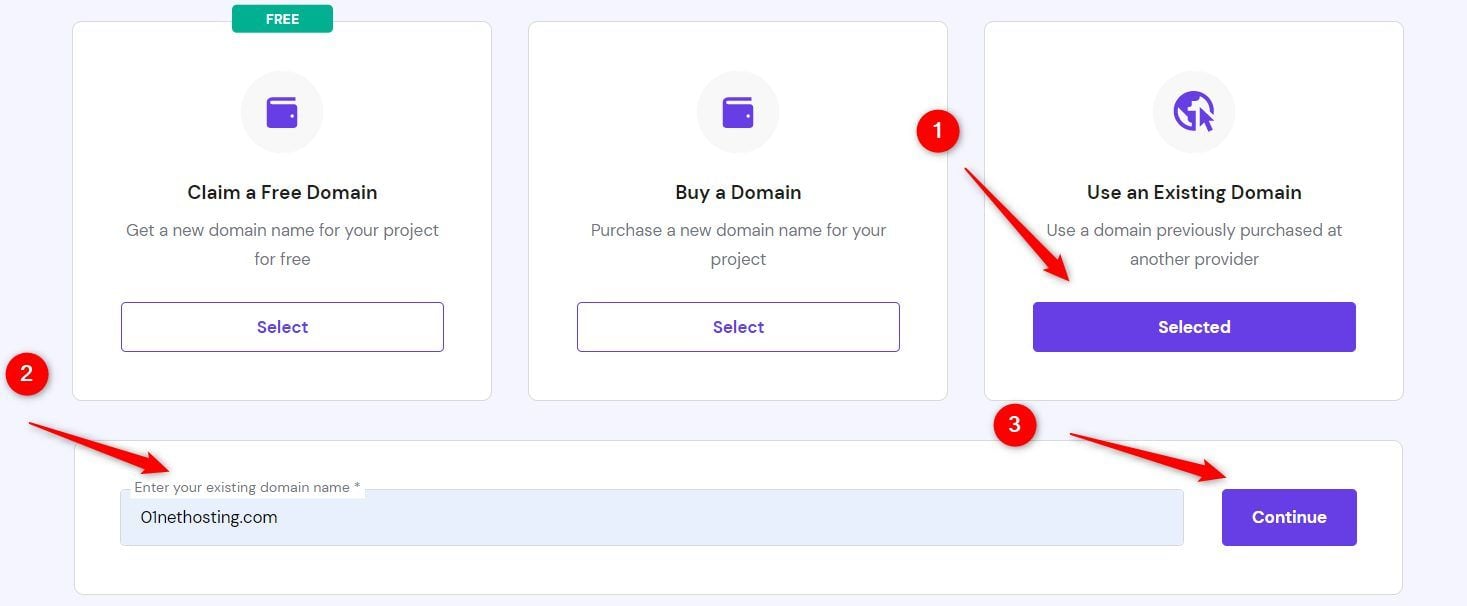
If you have a domain already, click the SELECT button under the Use an Existing Domain box instead. Type the domain name you want to use with Hostinger Website Builder to create your site in the box below. Then click the Continue button.
This will redirect you to the builder’s template page.
Choose A Template or Create Yours With Hostinger AI Website Builder
This is the next step to build your blog or store with Hostinger Website Builder. There are two ways to play this one. You can choose whether to use the AI or the available templates. Let’s see how to go about both.
Creating A Template With Hostinger AI Website Builder
Using the AI to create a site with Hostinger Website Builder gives you more personalized templates.
Create your site with Hostinger Website Builder
Scroll down till you see the purple section. Click the TRY AI WEBSITE BUILDER button. Allow a few seconds for the next page to load.

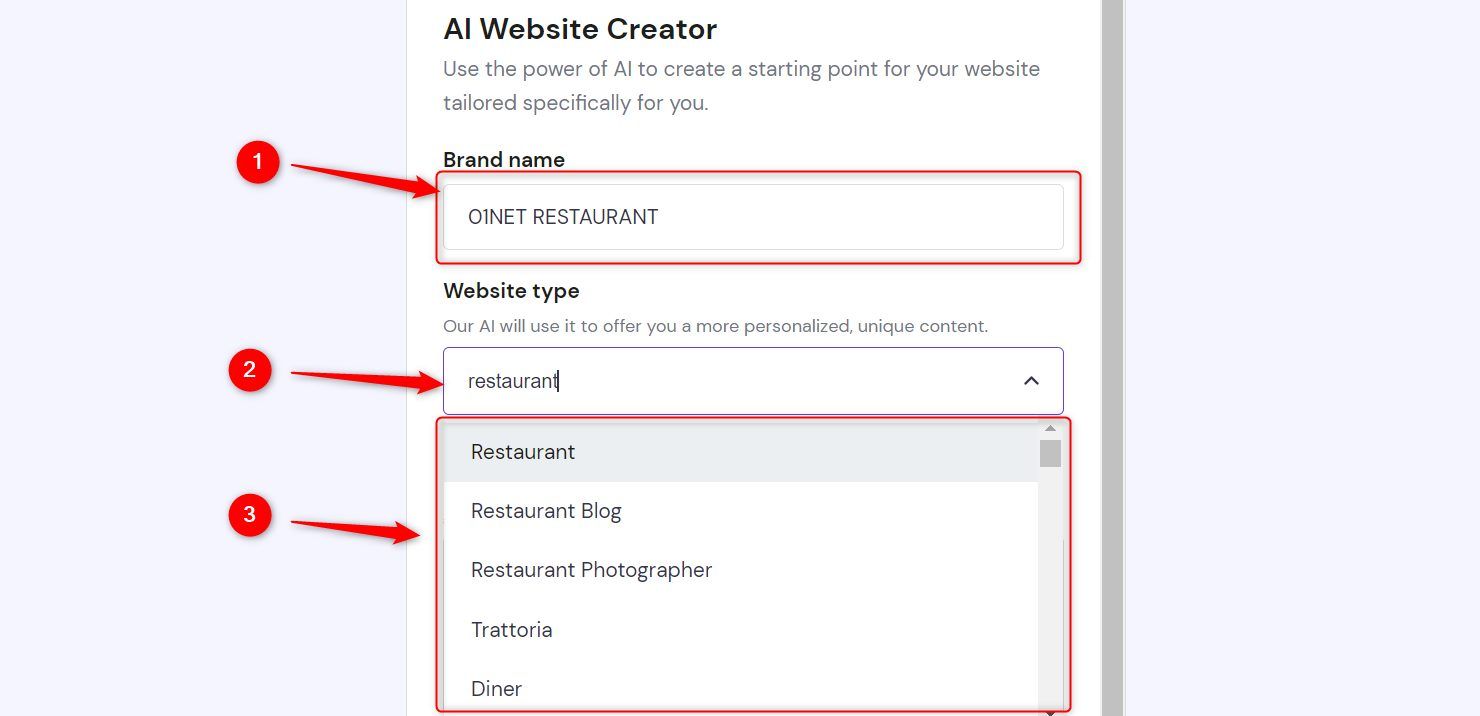
Now, provide your brand name in the space allotted for it. Click the box under the Website Type field and type your business type. Click it if you find it, or choose the closest one from the results displayed.
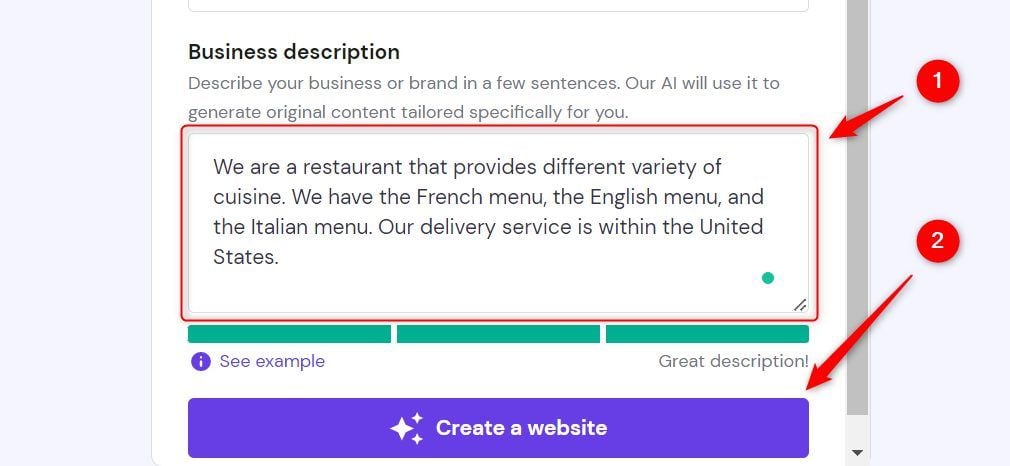
Then, provide information about the site you want to create in the Business description box to allow the AI to give the best results. Ensure you provide enough relevant information and that the colors of the tabs below the box turn green. Click the Create a website button afterward.
Hostinger Website Builder will create some templates and pages for you.
Use these floating buttons at the bottom of the screen numbered 1, 2, and 3 to switch between the templates. To add more pages, click the Pages button. Then click the plus sign beside the page you wish to add.
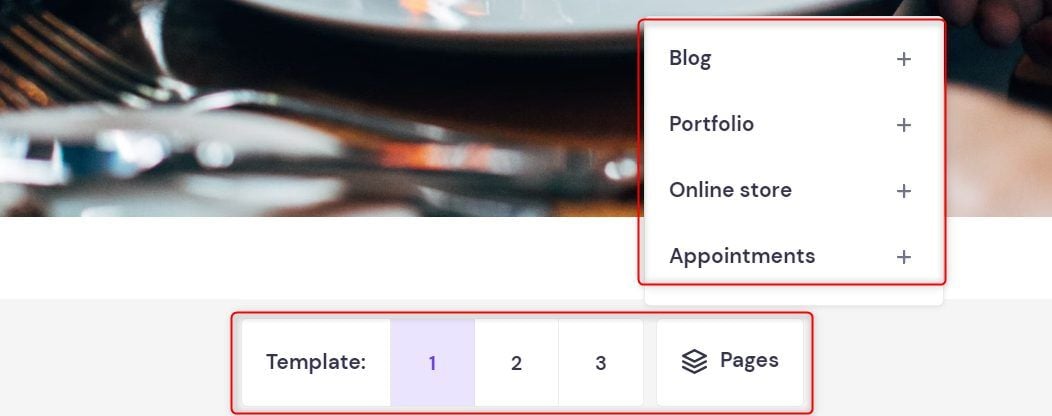
Navigate to the top-right corner to click the link to the pages you created and check if you like them.

If all is great, click the Continue to editor button. Otherwise, click the Try again button to generate new templates.

Click the Go back button if you would prefer to choose a template instead.

Choosing a Template
Now, this is the method you should use to build your site with Hostinger Website Builder if you don’t like the results of the AI.
Choose the category of your business to filter the results to show the best templates. If you have the name of the template you want, provided it is available on Hostinger, type it in the textbox.

Now, scroll down to choose a template. Hover your mouse on the one you choose and click the PREVIEW button.
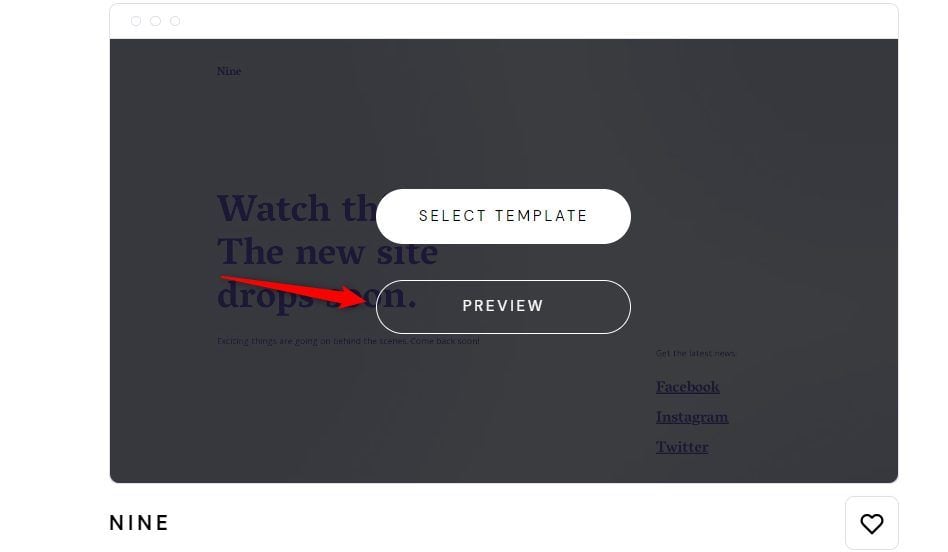
Click the different screen sizes from the icons to see how the pages are and how responsive they are on different devices.

If you don’t like the template, click the All templates link to pick another one.

Click the START BUILDING button to open the editor and continue the process of creating a website with Hostinger Website Builder.

Build Your Homepage With Hostinger Builder
When creating your site with Hostinger Website Builder, the next step is to design your homepage.
Editing The Header
The first part of your site to customize is the header. In the editor, navigate to the header and click anywhere on it. Then, click the settings icon, as shown below.

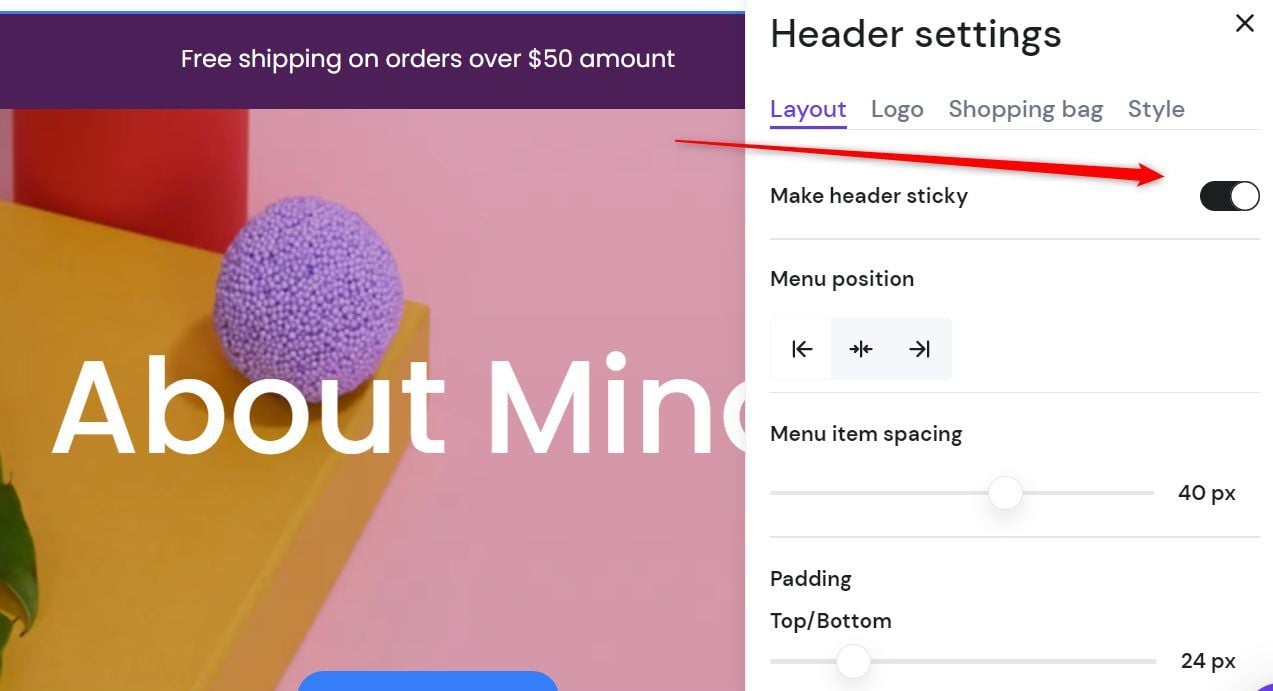
Under the Layout tab, toggle ON the Make header sticky option if you want your header to remain on the top of your pages as users scroll up and down.
Otherwise, toggle OFF the option. Choose where you want your menu (left, center, or right). Then set the spacing and the paddings. There are no ideal settings. So edit until you like how the menu looks, or leave the default settings.
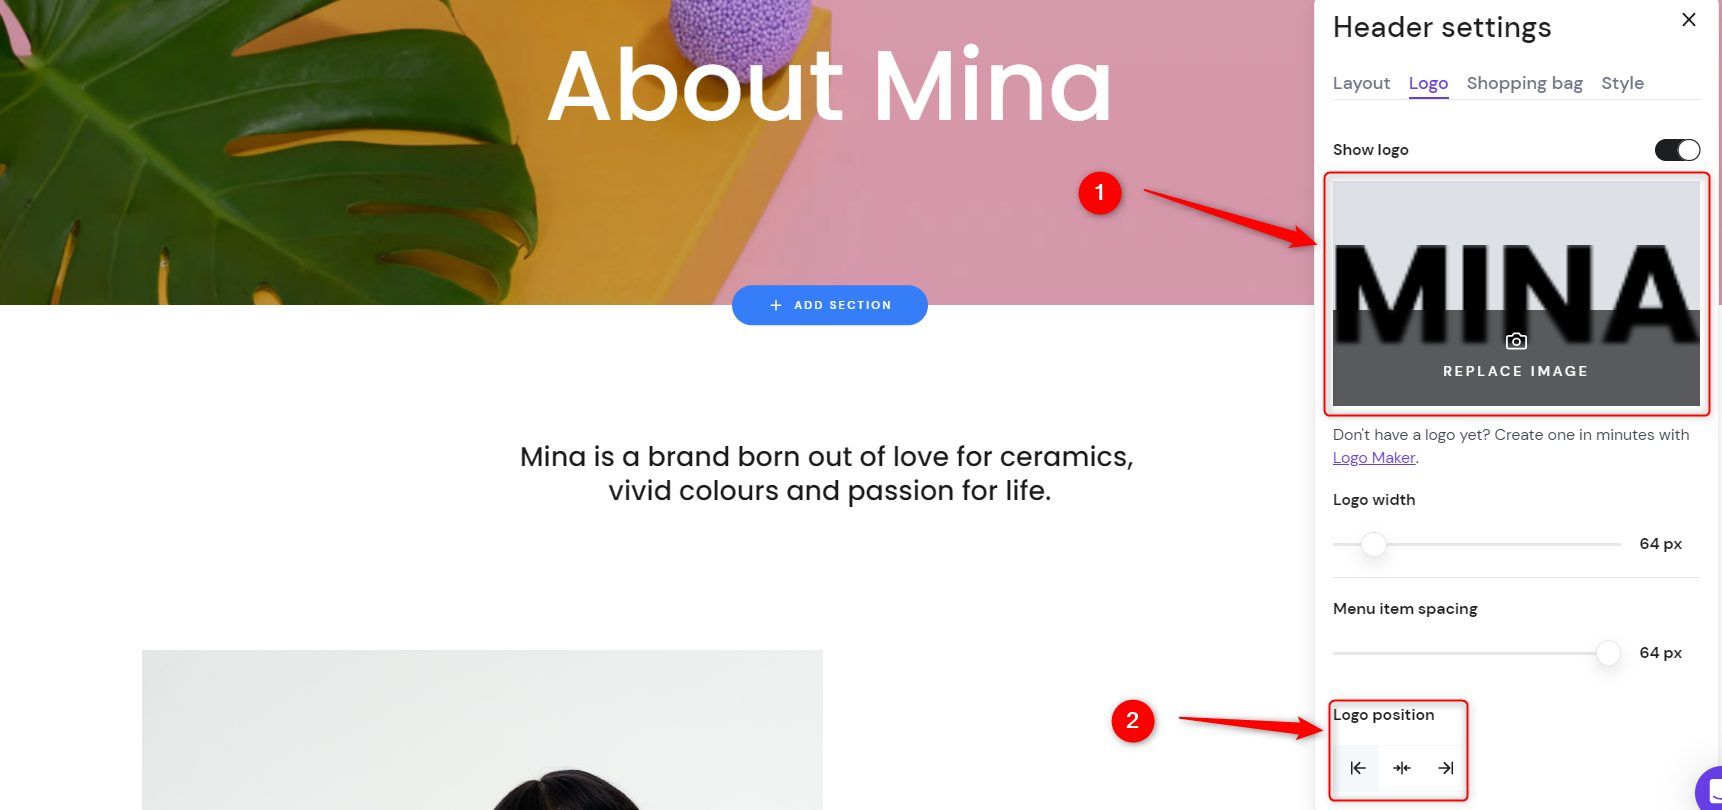
Now, click the Logo tab. Click the REPLACE IMAGE link to choose the logo file to upload from your computer. Leave the Logo width and Menu item spacing tabs in their default settings if the logo looks okay. Then, click the buttons (left, center, and right) under the Logo position section to change where your logo appears on the header menu.
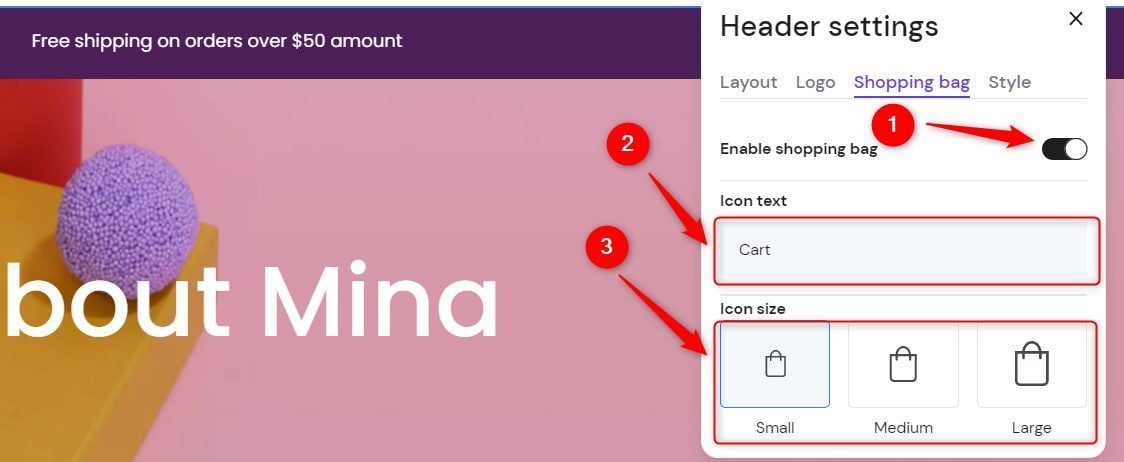
Switch to the Shopping bag tab. Toggle ON the Enable shopping bag option if you are creating an online store with Hostinger Website Builder. Type your preferred shopping bag name in the box. It could be “Cart,” “Shop,” etc. Then choose the Icon size of your shopping bag. Small is perfect in most cases.
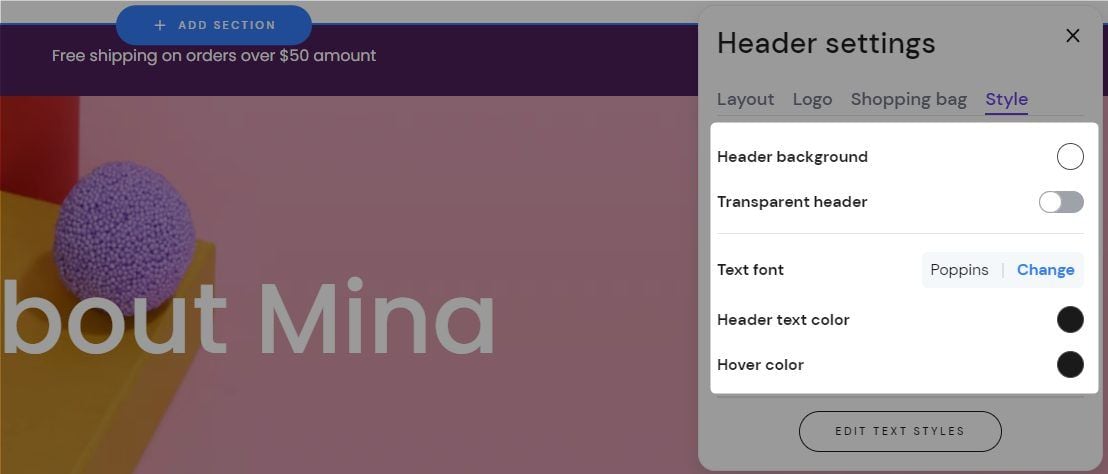
Click the Style tab. Change the background color of your header and choose whether to make it transparent or not. Click the Change button before Text font if you want a different font. Lastly, set your Header text color and Hover color. The Hover color is the color of the items in the header menu when the mouse cursor is on them.
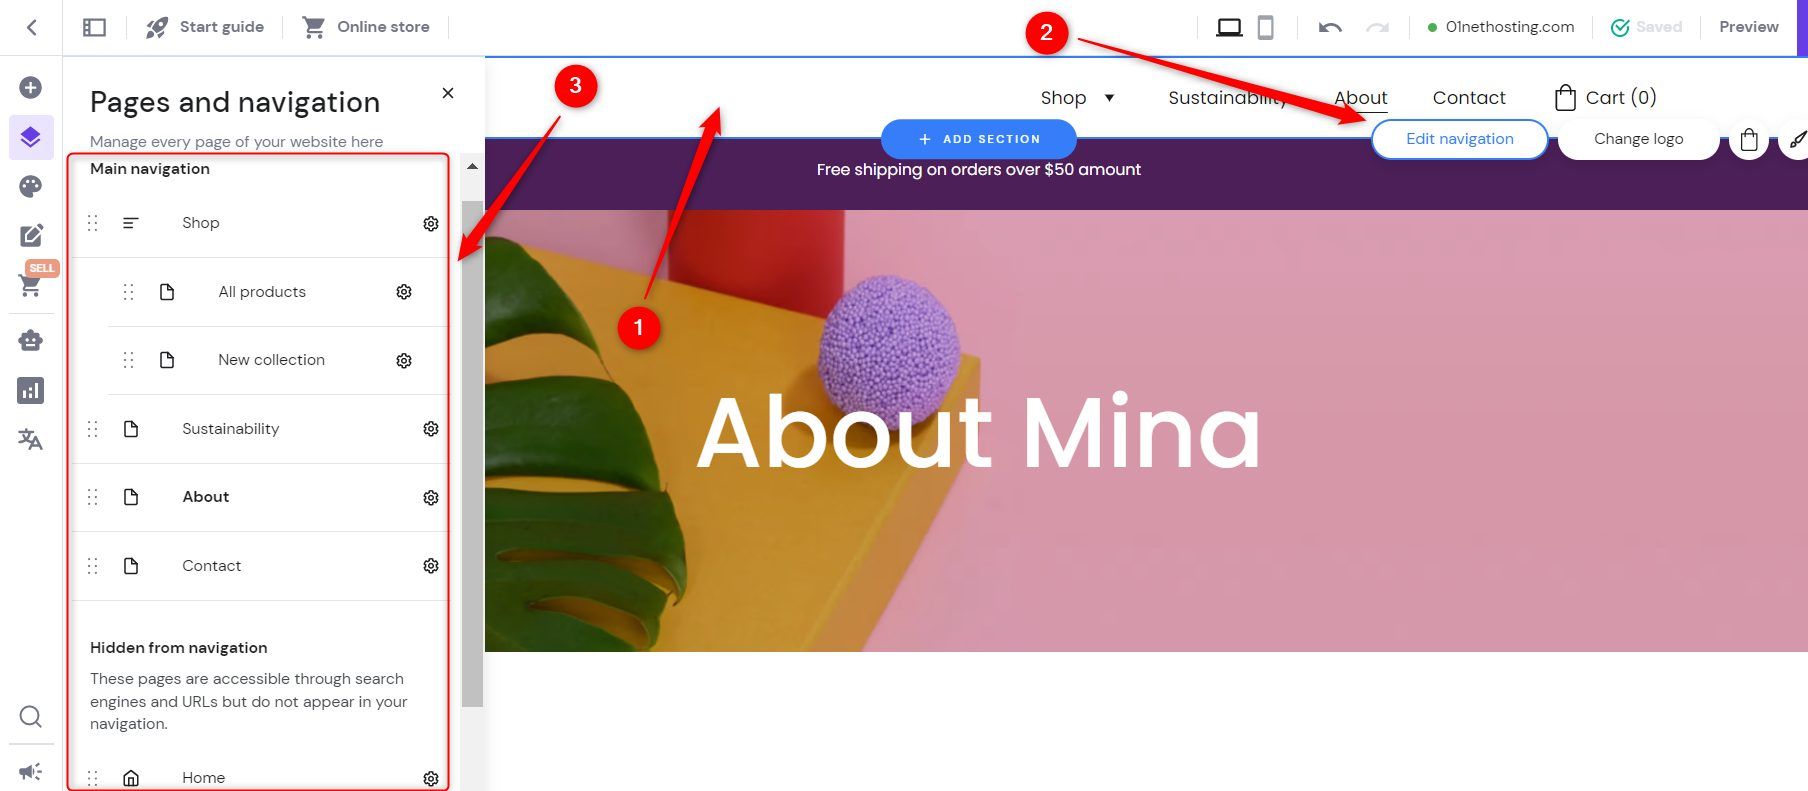
Now, click the header section again. Then, click the Edit navigation button. Once navigation shows on the left-hand side of the editor, click the braille-like icon on a menu item and drag it to where you want it. Drag and move the page you don’t want in the menu from the Main navigation section to the Hidden from navigation section.
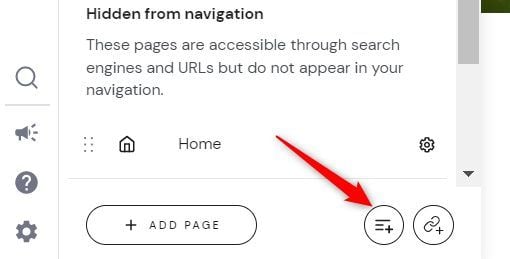
To add a drop-down menu on your newly created website with Hostinger Website Builder, click the icon shown below.
Once the dropdown menu is created, click the settings icon beside it. Then click the RENAME link. Type in your preferred name for the drop-down menu.

Now, drag the menu items you want to put into the drop-down menu under it.
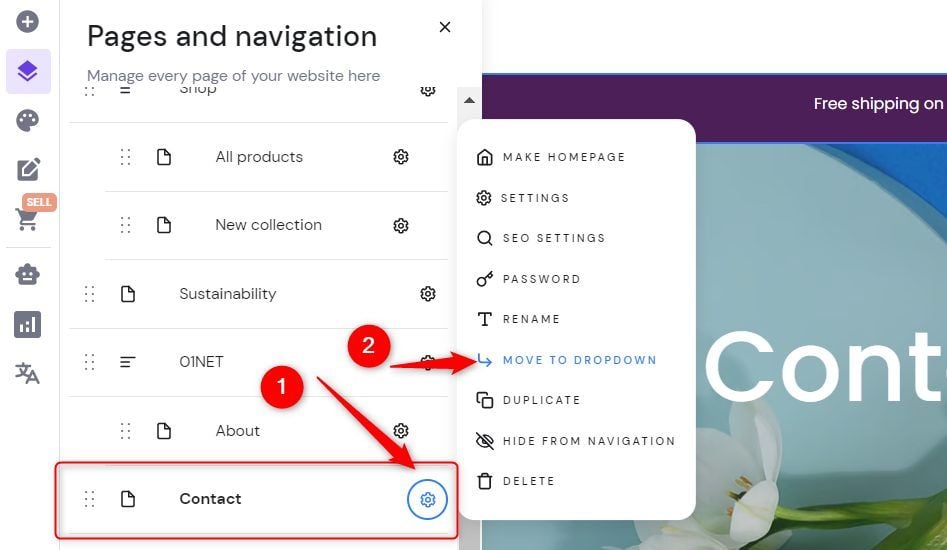
If a menu item is under the drop-down menu but does not show as a drop-down item (deflected to the right), click the settings icon beside it. Then click the MOVE TO DROPDOWN link.
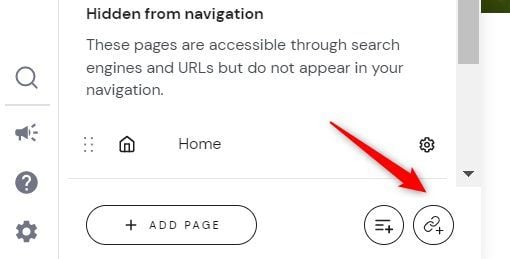
If you want to add custom links to the menu, click this icon, as shown below.
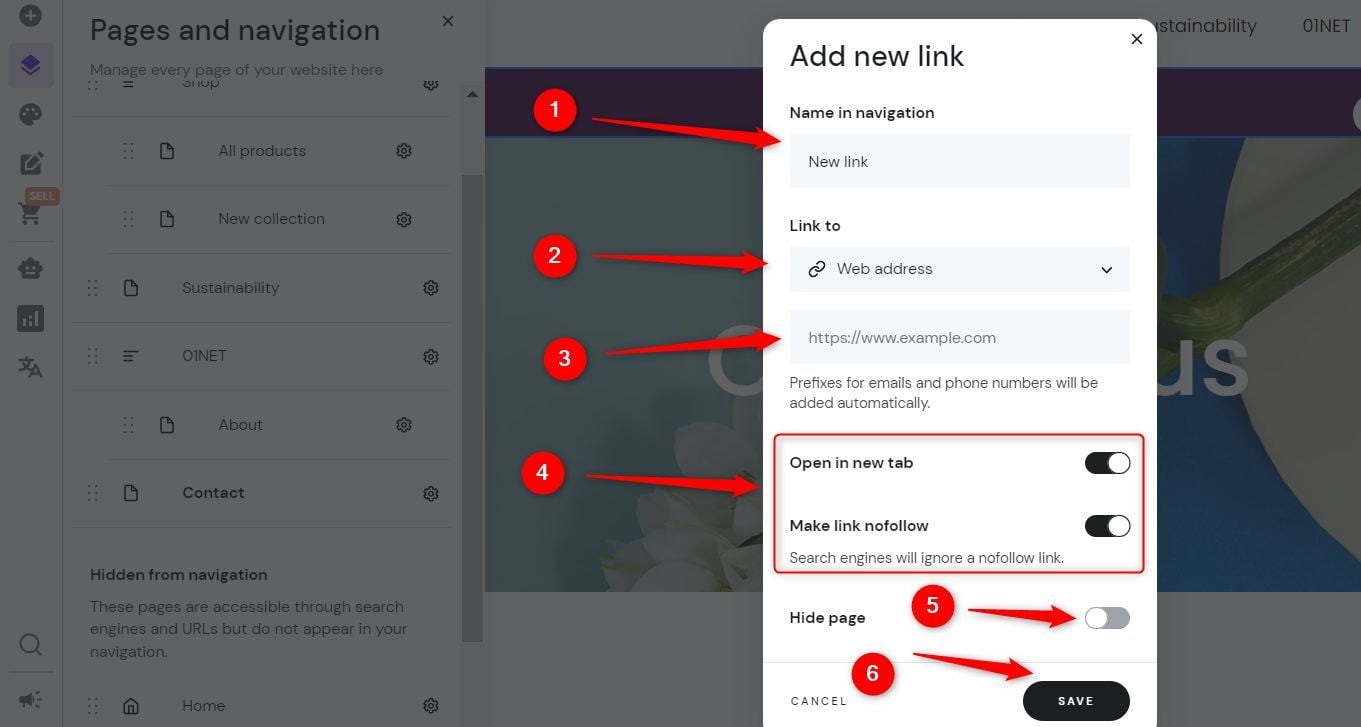
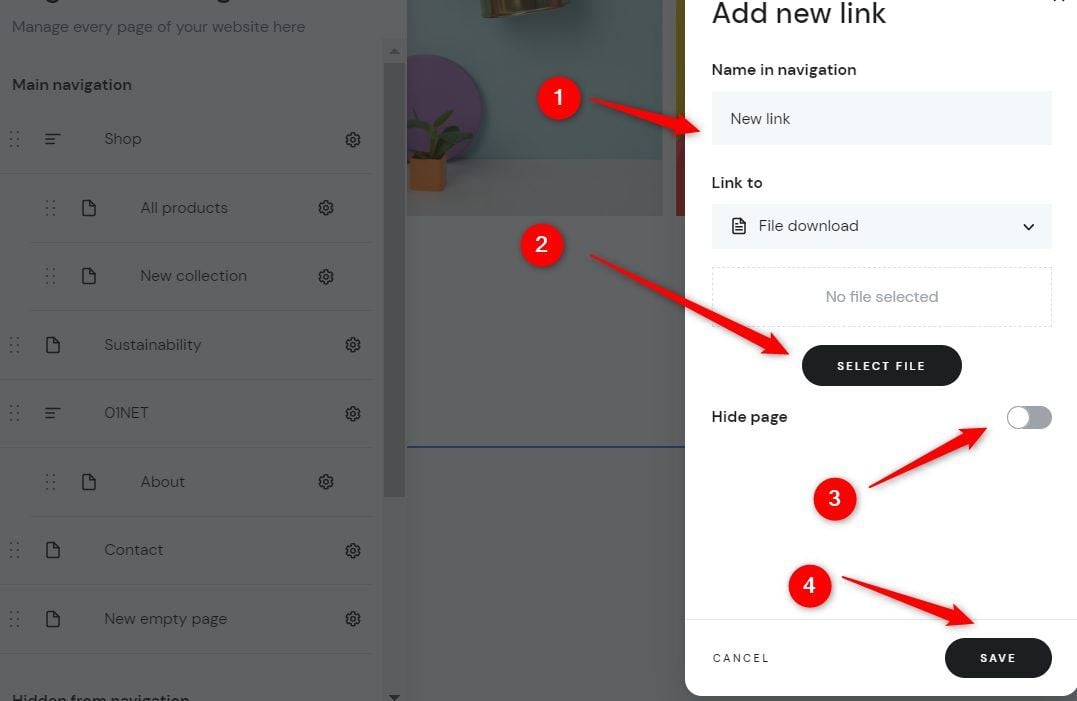
Provide the name of the link in the first box. If it is a web address, phone number link, or email, provide the link in the third box. Toggle ON or OFF the Open in a new tab option depending on your choice.
Build a site with Hostinger Website Builder
If you don’t want the page to be indexed by search engines, toggle ON the Make link nofollow option. Leave the Hide page toggle OFF since the link goes to the Main navigation. Then click the SAVE button.
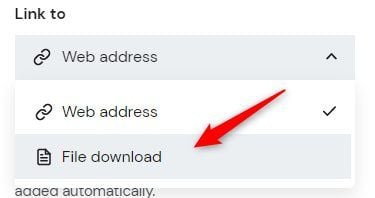
To add a file download link, click the second box with the phrase Web address instead. Then click File download from the drop-down.
Type the name of the link. Then click the SELECT FILE button to upload the file. Leave the Toggle of the Hide page option OFF and click the SAVE button.
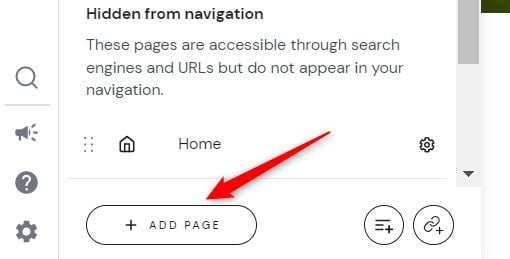
If you want to add a new page that does not exist yet to the navigation, click the ADD PAGE button. Once you create the page, move it to where you want it. (See how to create a page with the Hostinger Website Builder in its proper step)
Editing The Footer
Another important section you need to create on your site with Hostinger Website Builder is the footer.
To do that, scroll down. Once you get to the footer, click anywhere on it. Then, click the settings icon.

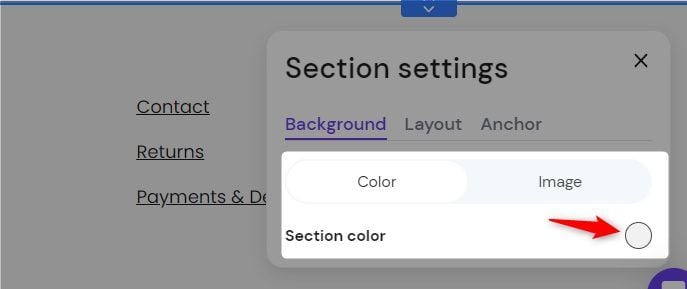
Now choose the background color you want for your Footer section by clicking on the circle as shown below.
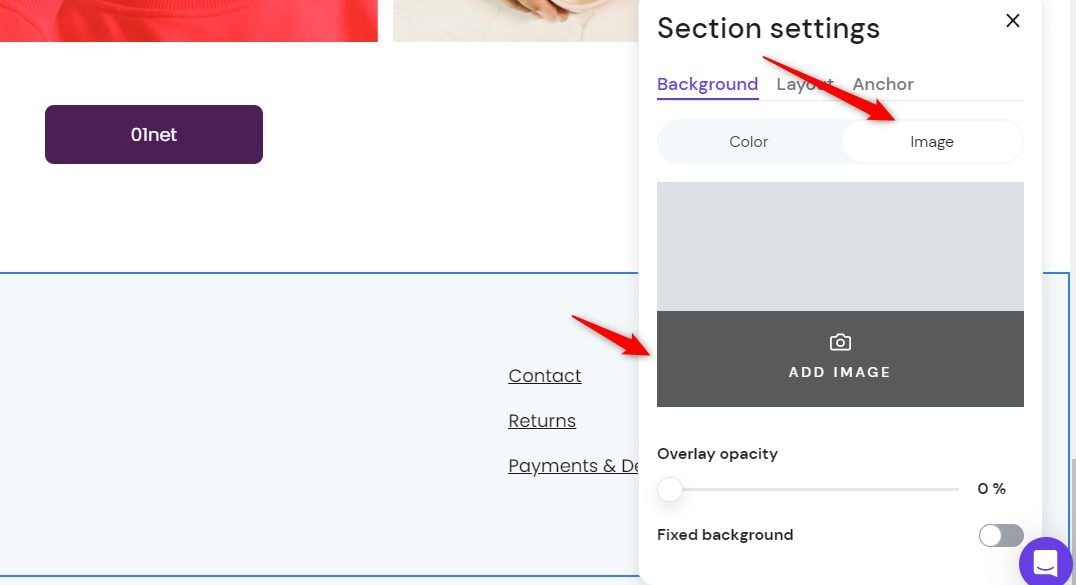
If you prefer an image, click the image tab. Then, click the REPLACE IMAGE button to choose an image file.
Now, switch to the Layout tab. Ensure the Snap to guides, and the Snap to elements toggles are ON.
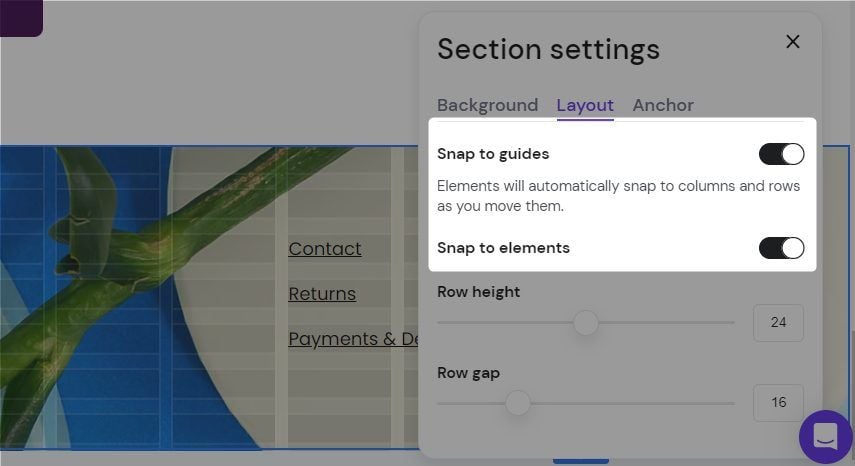
It is time to edit the elements on the footer now. If the elements on the footer from the template are everything you need, you have to edit them to become yours.
Click any element, for example, the texts. Now, click the Edit text button. Edit the text as you like. The same goes for other elements.

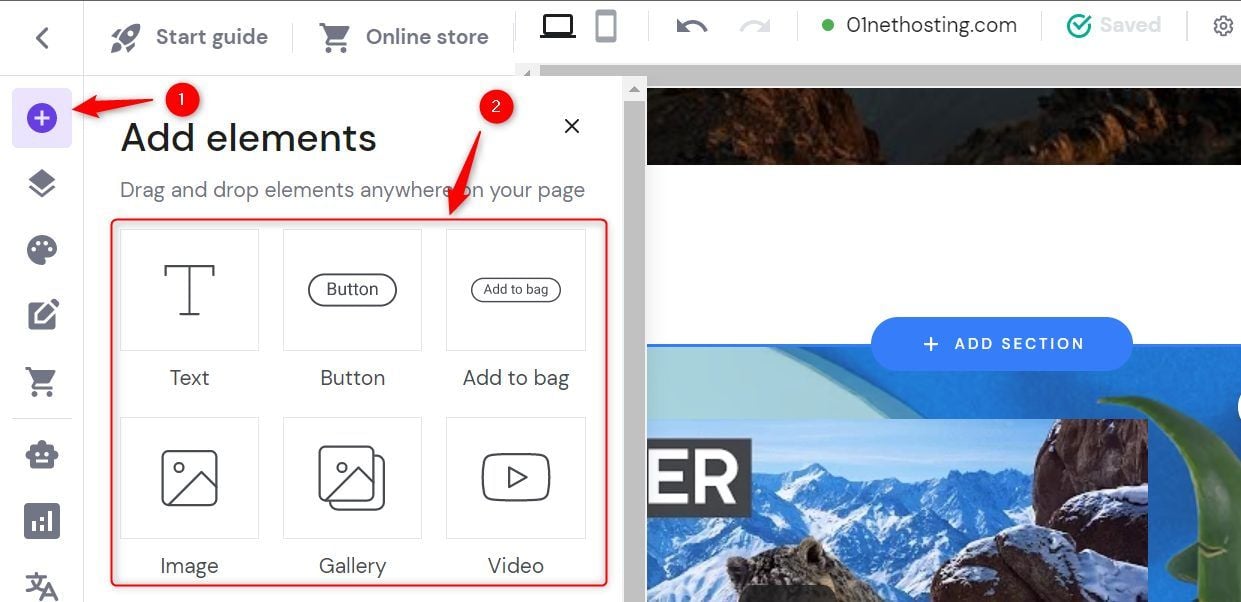
If you wish to add more elements to your website, click the plus sign button on the left sidebar. Then, choose your preferred element from the grid or drag it to where you want it in the footer section.
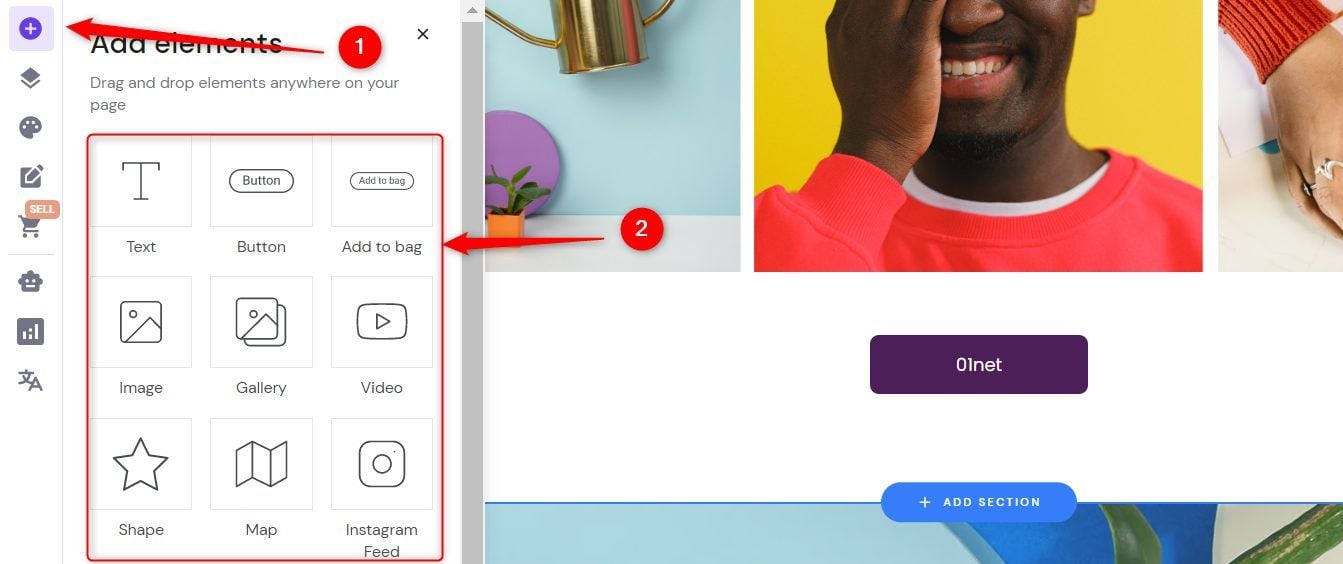
Afterward, start editing the elements and positioning them one after the other. Use the gridlines as a guide to build a responsive site with Hostinger Website Builder for elements positioning.
Editing The Body of The Homepage
The next important part of your homepage you need to create with the Hostinger Website Builder is the body. The body of your homepage is everything between the header and footer. This is where the most important sections of your pages are.
You need to move, add or delete sections and elements to edit it. Go to the top or bottom of an existing section, then click the add section button to add a new section above or below it, respectively.

Choose the type of section you wish to add from the left bar and choose a template from the right bar. If you prefer to start your section design or customizations from scratch, click the Add blank section link instead. You can now start editing the sections as we did in the “Editing the Footer” step.
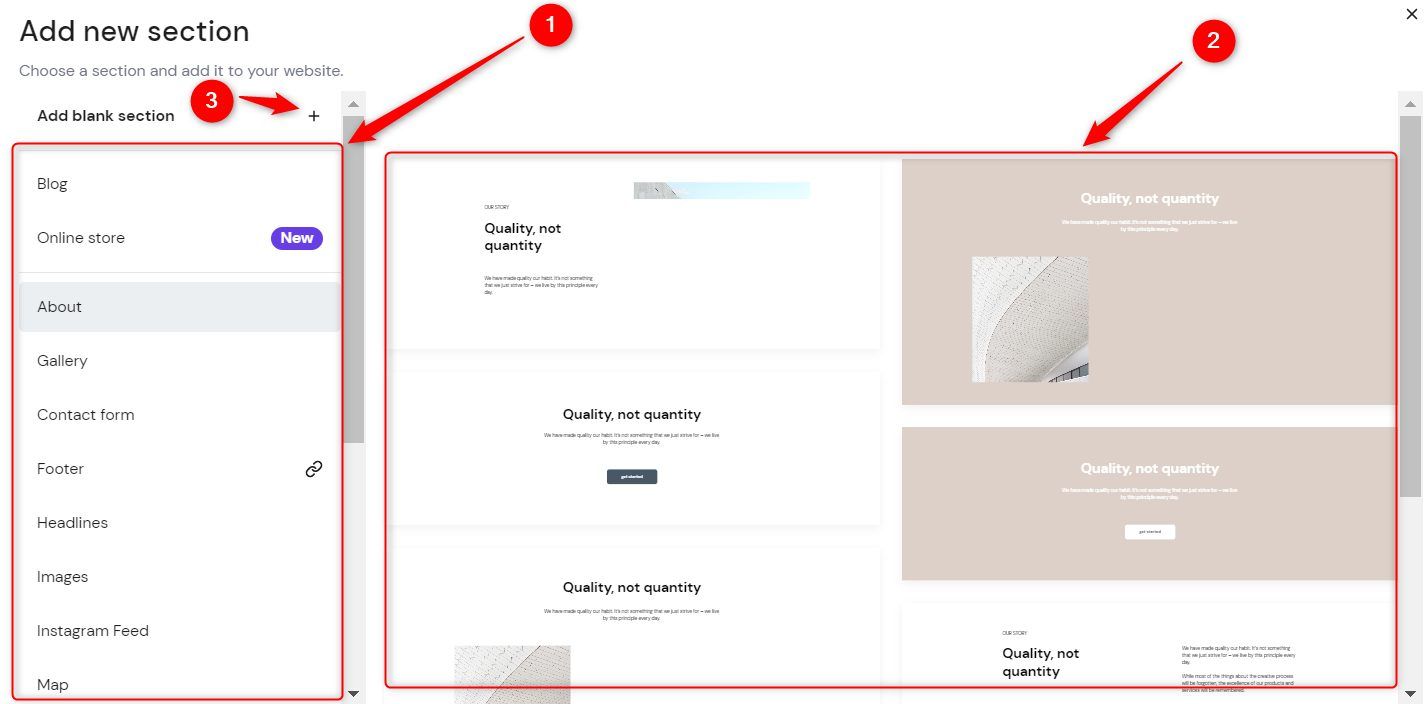
To edit the settings of the body sections, click anywhere on it. Then, navigate to the top right corner. Click the copy icon to duplicate the section. To move the section up or down, click the up and down arrows, respectively. Click the eye button to hide the section from either your site’s desktop or mobile version. If you don’t need the section, click the delete icon to remove it.

Note: When building your blog or store with the Hostinger Website Builder, the sections including the footer and their elements are edited similarly, except for the header section. The only difference is that you can move or delete other sections except for the header and footer.
Add/Edit New Pages
We are done editing the homepage in this guide on how to create a site with the help of Hostinger Website Builder.
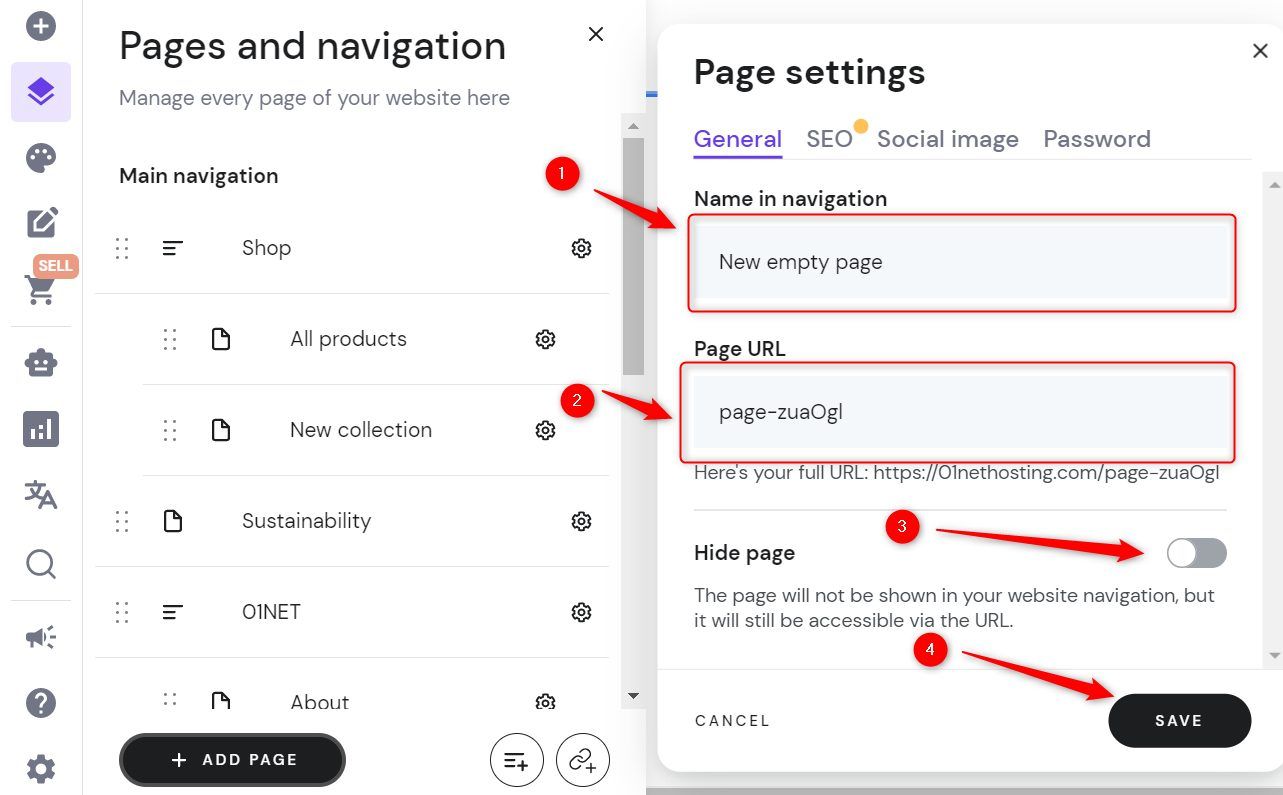
Now, depending on the type of site you are creating with Hostinger Website Builder, you need to add more pages and customize them. To add a new page, navigate to the left sidebar and click the Pages and Navigation icon. Then, click the ADD PAGE button.
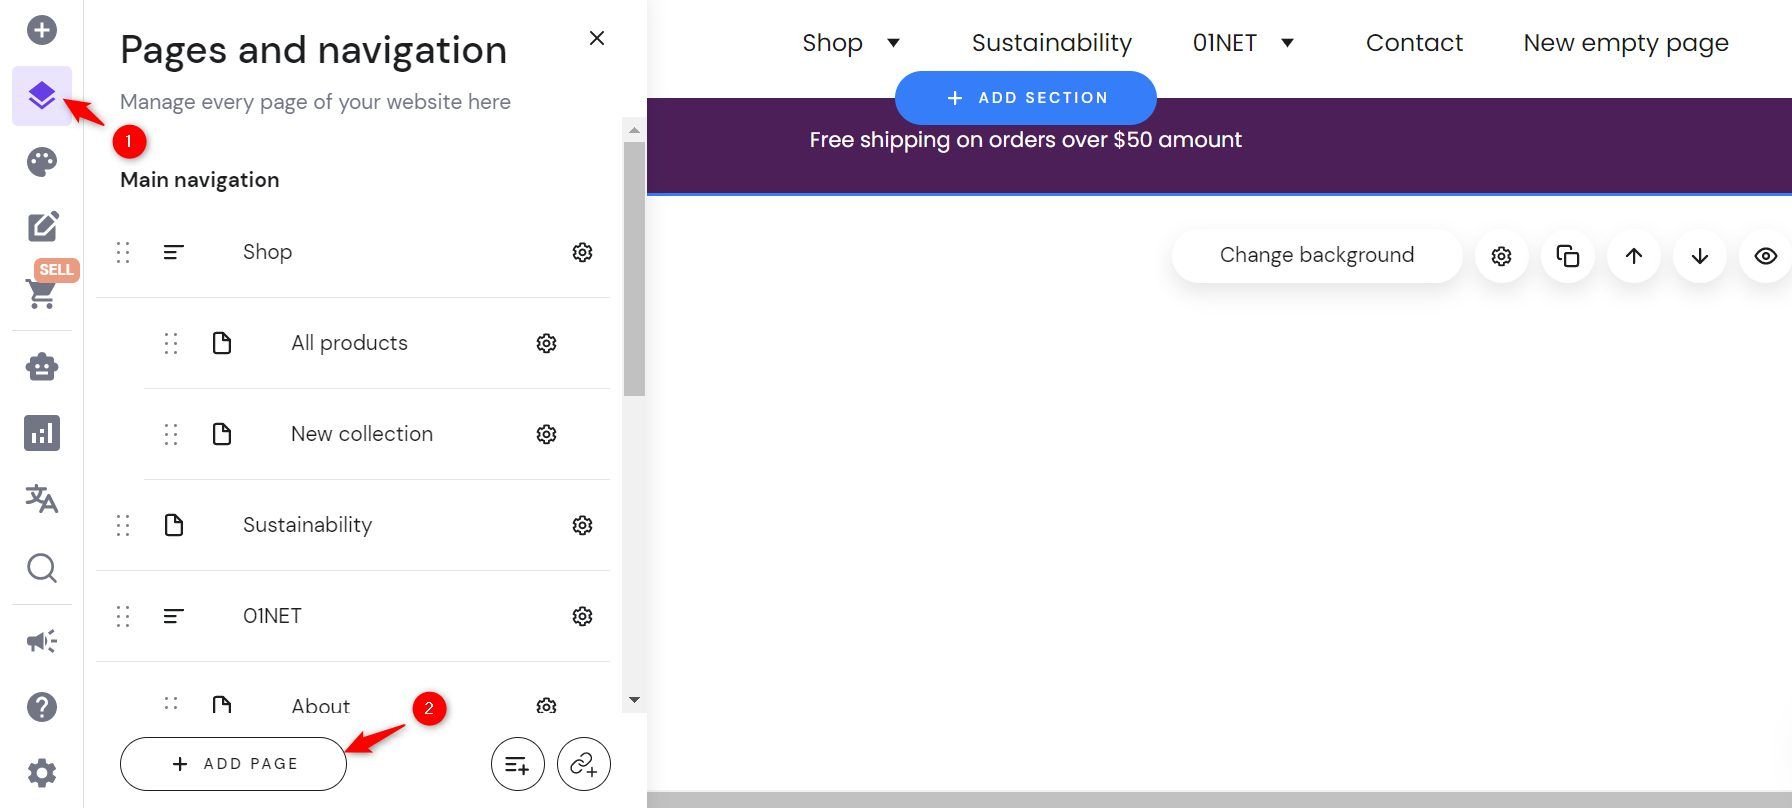
Type the title of the page in the Name in navigation box. Then, choose an SEO-friendly Page URL. It is best to put the keywords in the page’s title in the URL box. Toggle ON the Hide page option if you don’t want the link in your navigation. Otherwise, leave it. Click the SAVE button when done.
To edit any page, new or old, click it. It will open in the editor window. You can now start editing it by adding sections and elements. Please, follow the same procedure explained in the “Editing The Body of The Homepage” step.
Add Blog Posts
If the site you want to build with Hostinger Website Builder is a blog or has a blogging purpose, this is the next step.
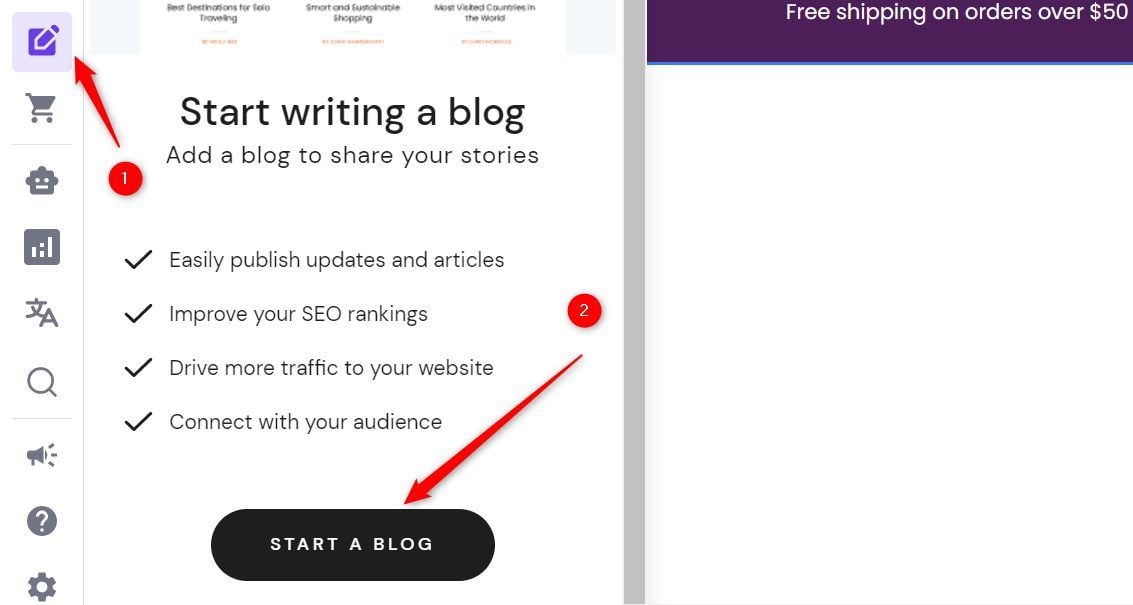
Go to the left sidebar and click the Blog button or icon. Then, click the START A BLOG button. This automatically creates some dummy blog posts for your site.
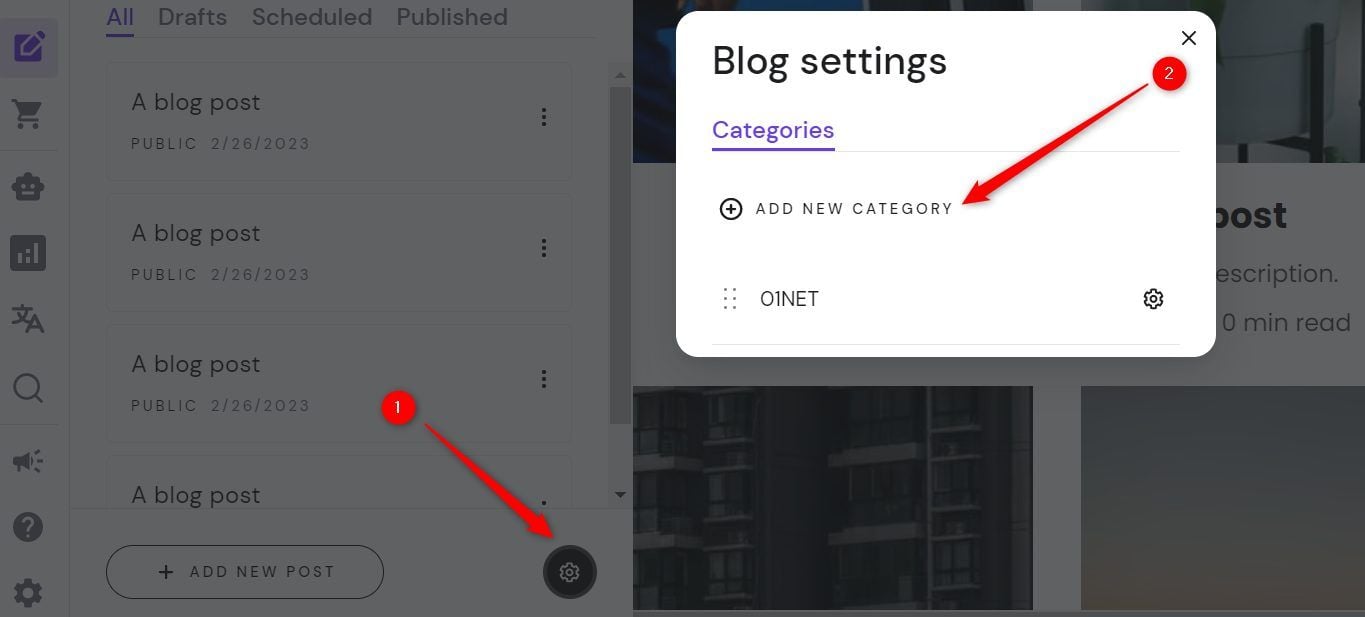
Now, click the settings icon at the bottom. Click the ADD NEW CATEGORY button and type the name of the category you want to add. Repeat this for all the categories you wish to add.
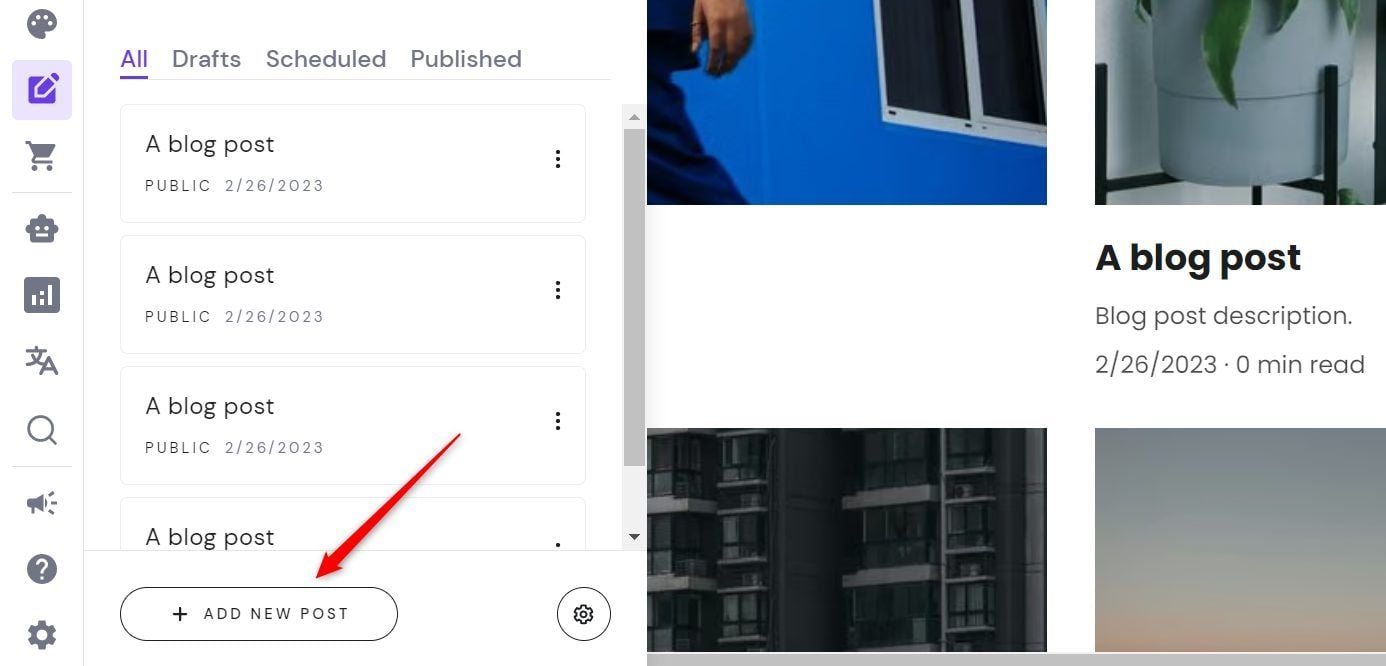
Now, click the ADD NEW POST button. This automatically creates a blog post for you titled A blog post.
Navigate to the editor page and click the Change post title button.

Type an SEO-friendly title for the page in the first box. Write the post’s meta description in the second box. At the same time, type an SEO-friendly URL in the third box. Specify the author in the fourth box.

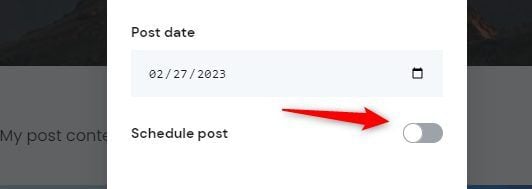
Then, choose the date you want to publish the blog post. You can only choose a future date if you toggle ON the Schedule post option.
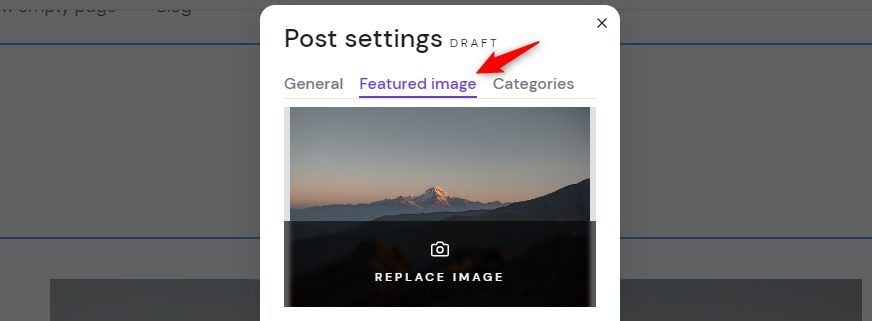
Now, switch to the Featured image tab and click the REPLACE IMAGE button to choose an image file.
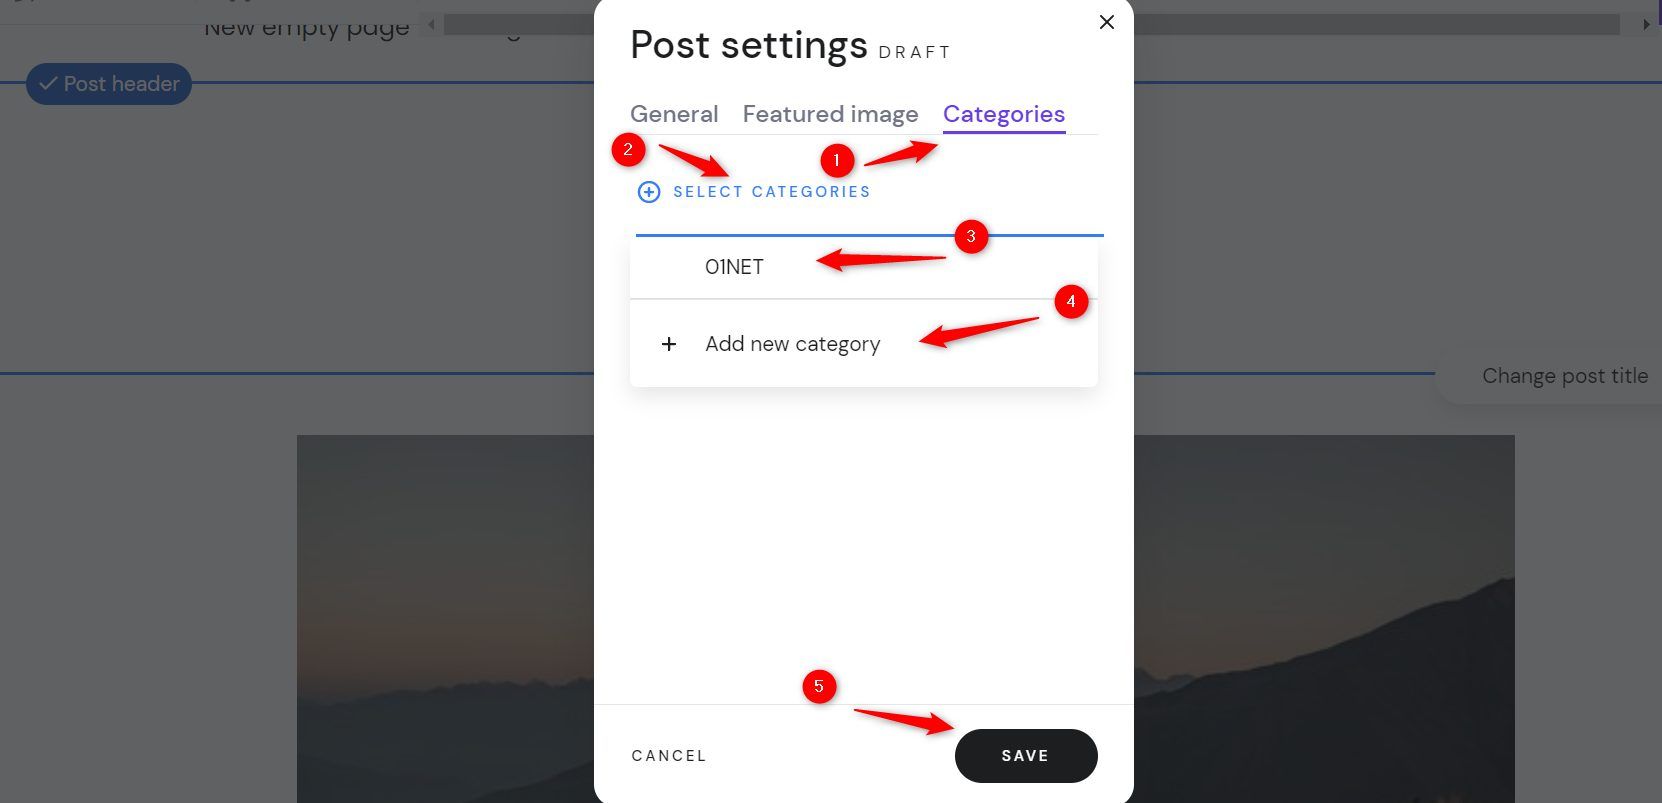
Switch to the Categories tab and click the SELECT CATEGORIES link. Click the categories you want from the drop-down if available. Otherwise, click the Add new category link. Then, click the SAVE button.
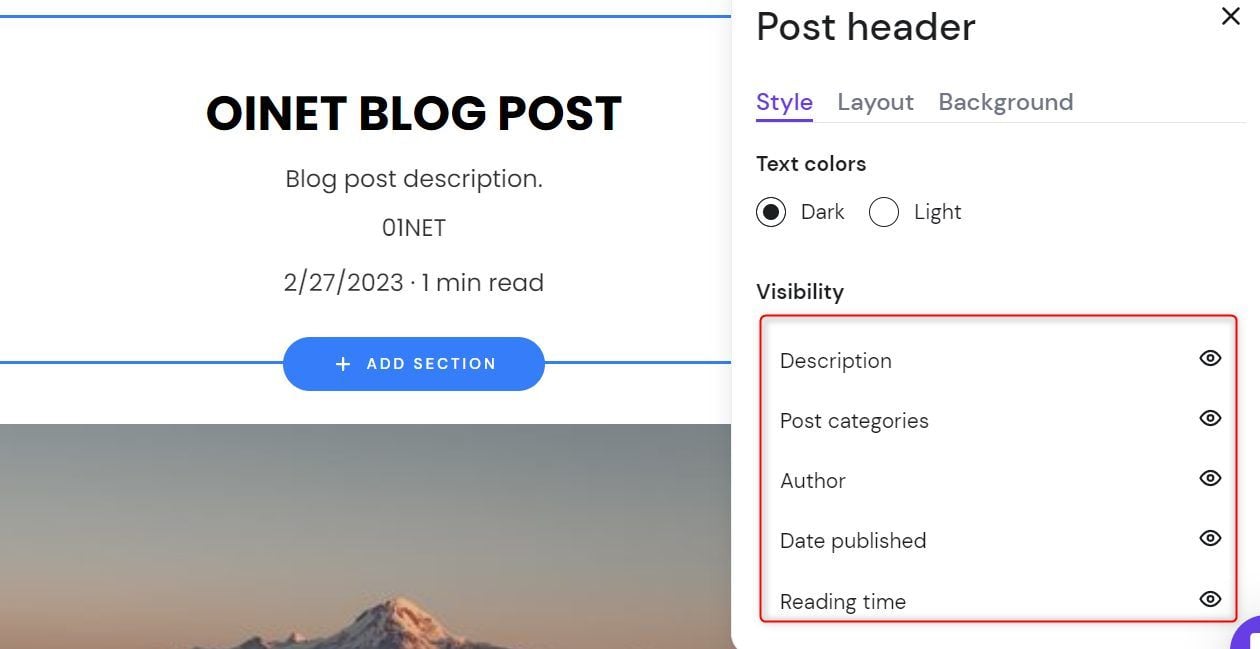
To customize your Post header, click anywhere on it. Then, click the settings button.

You can change the visibility of the metadata in the header by clicking the eye icon on each of them.
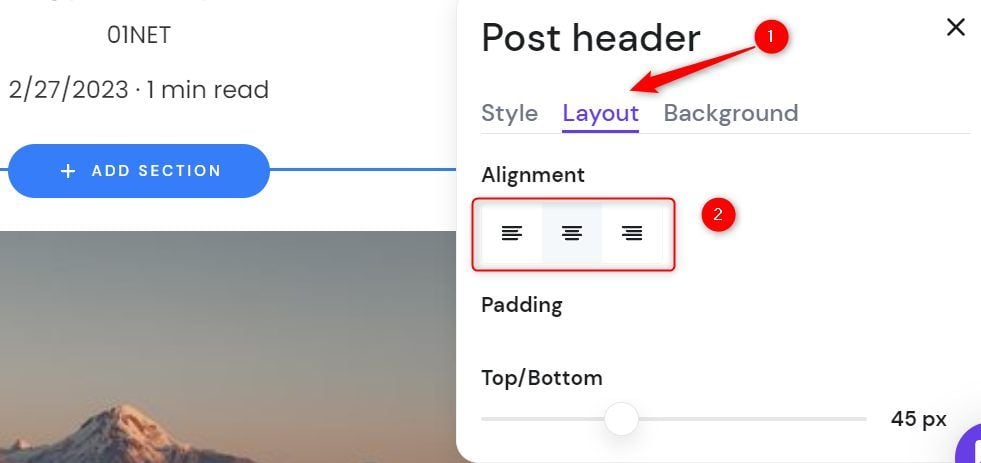
Switch to the layout tab by clicking on it. Use the alignment controls (left, center, and right) to specify where you want the header content. At the same time, you can use the Padding controls to specify the distance between the top and bottom borders of the post header and the content.
Scroll down the page and click anywhere on the My post content element. Click the Edit text button afterward and write your blog post.

Click the Add element icon if you need to add an image or any element after a text block. Then, drag the element to where you want it. Use the grid lines for positioning.
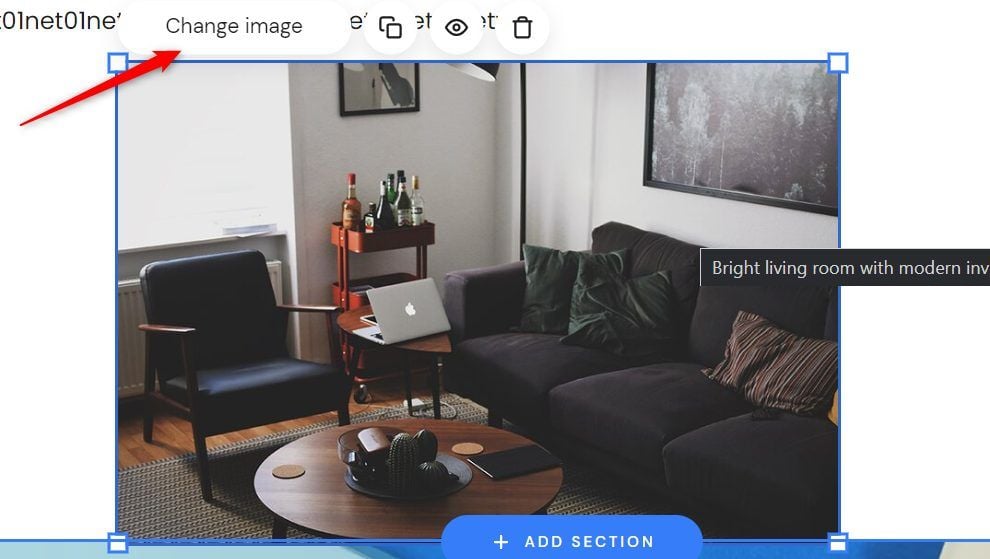
For example, if you add an image, click the element and then on the Change image button.
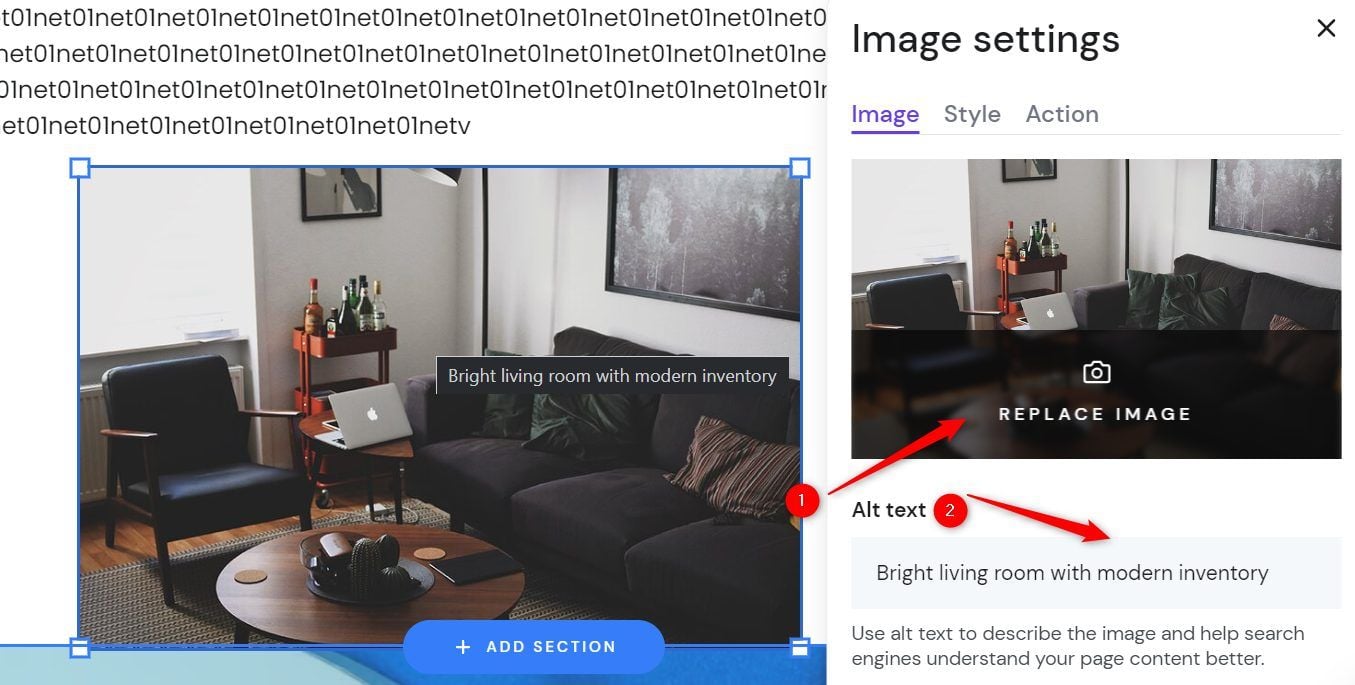
Click the REPLACE IMAGE button to pick another image from your computer or the stock photos. Then provide Alt text describing the image. You may try to put your targeted keyword in there. You are done creating a blog post with Hostinger Website Builder now.
Set Up SEO and Integrations
The next step when building a blog or online store with Hostinger Website Builder is integrating the third-party apps and setting up your site SEO.
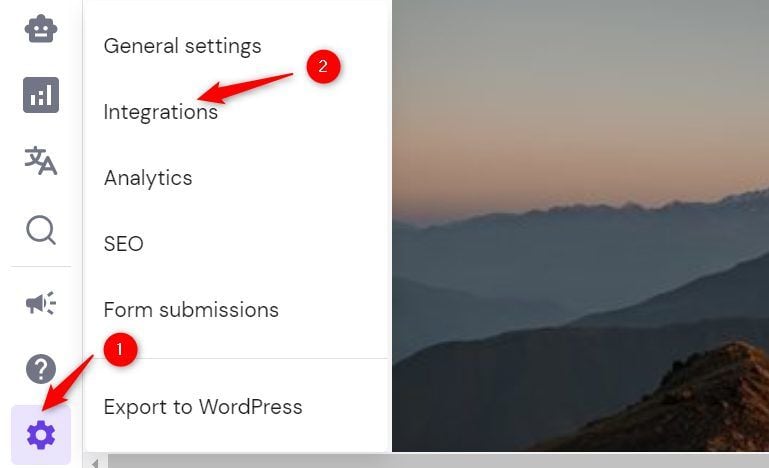
To do that, navigate to the left sidebar of the editor and click the settings icon. Then, click the Integrations link.
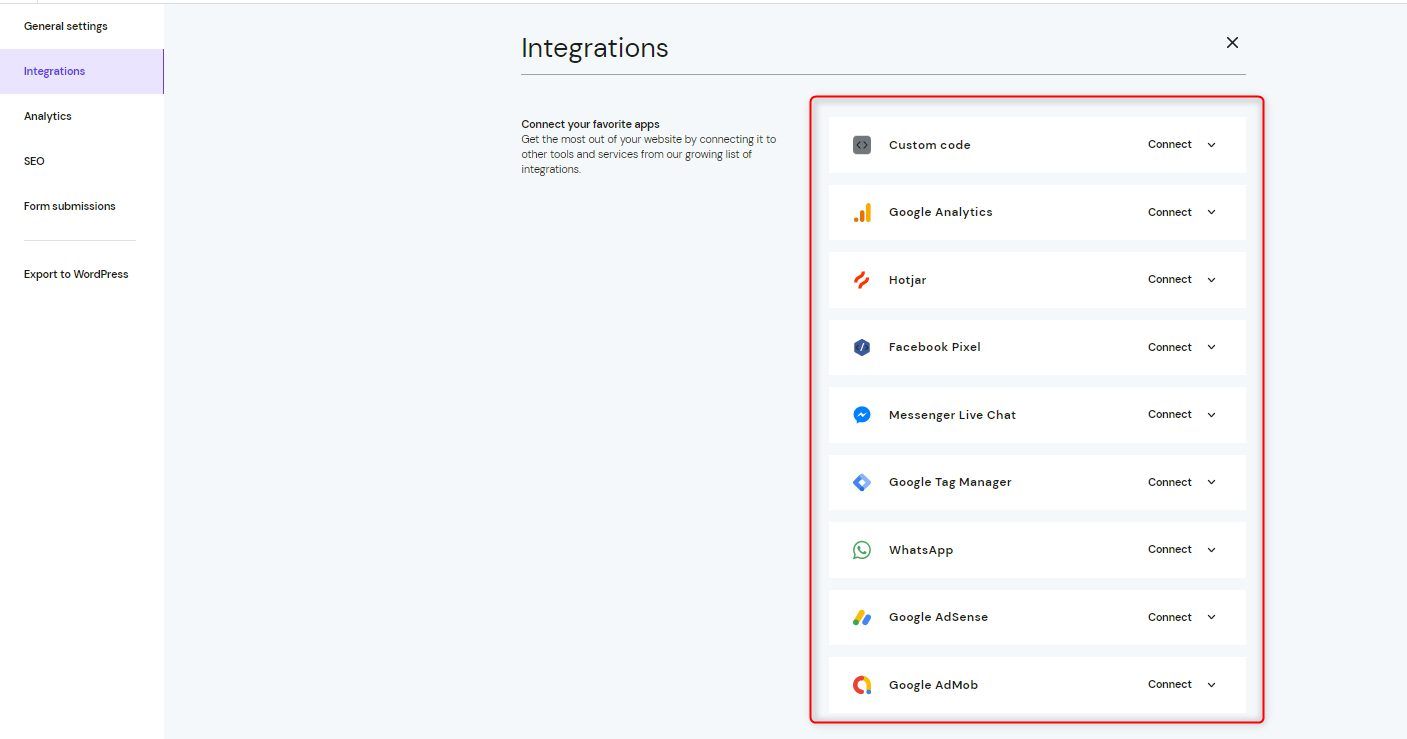
On the next page, click the Connect link of any of your integrations, one after the other.
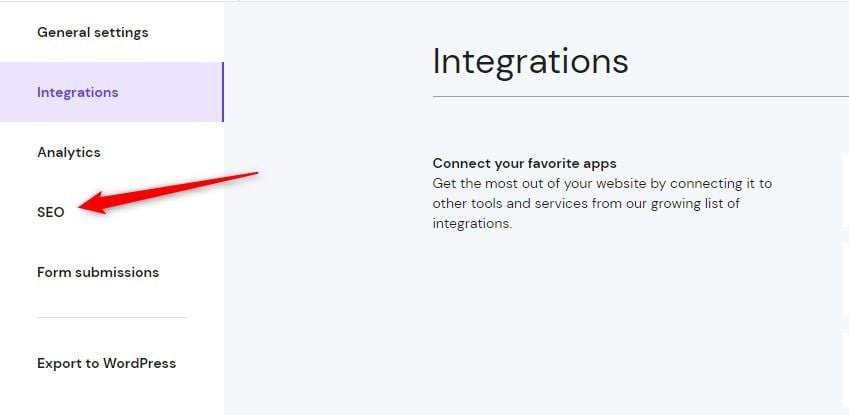
Now, click the SEO link in the sidebar.
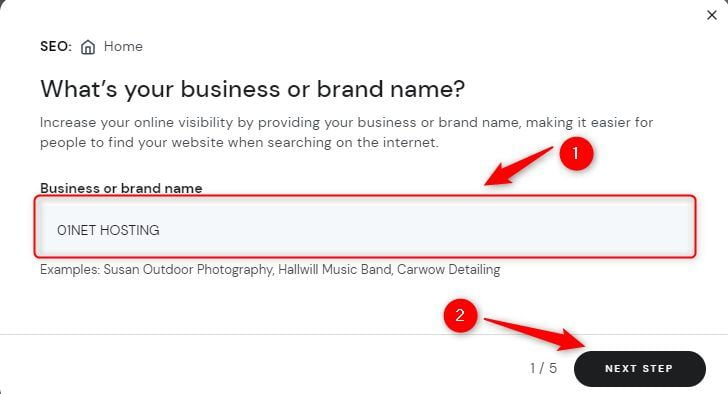
When or if the pop-up appears, provide your business or brand name in the box and click the NEXT STEP button.
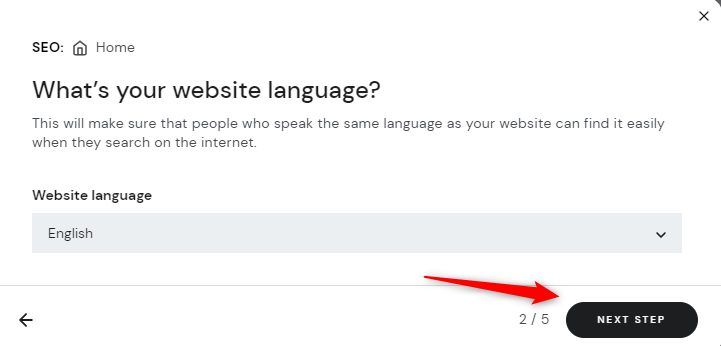
Choose your preferred website language from the drop-down and click the NEXT STEP button.
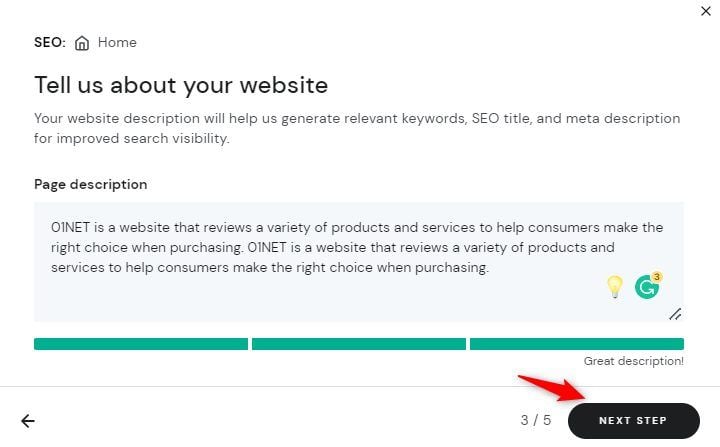
Now, type the description of your homepage until the 3 yellow tabs under the Page description textbox turn green. Then, click the NEXT STEP button.
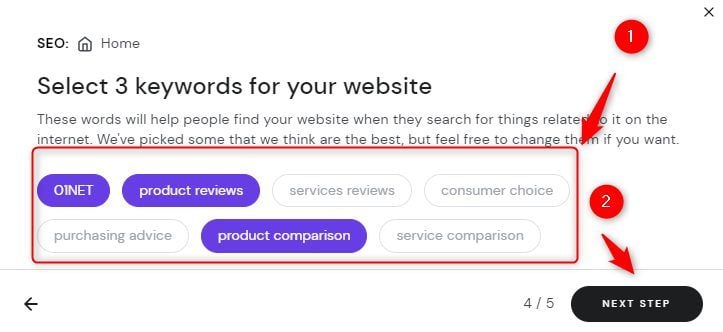
Select the three closest keywords for your site from the suggested ones by clicking on them. Clicking on a selected keyword (purple-colored) removes it. When done, click the NEXT button.
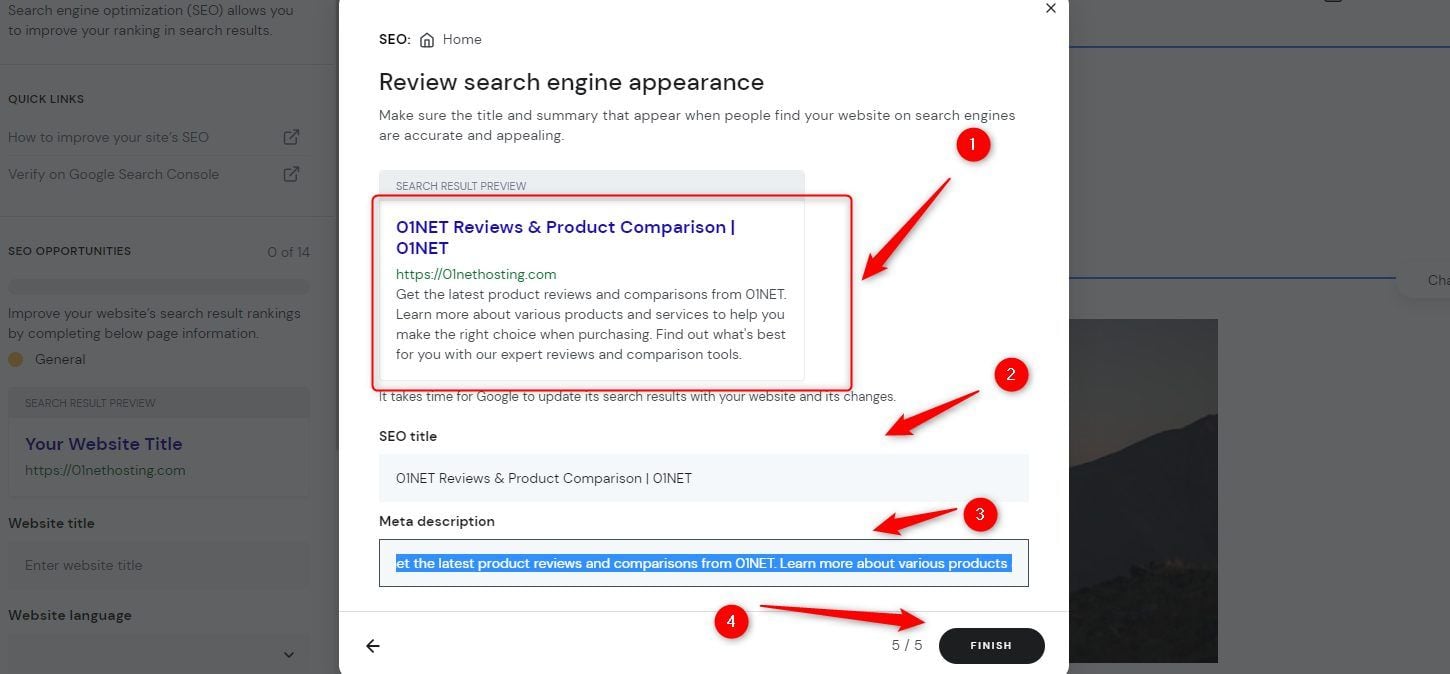
Now check if the suggested homepage title and meta description and great. If yes, click the FINISH button. Otherwise, change them first.
Switch to the Social image tab. Choose an image by clicking on the REPLACE image tab. Then click the SAVE button.
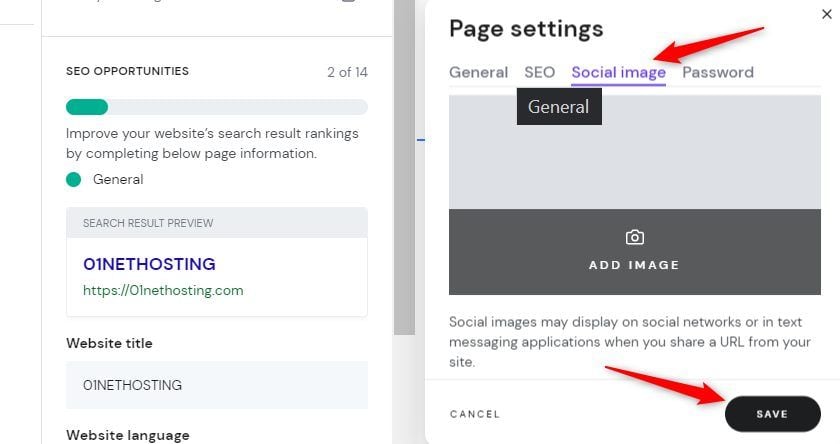
Now click the other pages and repeat the same process to set up their SEO. Green color indicates that the SEO of the page has been set correctly.
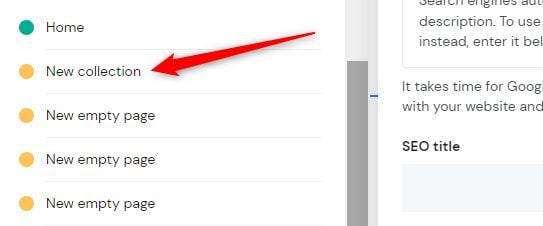
Configure Your Store (Optional)
This step is important if you want to create an online store with Hostinger Website Builder. If you don’t want to create an eCommerce, you can skip this and go directly to the last step explaining how to get a site online with Hostinger Website Builder.
In the editor, navigate to the top to click the Online store link.

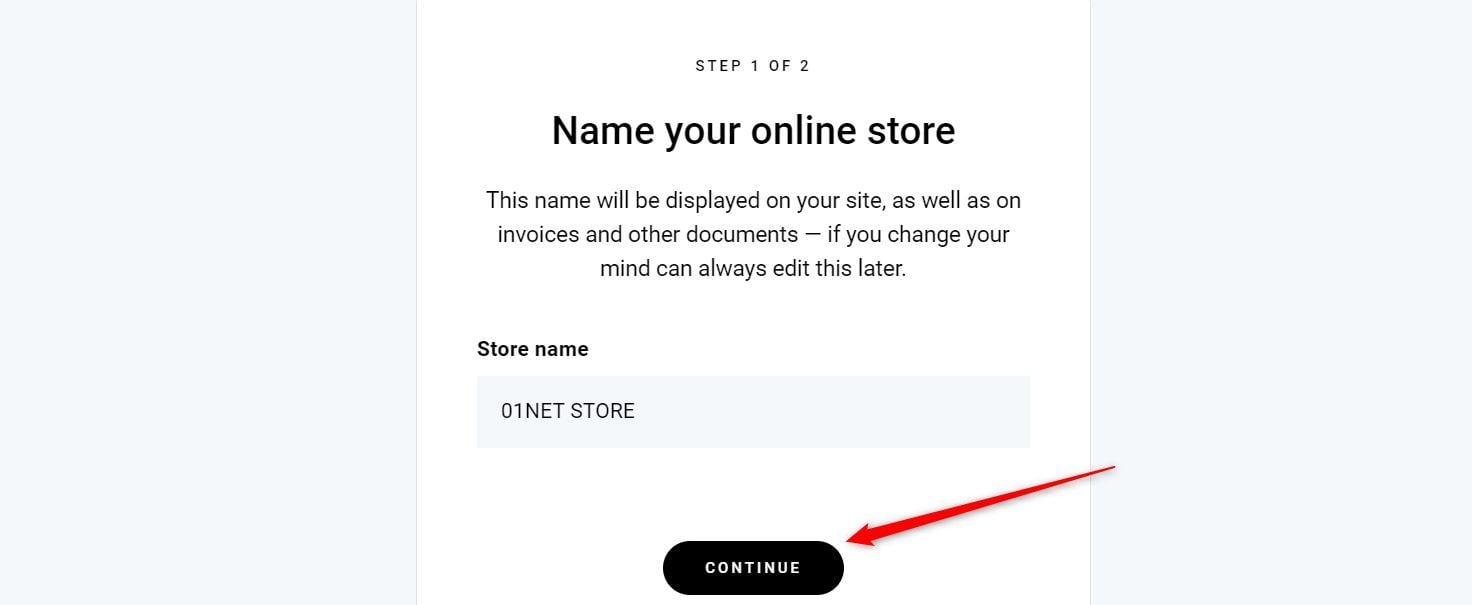
Type your store name and click the CONTINUE button.
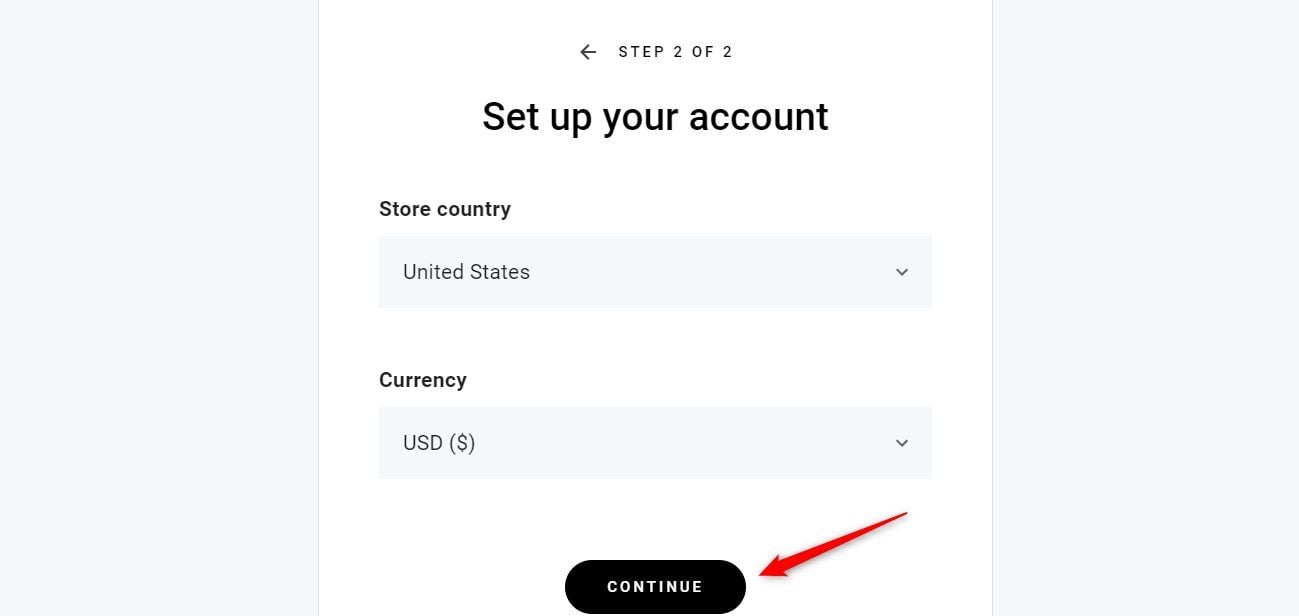
Select your store country and currency. Then, click the CONTINUE button.
Click the Add products link.
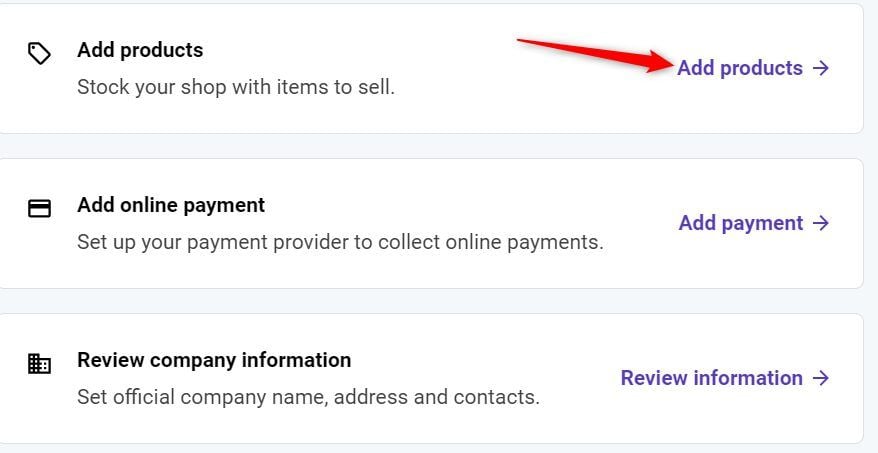
Choose the product type.

Provide the required information about the product and click the SAVE button afterward.
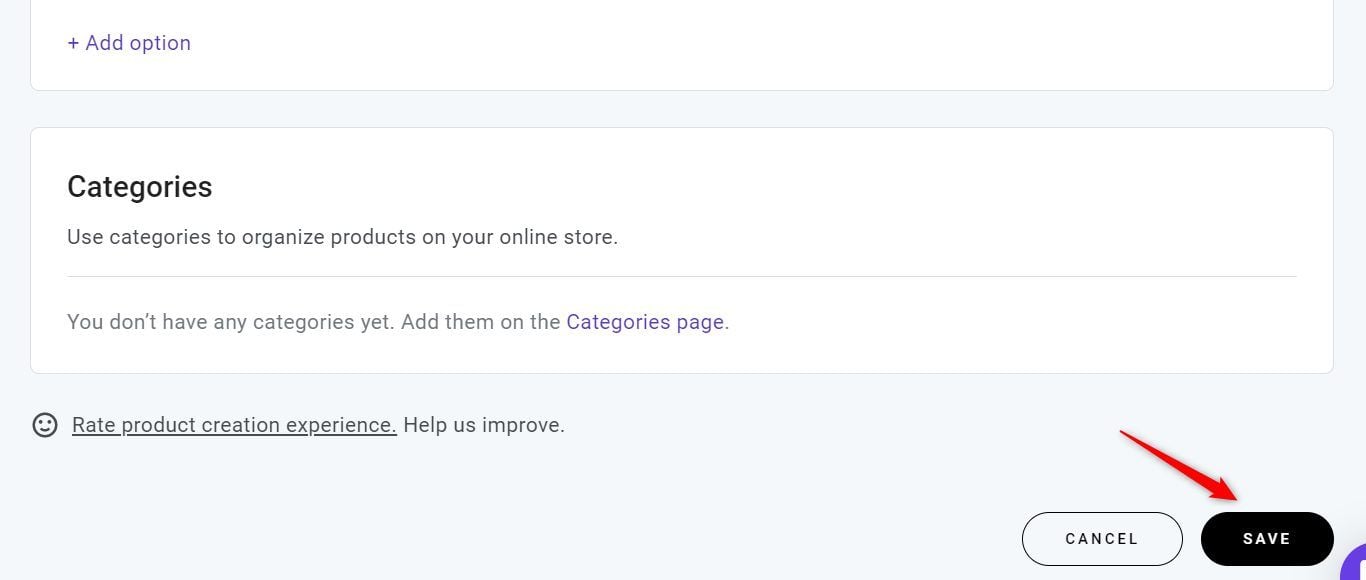
Click ADD PRODUCT button to add more. Repeat for additional products.

Click the DASHBOARD link to go back to the Store Dashboard.

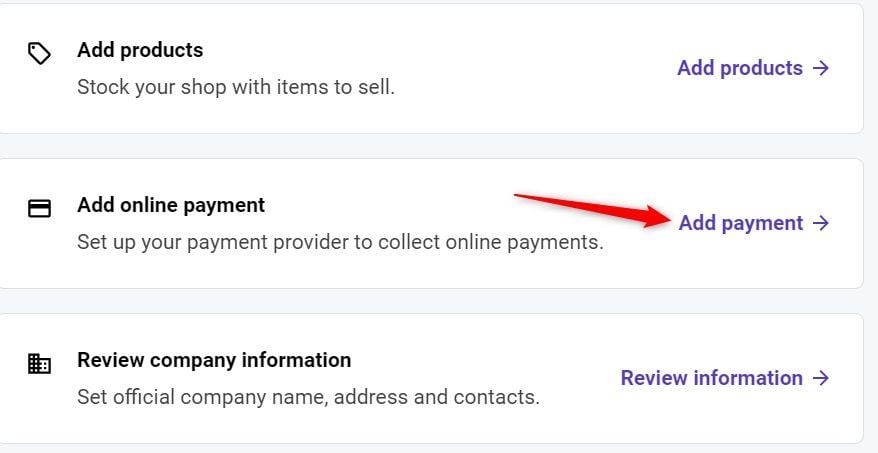
Now, click Add Payments link.
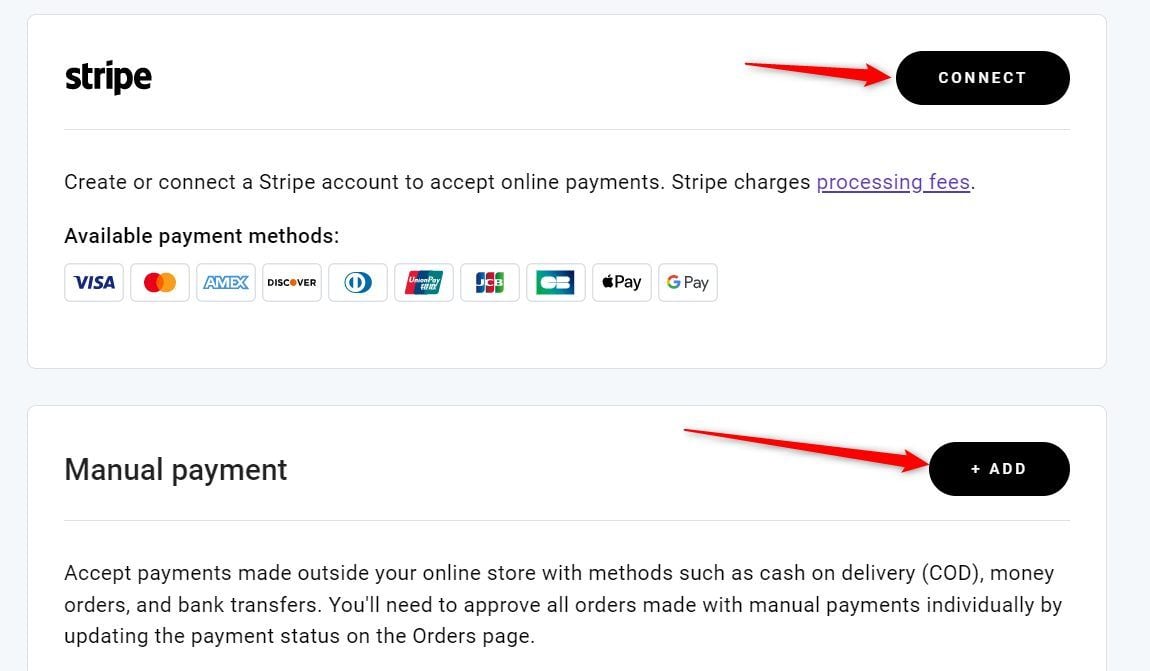
Click the CONNECT button for Stripe or the ADD button for custom payment methods.
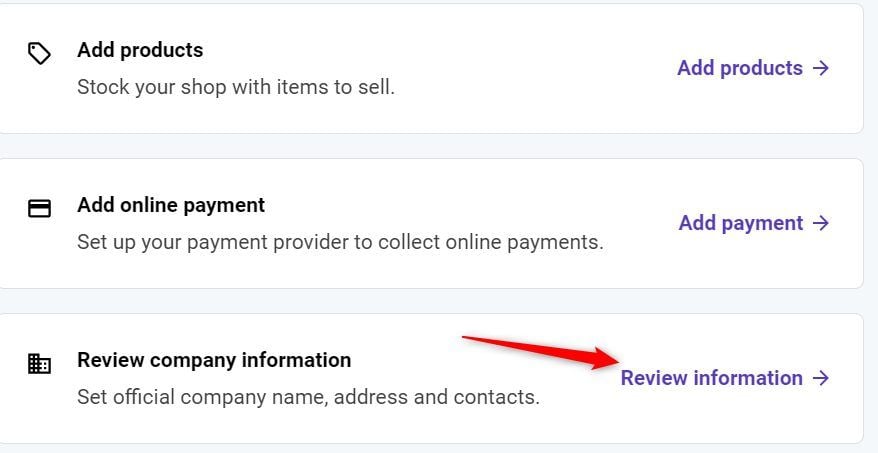
Now, click the Review information button.
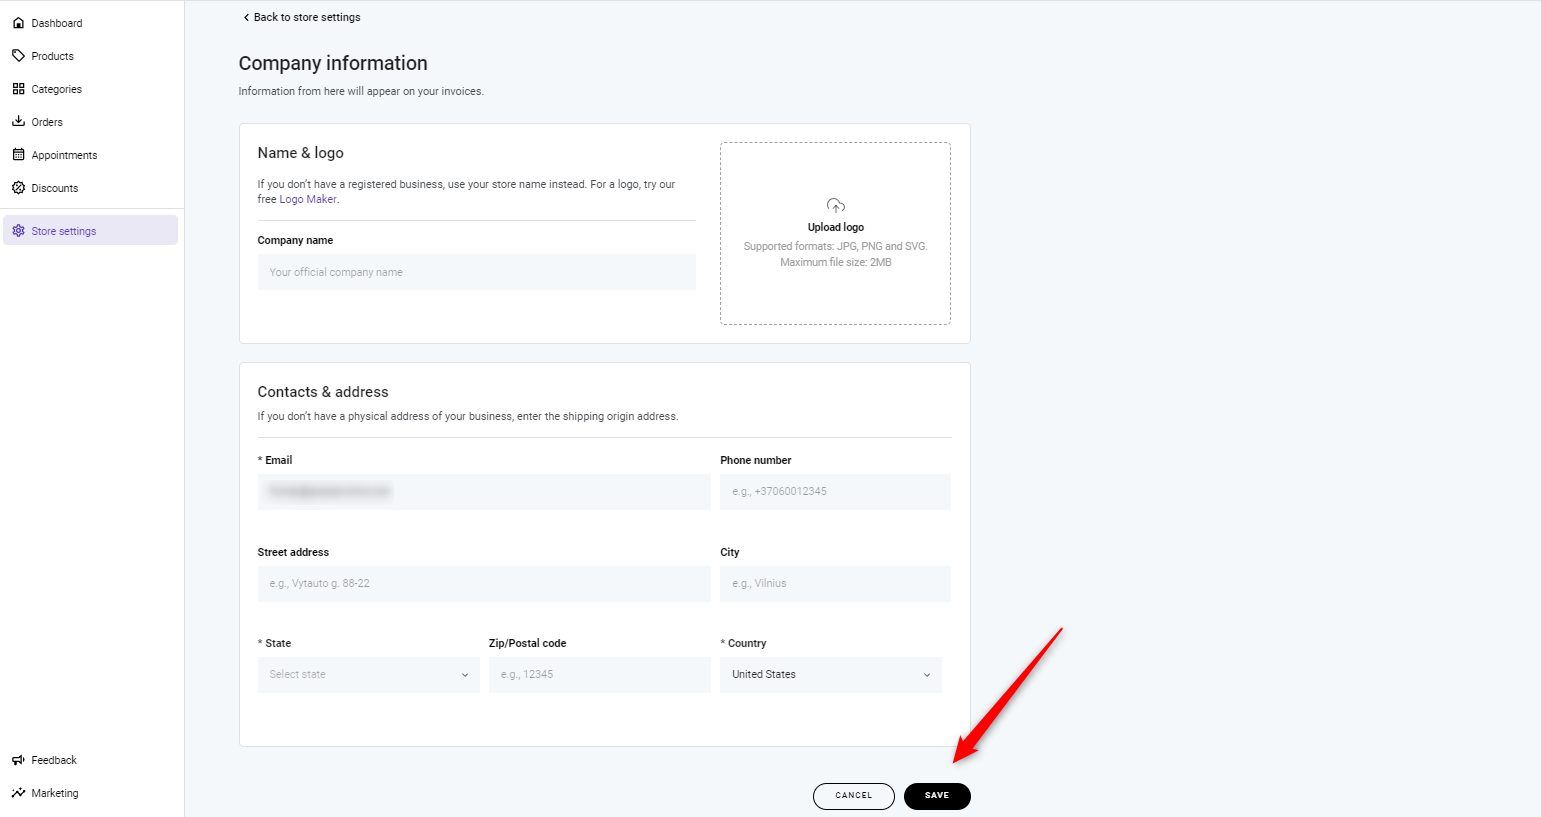
Provide the required details and click the SAVE button.
Click the Back to editor link.

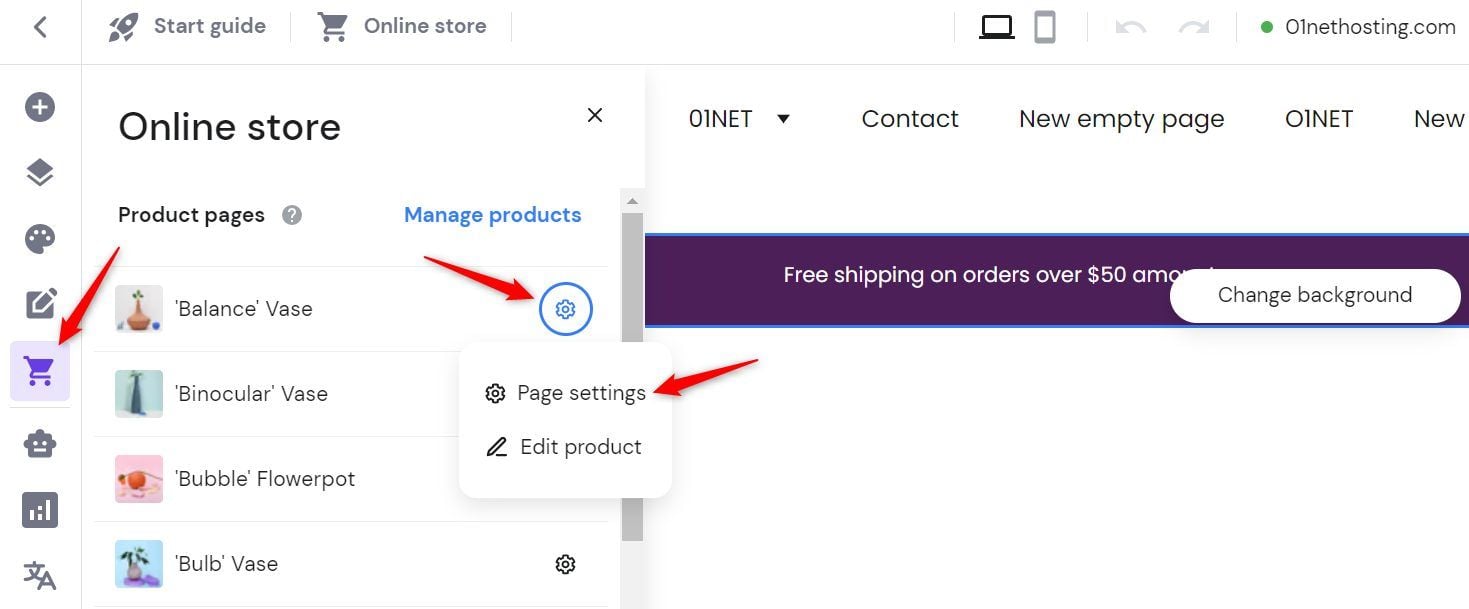
Click the Online store icon at the left sidebar. Then click on the settings icon of the product edit. Click the Page settings link.
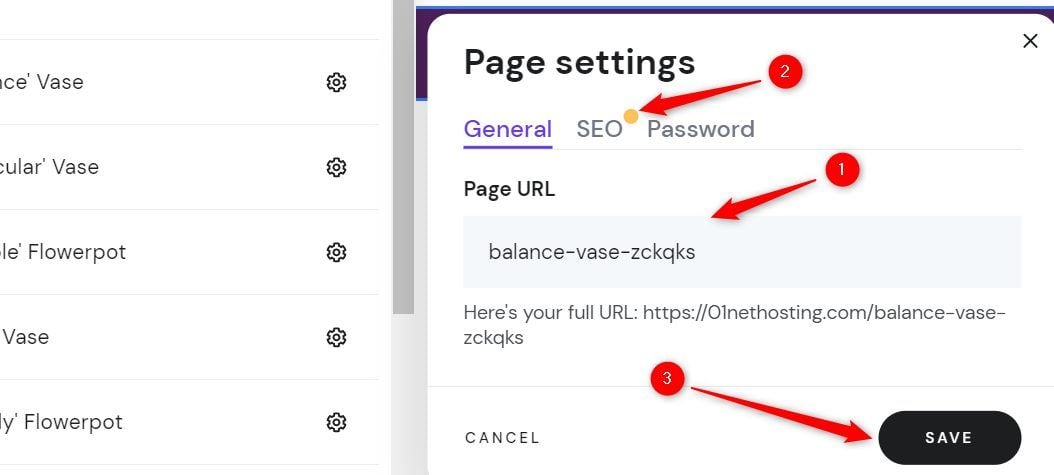
Set an SEO-friendly page URL. Then switch to the SEO tab to set it up as we did in our SEO setup step.
Once done, click the Online store link on the sidebar again. This time, click on any product to edit. This opens the product page.
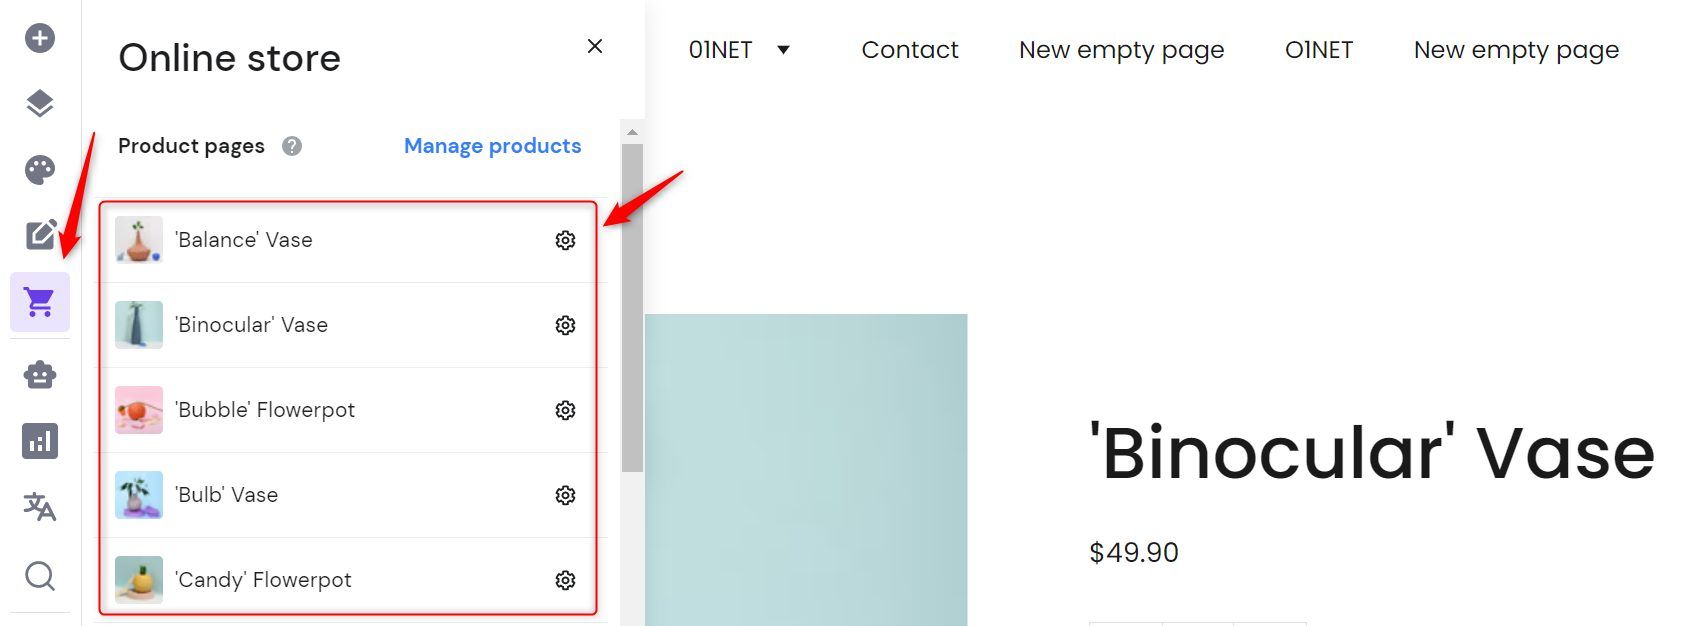
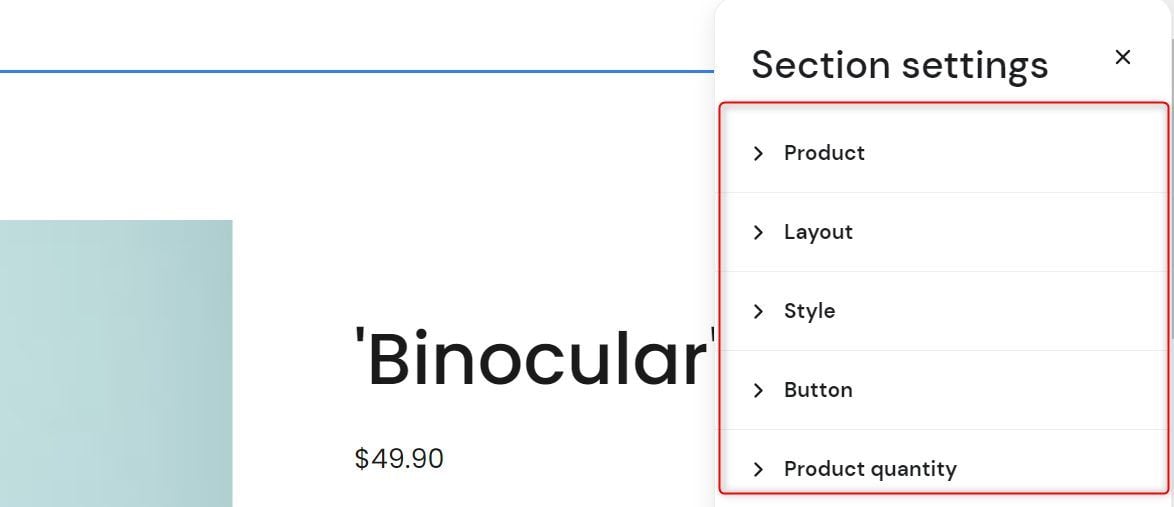
Now click the product page in the editor. Then click the Edit section button.

Click on each settings link to directly edit how the product page looks.
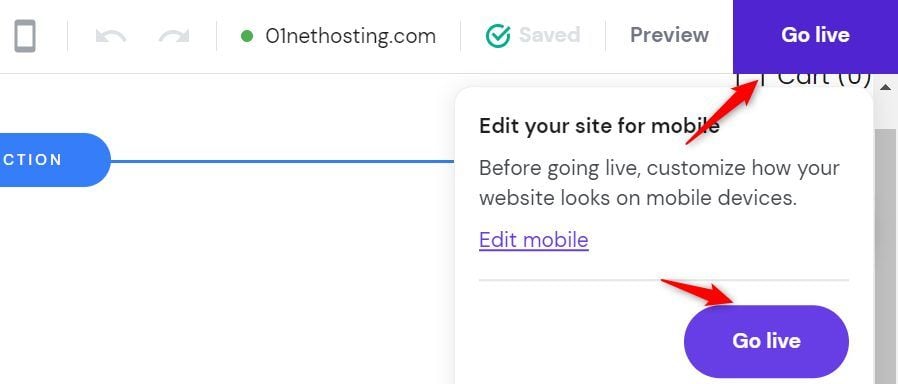
Click the Go live button at the top-right corner of the editor. Then click the Go live button on the drop-down to publish the changes you made.
Finishing Up
When building your blog or online store with Hostinger Website Builder, the last step is to update your nameservers.
Change your nameservers one and two to ns1.dns-parking.com and ns1.dns-parking.com, respectively, at your current domain registrar (if not registered with Hostinger).
Now you know how to use Hostinger Website Builder to create, customize and publish a website. In case of doubt or problem, do not hesitate to contact the company’s customer support.