If you have decided to migrate your website to Hostinger, you have made the right choice. It is a hosting company with the best interests of its customers in mind and always delivers great performances at affordable prices. Compared with your present host, you will surely get value for your money here.
Overview of the steps to migrate a website to Hostinger
Transferring your website to Hostinger is quite easy and something you can do in a matter of minutes by following simple instructions.
Here are the ways through which you can transfer your site to Hostinger from your present host:
- Asking Hostinger Support to migrate your site for you (Free!)
- Manually uploading your website backup files and databases yourself
If you’re still exploring options and haven’t purchased web hosting from Hostinger yet, that’s fantastic! We have a special coupon code, 01NET, that will save you 10% on your bill.
Simply click the button below, select your preferred web hosting plan, and before completing your payment, apply the code.
How to Migrate Your Website To Hostinger (Free)
In order to make your site transfer to Hostinger swift and easy, it provides a free professional website migration service. One thing we love about this service is that you can use it to migrate an unlimited number of websites to Hostinger easily. Unlike many hosts whose free migration services only cover a domain.
Here is what you need to do.
1. Select/Purchase a Hosting Plan
There is no way to migrate your site to Hostinger if you do not have a hosting account, so you need to get yourself one. To do that, navigate to its website and choose the hosting type you want from the menu to check the available packages.
You can go for the “Single” plan (which is a shared hosting plan). It costs less than $2 per month and is quite convenient if you only plan to host one website. We, however, recommend the “Premium” package if you have multiple websites and/or want to get a free domain for one year.
To purchase your chosen plan, click on Add to Cart.
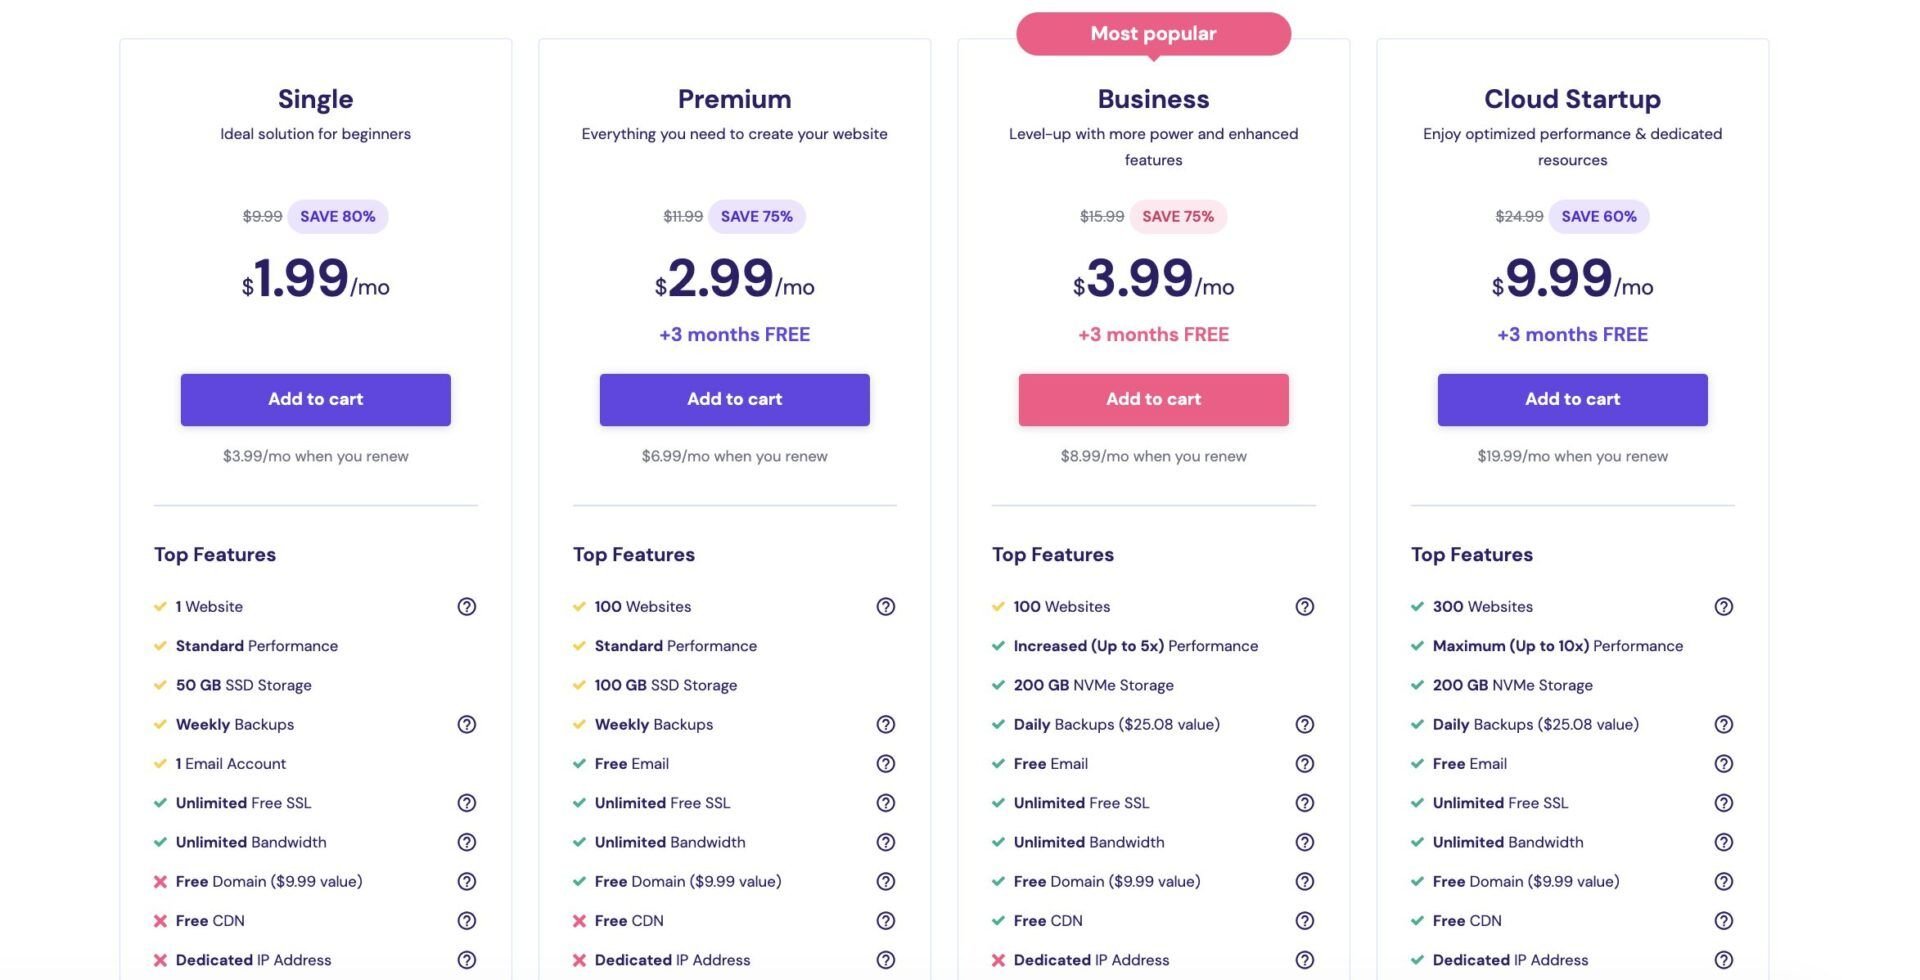
Afterward, choose the hosting period you want to commit to between 12 to 48 months. It is usually advisable to go for the 48-month subscription period because it saves you more money. For additional savings (10% off), consider applying our Hostinger coupon to your order.
On the same page, provide your email address or create your account with your Facebook or Google accounts.
Then, choose your preferred payment method and input your details. Once you are done, click on Submit Secure Payment.
You can now proceed to log in to your hPanel and submit a support request to migrate your website to Hostinger without lifting a finger.
2. Submit the Migration Request
After you have logged in to your hPanel, the next to do is navigate to the Websites on the Menu bar.

Click on the Create or migrate a website box on the Websites page.
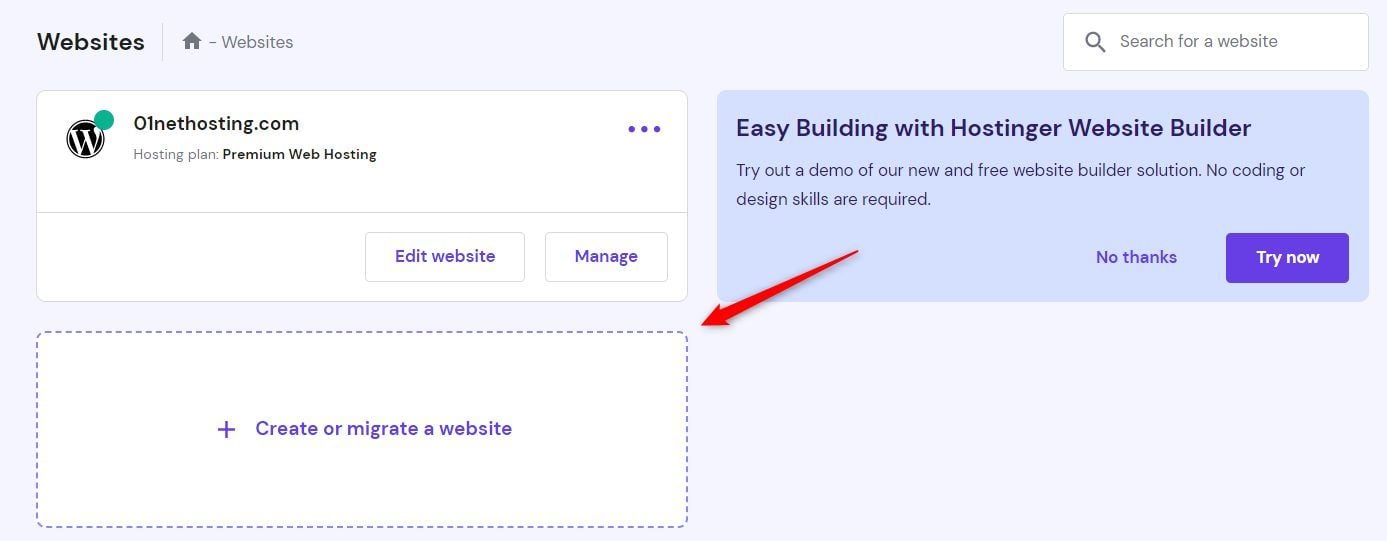
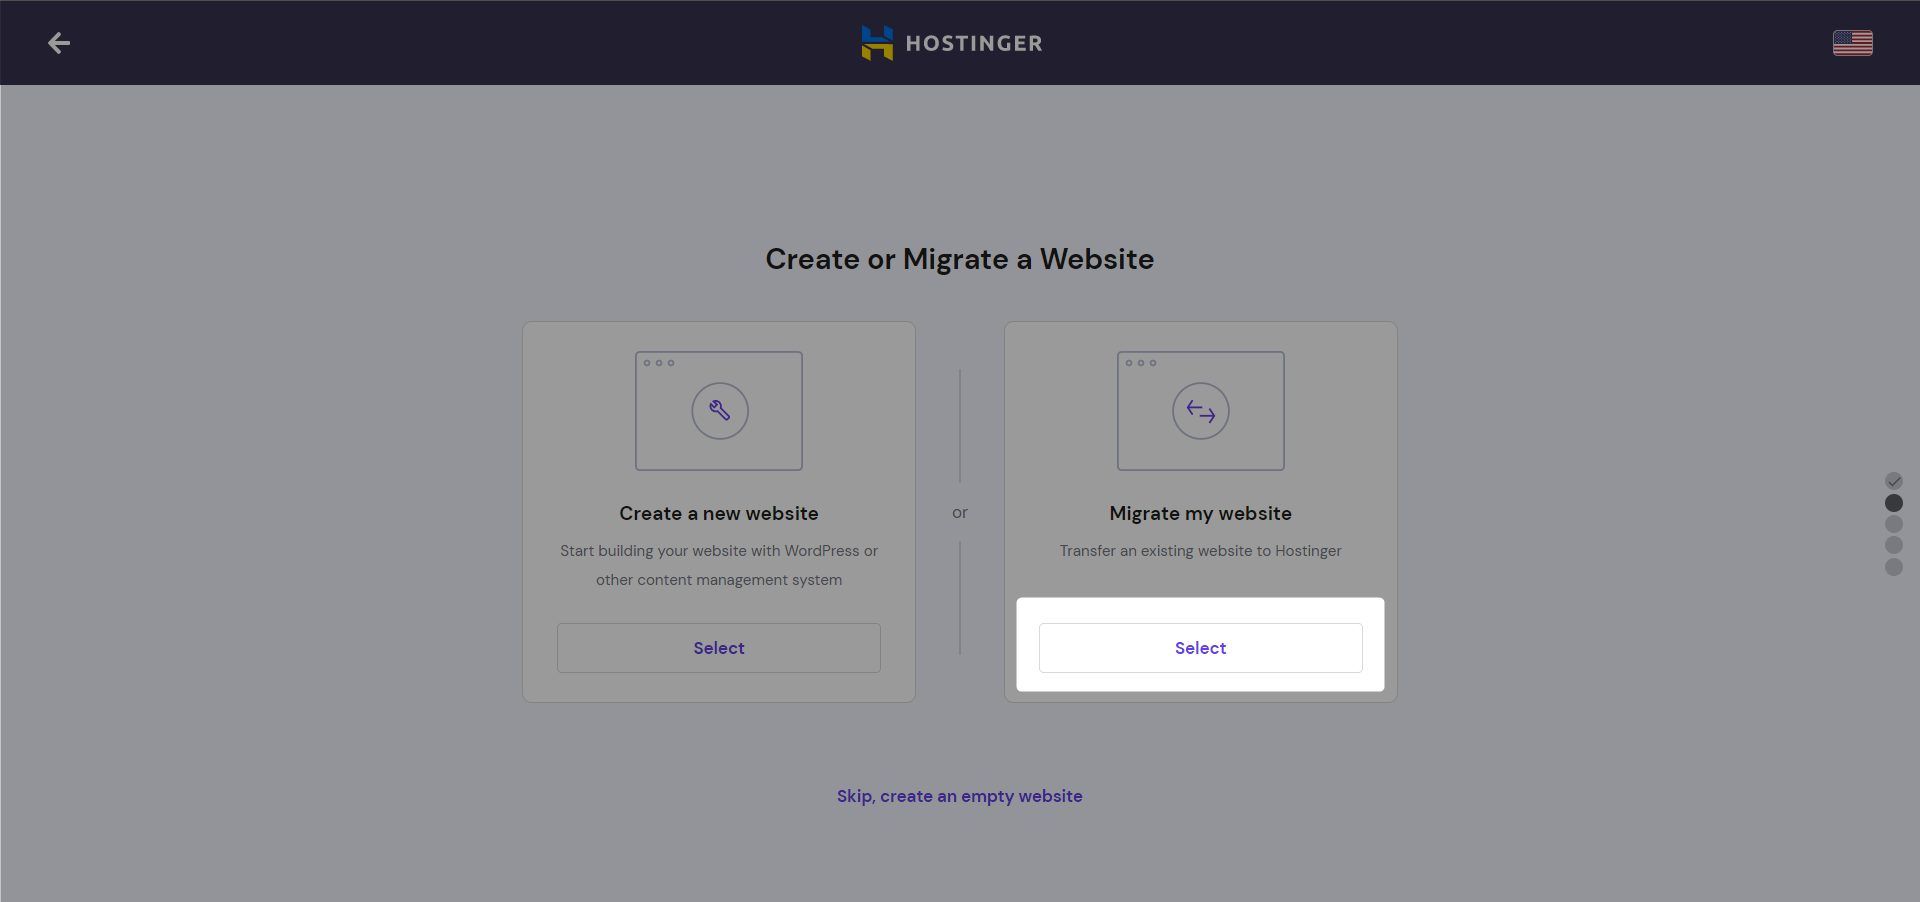
On the next page, click on Select under the Migrate my website box.
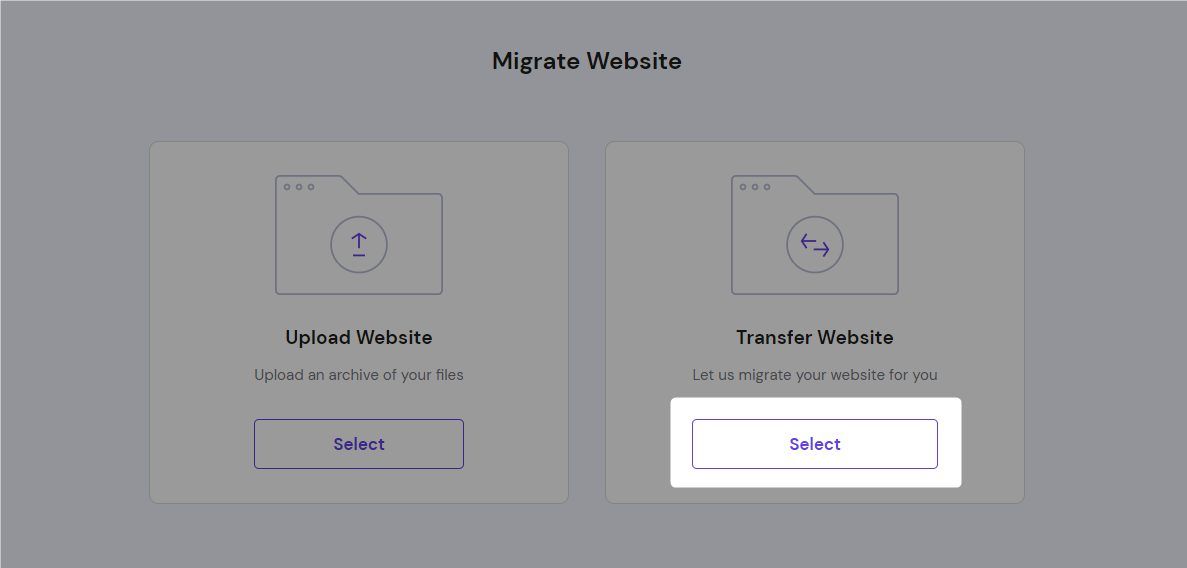
Then, click on Select under the Transfer Website box. It will take you to the Professional Migration Service page.
If the website you want to migrate to Hostinger is on WordPress, fill in your WP-admin login URL, administrator username and the password. Then click on Submit request.
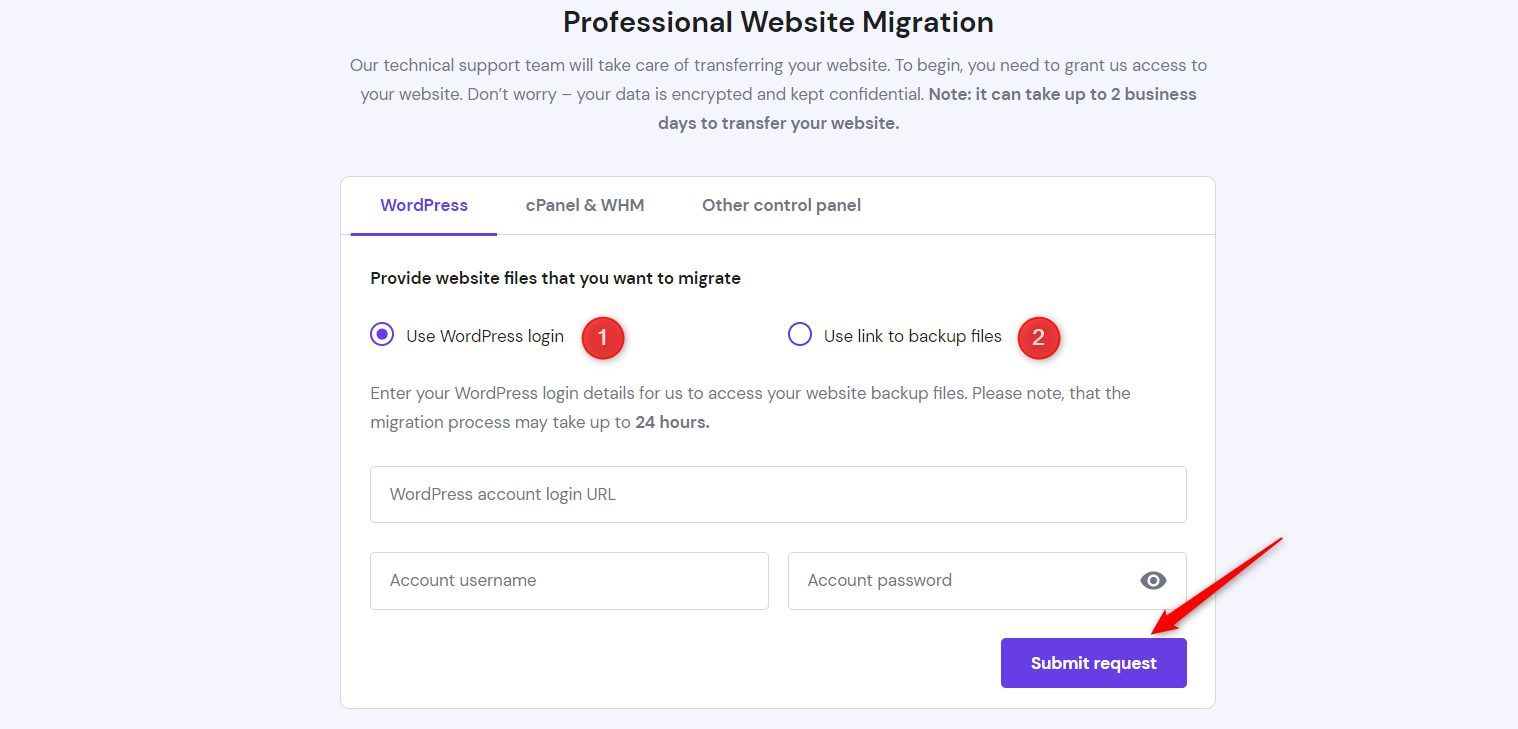
Alternatively, you can click on the circle beside the Use link to backup files on the same page if you don’t want to share your login details for security reasons. Although, you have nothing to worry about with this web host. Copy and paste the link to your backup files in the box provided and click on Submit request.
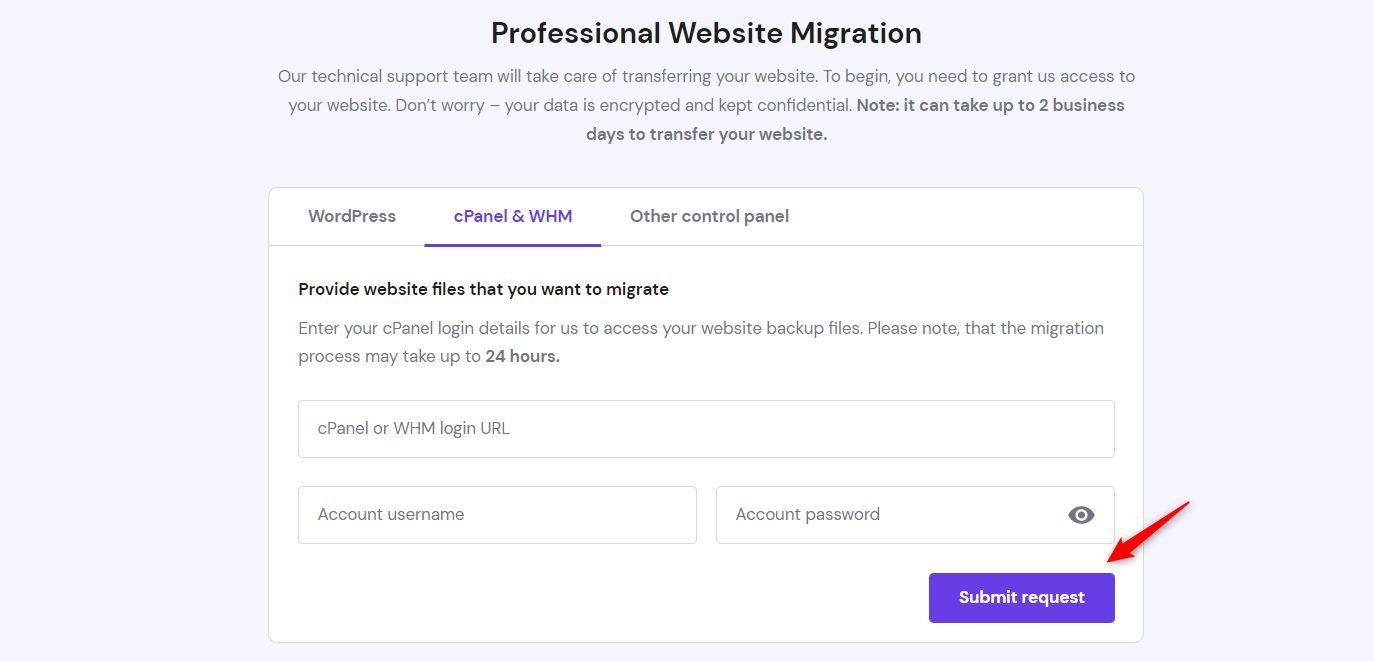
If your website is not a WordPress site and your files are on cPanel or WHM instead, click on the cPanel & WHM tab.
Then input your cPanel or WHM login URL, username, and password in the boxes provided. Click on the Submit request button afterward.
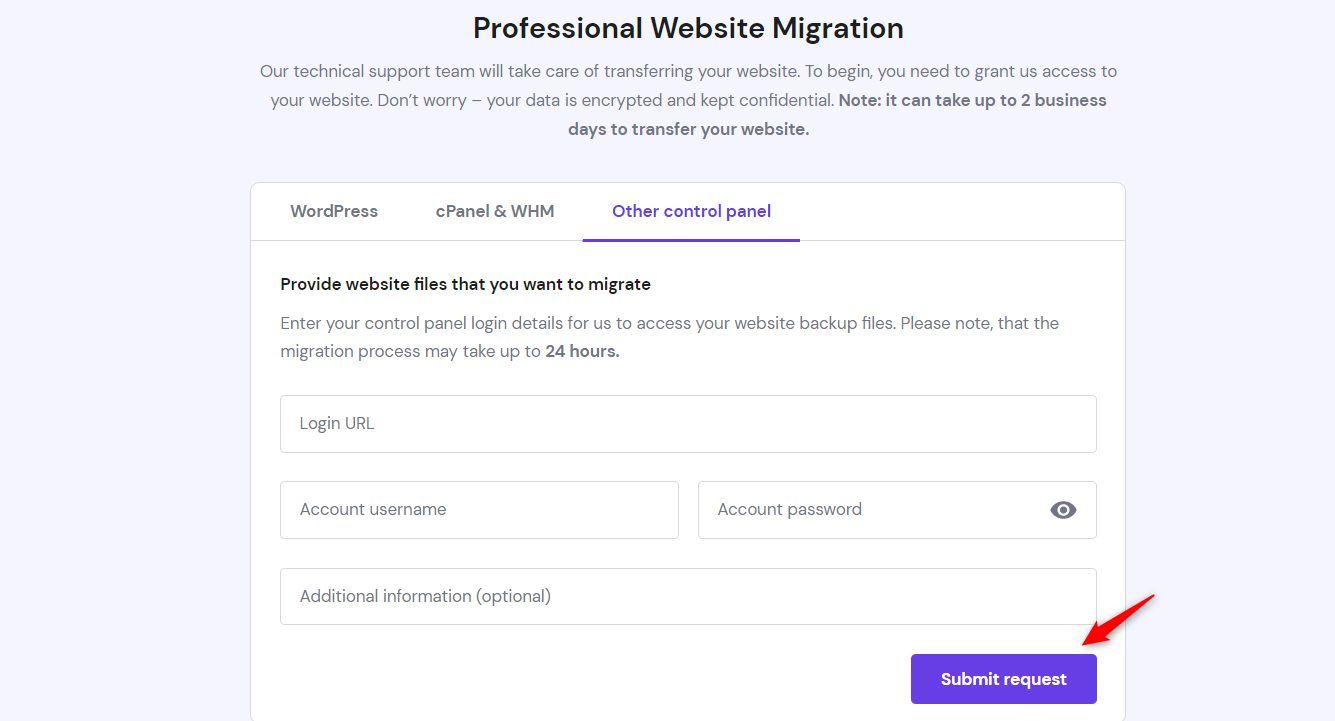
Alternatively, if your website is on a control panel other cPanel or WHM and not on WordPress, click on the Other control panel tab.
Input the login URL to this control panel, your account username, password, and any other information that will make the support help you faster in the appropriate boxes.
Click on the Submit request button afterward.
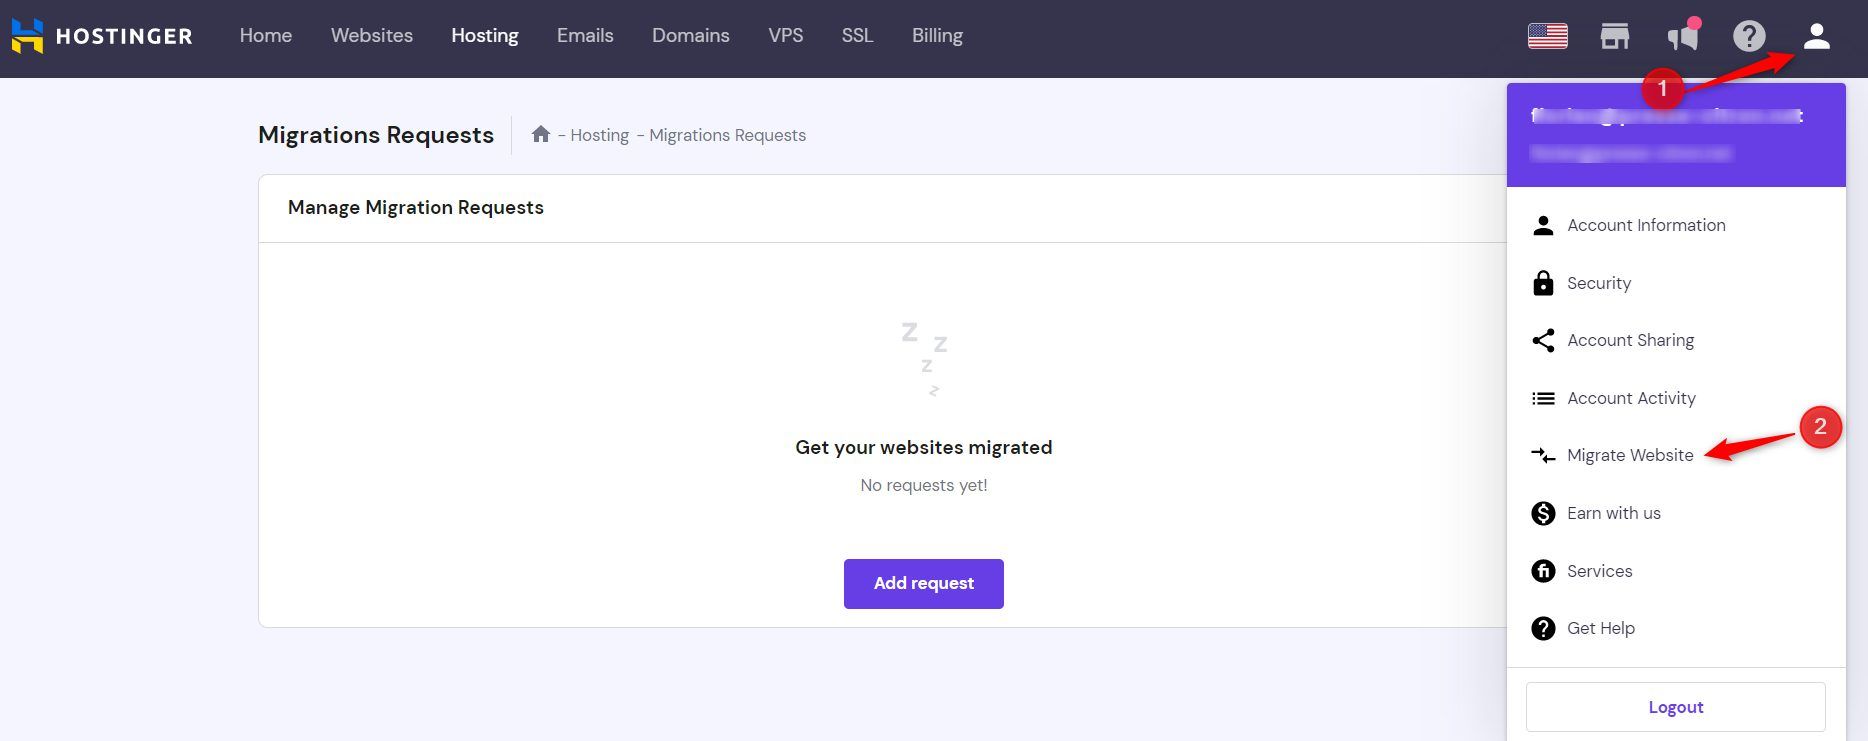
Once done with this, you can sit back and let the professionals migrate your website. Quite easy, right? The process takes less than 48 hours, and you can check the status from the Manage Migration Requests page.
To get to the page, click on the Profile icon at the top right corner of your hPanel page. Once the hamburger menu drops, click on Migrate a website.
How to Migrate Your Website to Hostinger Manually
If you wish to transfer your website yourself, that is also great. It is a very straightforward process and you will be done with it before your coffee gets cold. Yes! That is how beginner-friendly the process is.
1. Download Your Files and Databases
To download your files and databases, you must log in to your cPanel or the control panel your present host uses.
On your cPanel home, scroll down to the Files section and click on File Manager. This will take you to the location of all your website files.

If you have more than one domain on the cPanel, it will show all the files on your account. You can then navigate to the folder of the desired site.
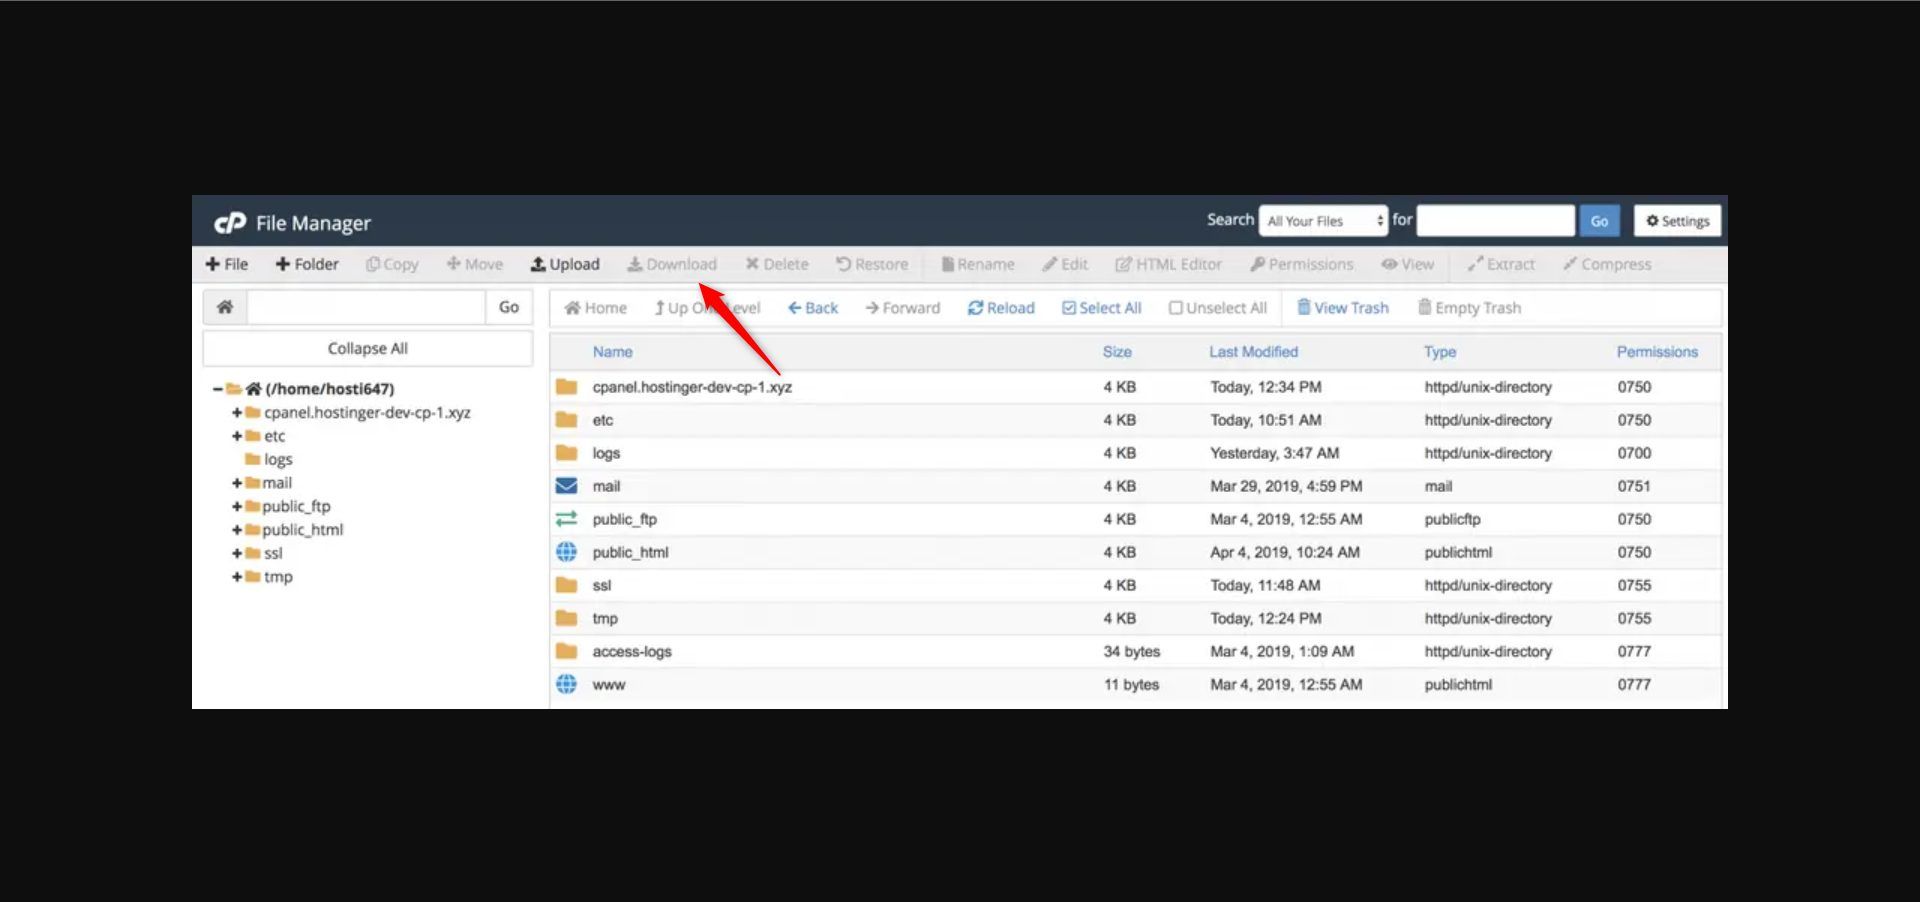
Afterward, click on public_html with a web icon beside it and navigate to the top right bar to click on Compress.

It will create a zip file for you and save it at the same location where you are. The name will be public_html.zip.
Click on this file and then the Download button on the top bar to save it on your computer.
The file should look like the one below on your computer.

Afterward, extract it, so you have this folder below on your computer.

Then, open it. The inner folder, which is also named public_html, is the one that has all the files you need. Open it and ensure the files in it are exactly as they appear in your File Manager on cPanel. Rename it public_html 1 for easy access later.
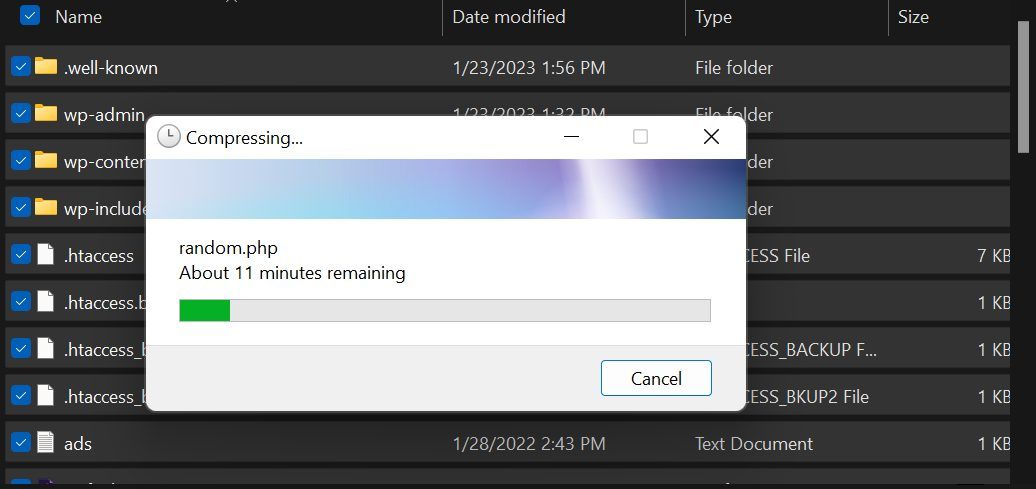
Now, select all the files in public_html 1, and compress them into a zip file. Name this compressed file public_html 2.
Afterward, you need to download your database. You can do this using your phpMyAdmin.
To access phpMyAdmin, go to your cPanel homepage and scroll down to the Databases section. Click on phpMyAdmin.

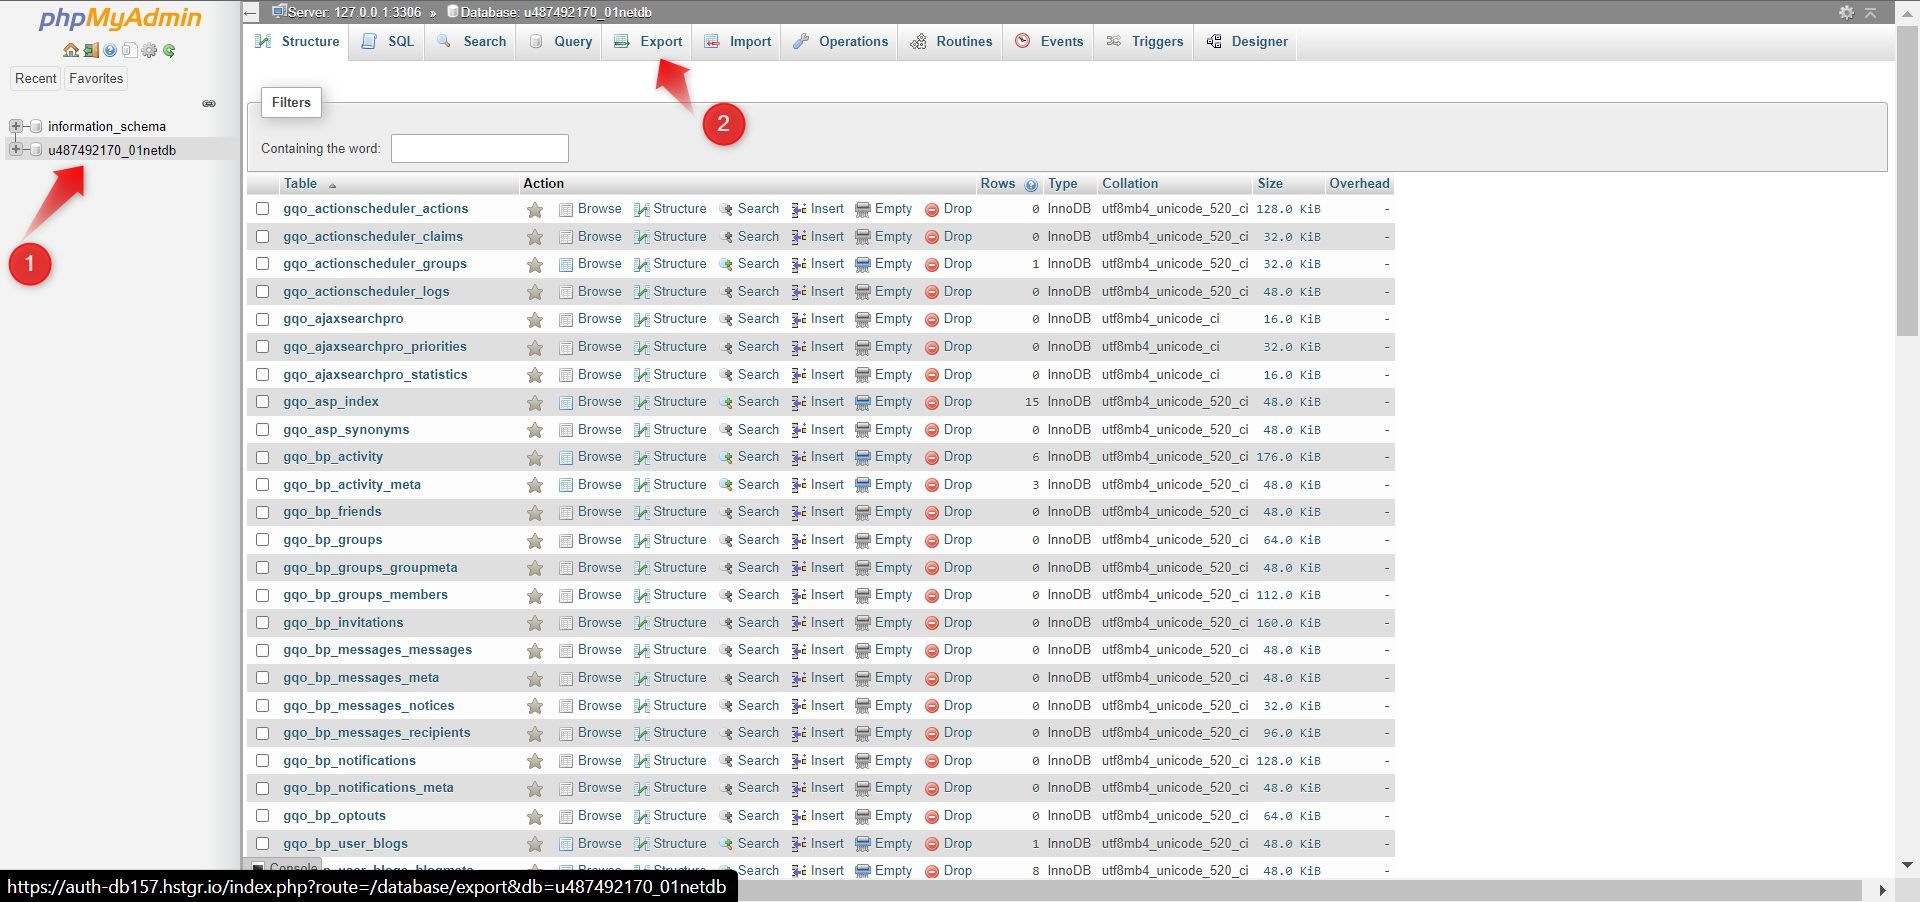
On the next page, choose the database the website you want to transfer to Hostinger is using, and navigate to the top of the page to click on Export.
Then choose the Quick option and click on Go.

It will download the database for you, and it will look like, for example, 01nethosting.sql. Now, you can proceed to the hPanel.
2a. Upload Backup Files (Method 1)
After purchasing the best web hosting for your needs, as we explained earlier, login to your hPanel, then navigate to the Websites page.

Click on the Create or migrate a website box.

On the next page, click the Select button under migrate my website.

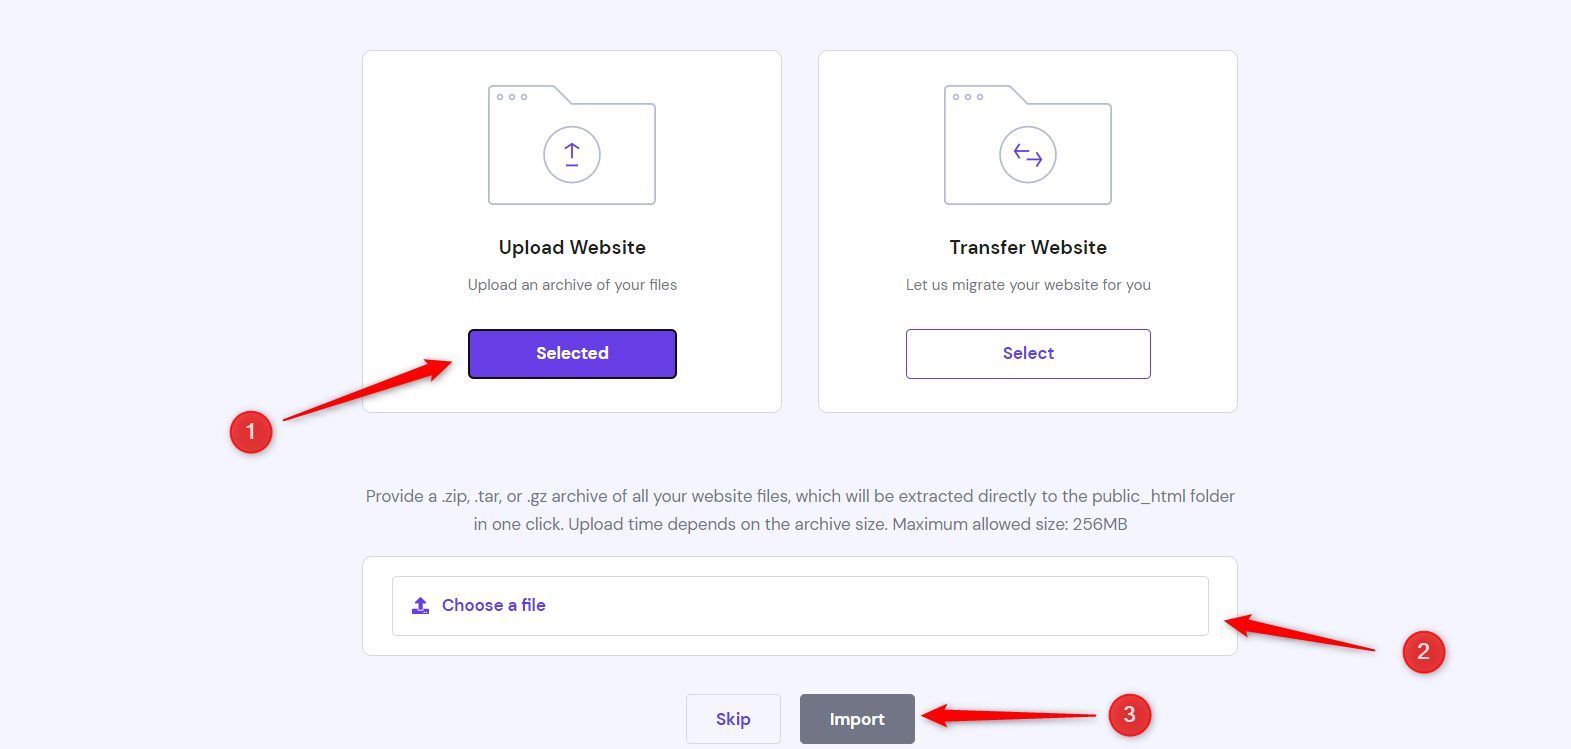
Next, click on Select under the Upload Website box. This will bring a drop-down upload box for you to choose your .zip backup file. The file you are to choose here is the public_html 2, which we created earlier. Click on Import afterward.
Now, click on the Select button under Use an Existing Domain. Then type your site’s URL in the box displayed under it and click on the Continue box.
Migrate your website to Hostinger
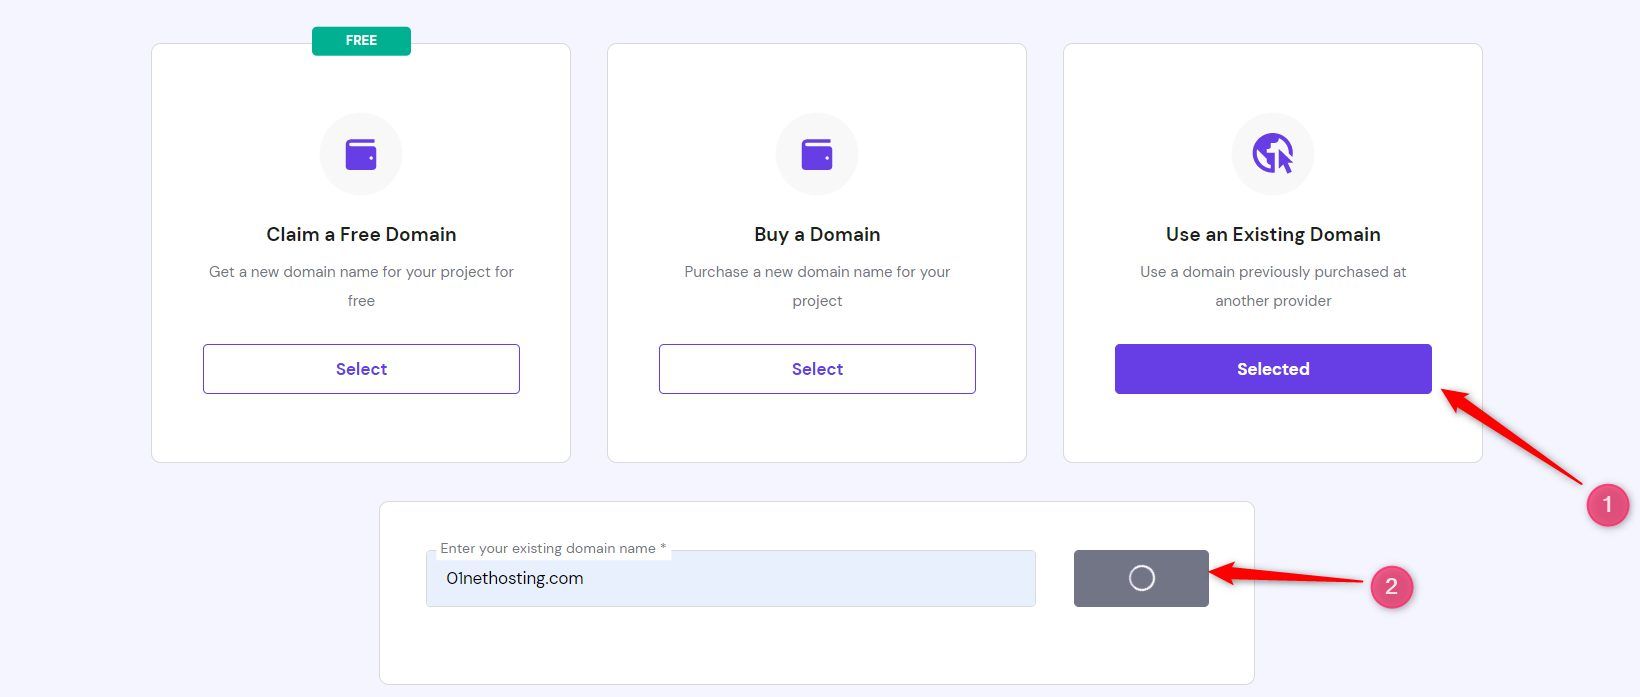
Click on Finish setup on the next page, and wait a few moments for the extraction of the uploaded file into your publc_html folder.

On the next page, click on Manage.
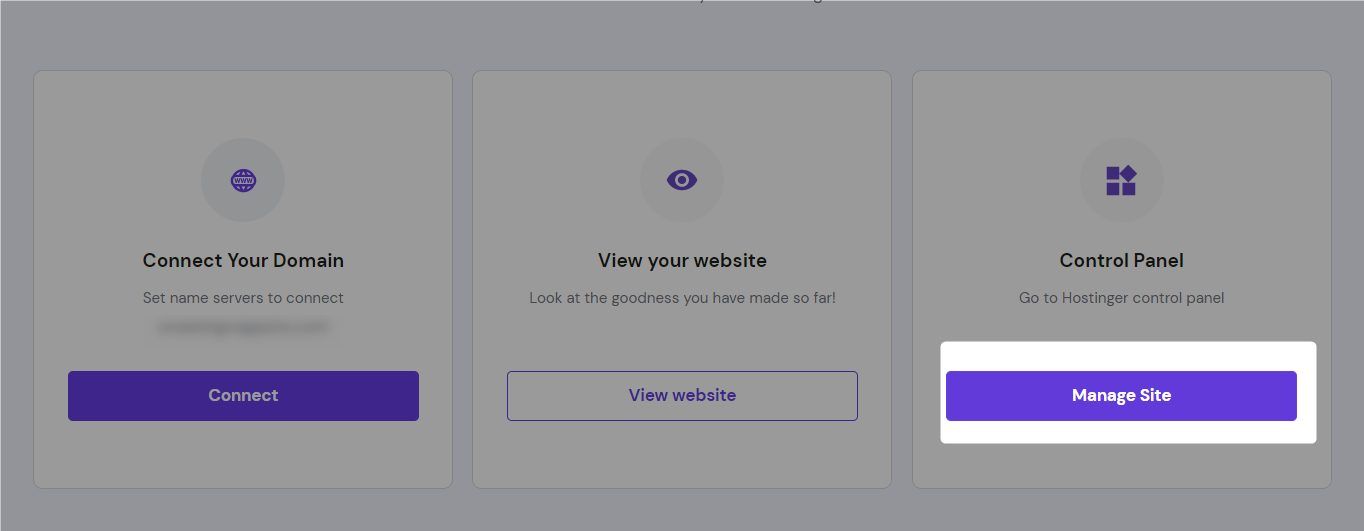
Then click on File manager.
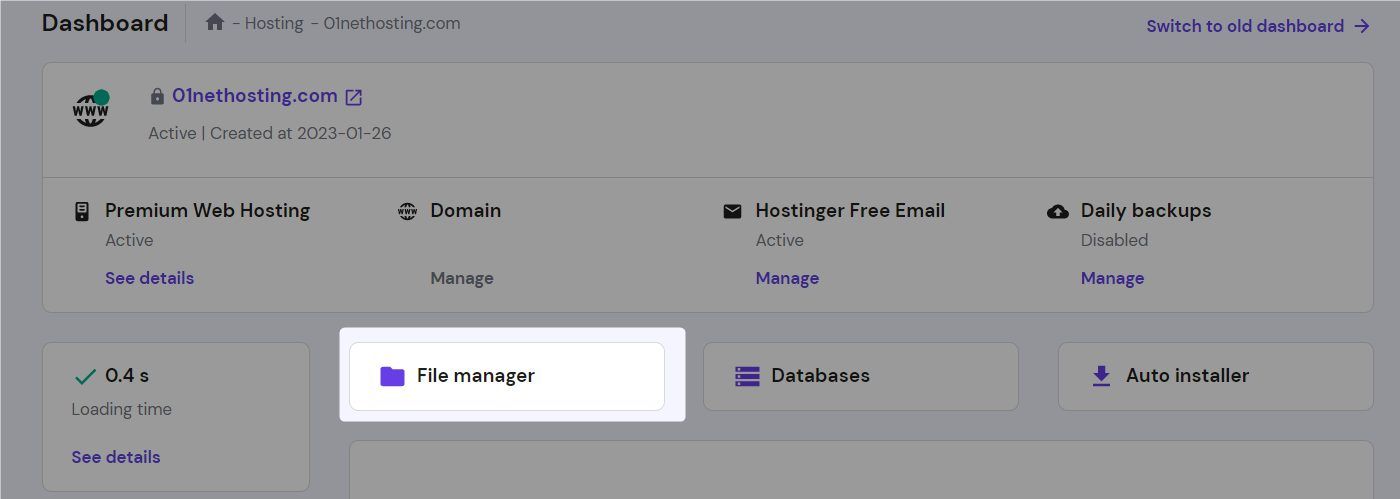
Afterward, open the public_html folder to confirm all the files and folders appear as they do at your current cPanel.
2b. Upload Your Backup Files (Method 2)
In case your files are bigger than 256 MB, you have to use this method to upload them to your public_tml folder. This method is also quite easy.
Navigate to the Websites page from your hPanel home.

On the next page, click the skip, create an empty website link.
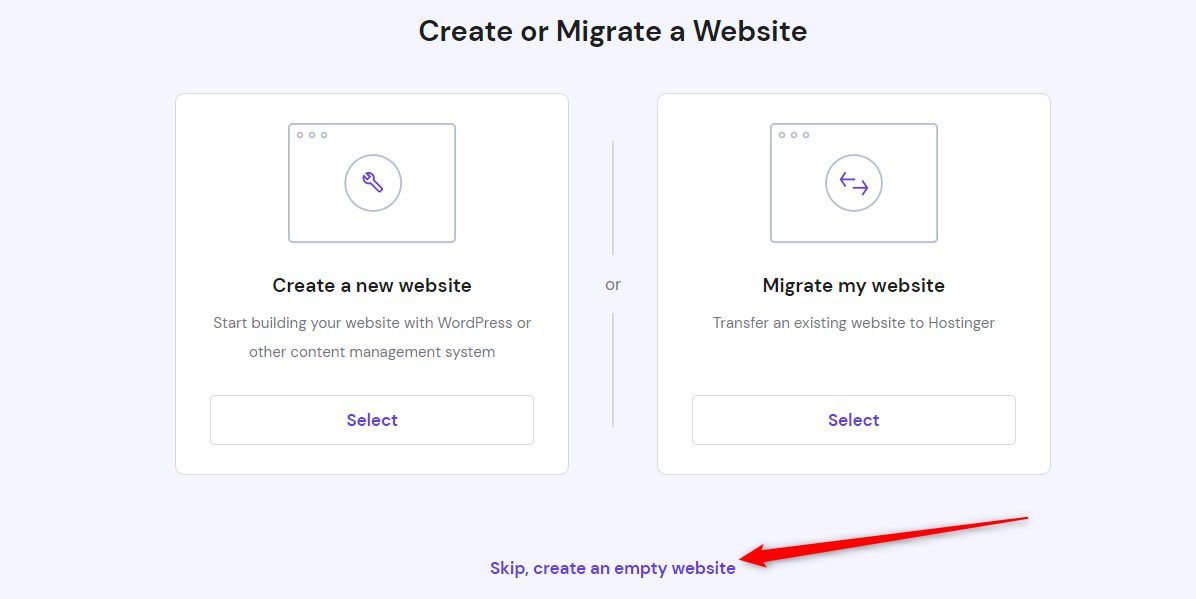
Afterward, click on Select under the Use an Existing Domain box. Enter the domain name in the box provided below, and click on the Continue button.

Click on Continue and then Finish setup buttons on the next pages.

Now, click on the Manage site button.

On the hPanel dashboard, click on the File manager tile or button.

In your File manager, delete the public_html folder permanently.
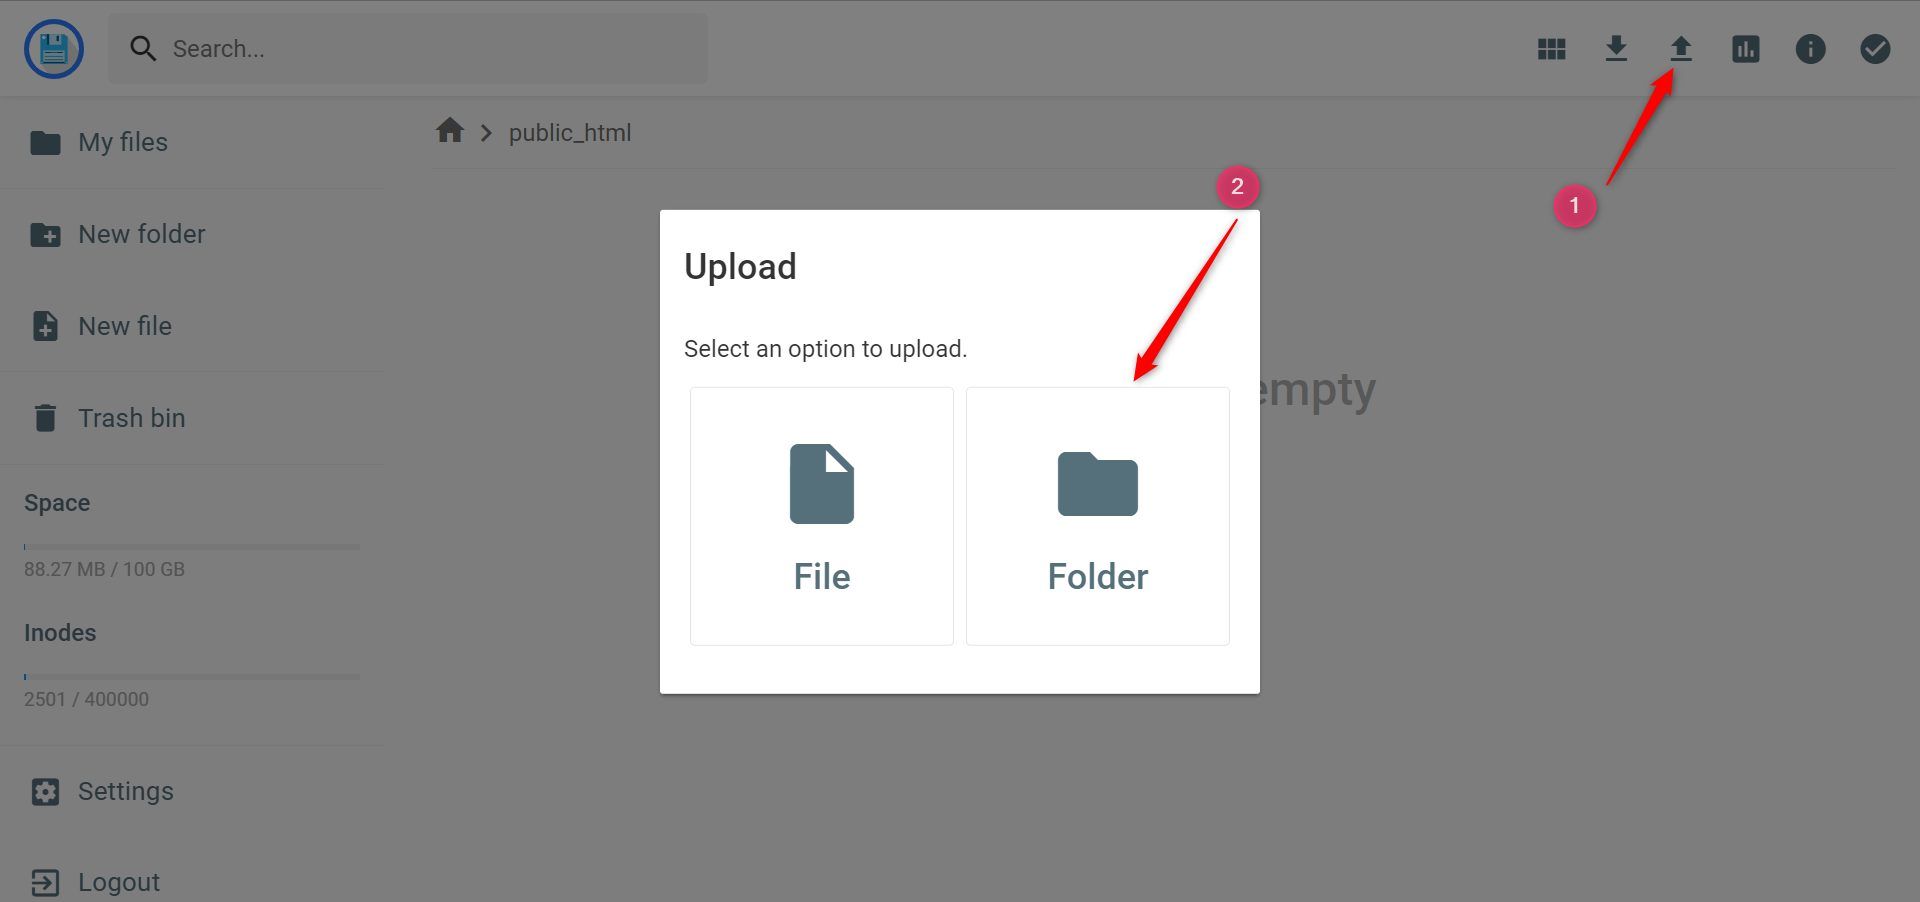
Navigate to the top right corner of the page, and click on the upload icon. Choose the folder option and select the public_html 2 folder from your computer. It might take a while, so have a little patience.
3. Set your PHP Version
The next step to migrate your website to Hostinger, in 4 easy steps, is to set your PHP version. Your new PHP version must be the same as your present host for your website to function properly or at all. So you need to know the version.
To get the version of your current PHP, go to your cPanel again. Now scroll down to the SOFTWARE section and click the Select PHP version button.

On the next page, note the Current PHP version digits.
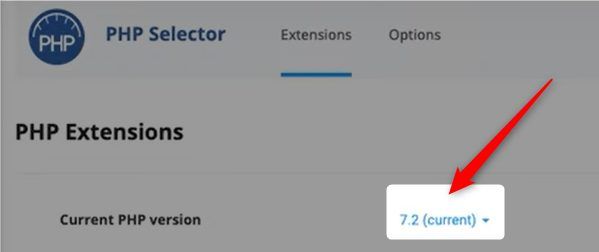
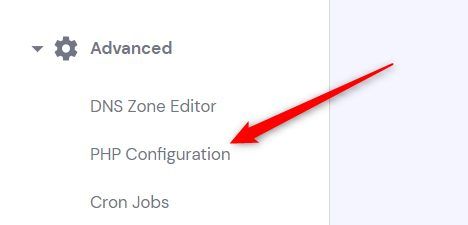
Now, come to the hPanel. Scroll down and navigate to Advanced >> PHP Configuration.
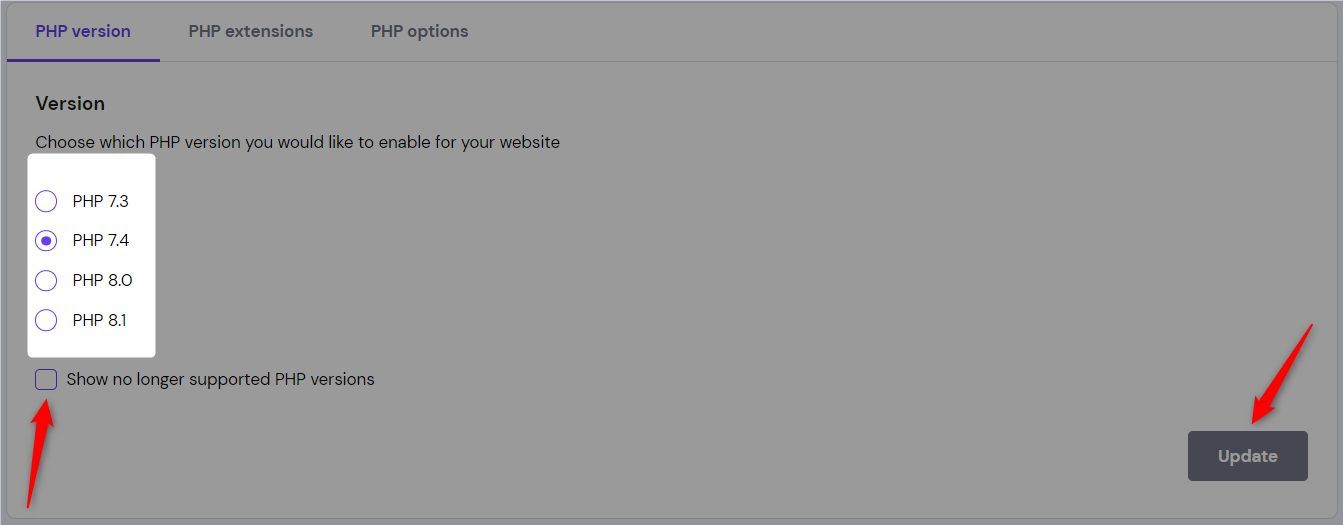
Select your current PHP version on this page and click on the Update button. If your site uses an older version of PHP, tick the show no longer supported PHP versions box to see more options.
4. Create & Import Your Database
The next step to successfully transfer your site to Hostinger is to create and import your database.
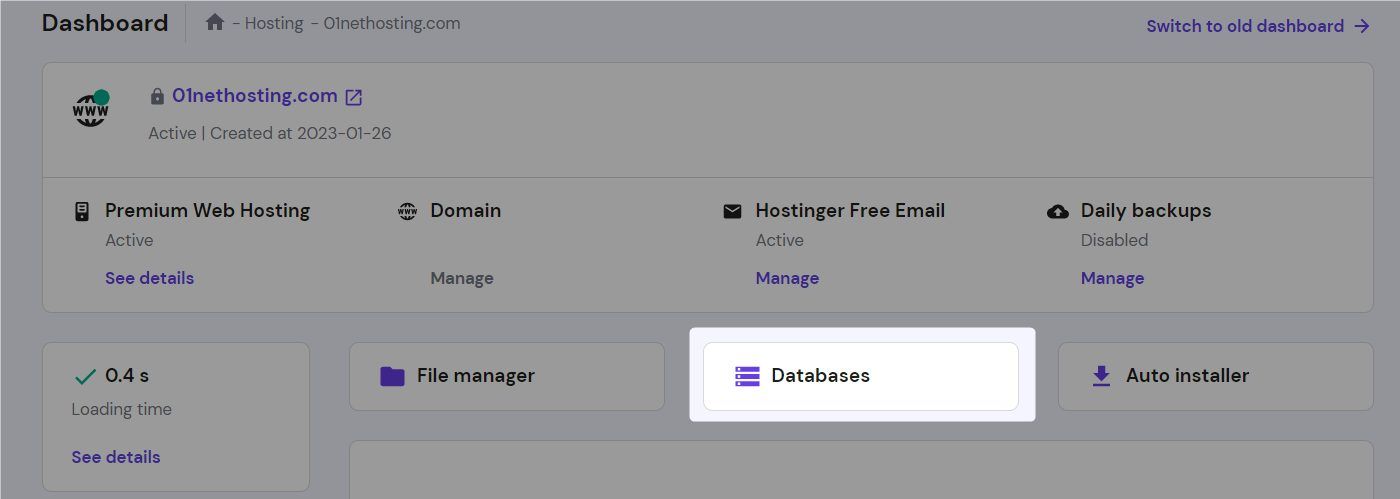
Go to your hPanel dashboard and click on the Databases tile.
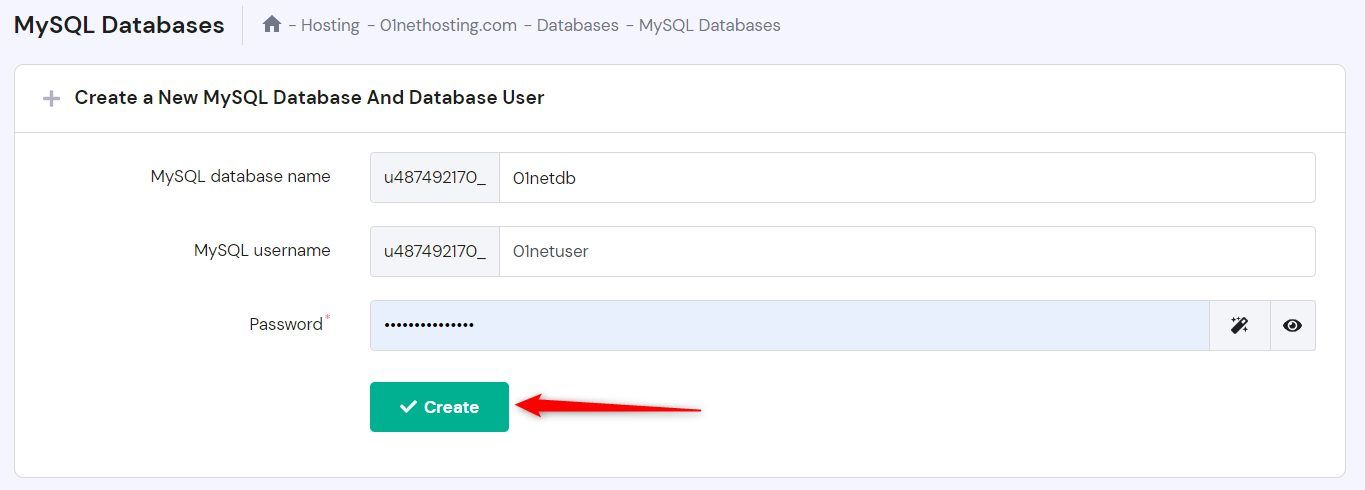
Now, enter your preferred MySQL name and username in the boxes provided. Choose a strong password and click on Create. Make sure you copy this password.
Scroll down, and copy your MySQL username and name also. Then, click on the Enter phpMyAdmin button.

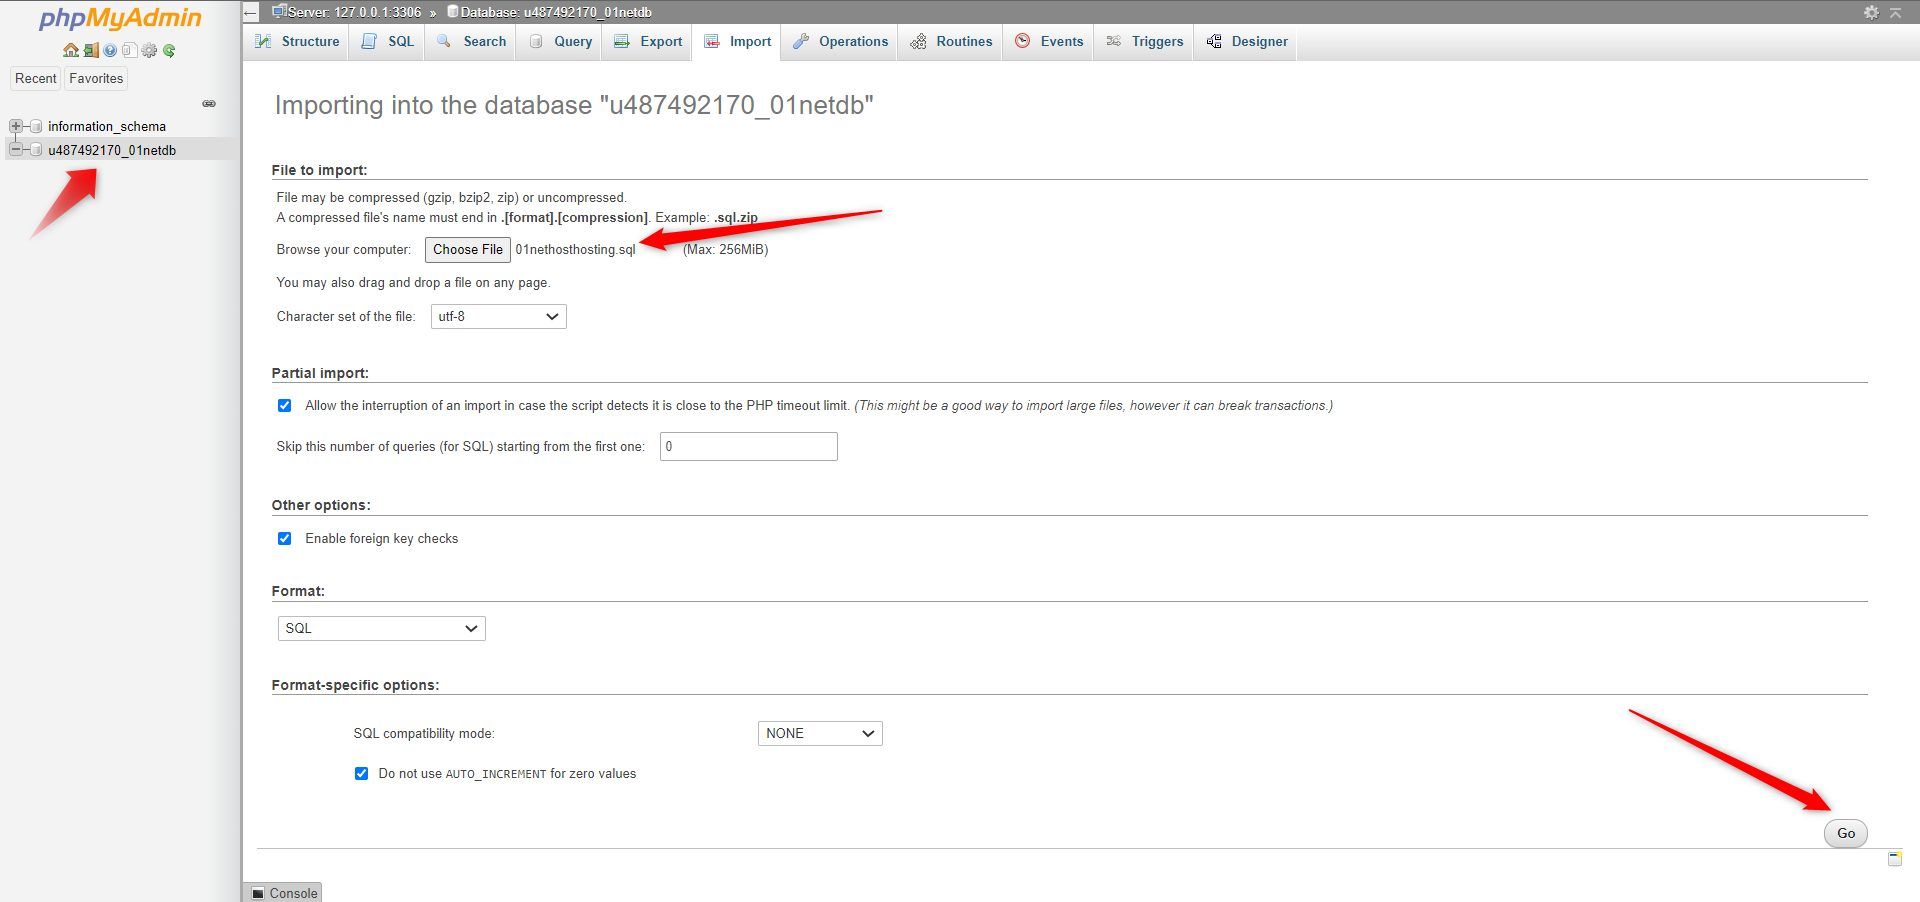
Select the database you just created from the left menu and click on Import at the top of the page.

Select the database you downloaded to your computer earlier. Then, click on the Go button.
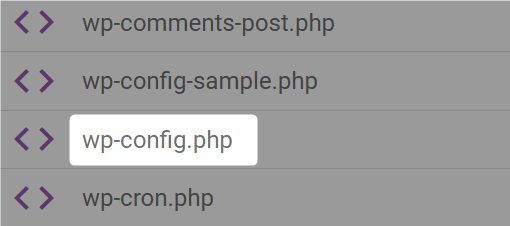
Now, go to your wp-config.php file in the public_html folder. Double-click on it to open.
Scroll down to the Database settings lines. Replace the database name, username and password with the ones you copied earlier. Save the file afterward.

Now, your website is ready. You need to replace your nameservers with Hostinger’s (ns1.dns-parking.com & ns2.dns-parking.com). Wait a few hours for the DNS to propagate properly. In most cases, it takes less than 12 hours.
After you’ve done all that, you’re done!
5. Migrate Your Emails to Hostinger for Free (Optional)
This is an optional step that is only applicable if you already had email hosting with your former provider and you want to move your former emails (messages) to Hostinger. Since Hostinger offers free email hosting, this is a win for you. In order to do this, ensure that your email hosting account is still active with the former provider and that the DNS settings (emails) for the domain are still theirs. This means you should not change your name servers yet.
Once that is set, navigate to Emails on the top menu of your hPanel dashboard and click it.

On the next page, choose the domain whose emails you want to move and click the Manage button.

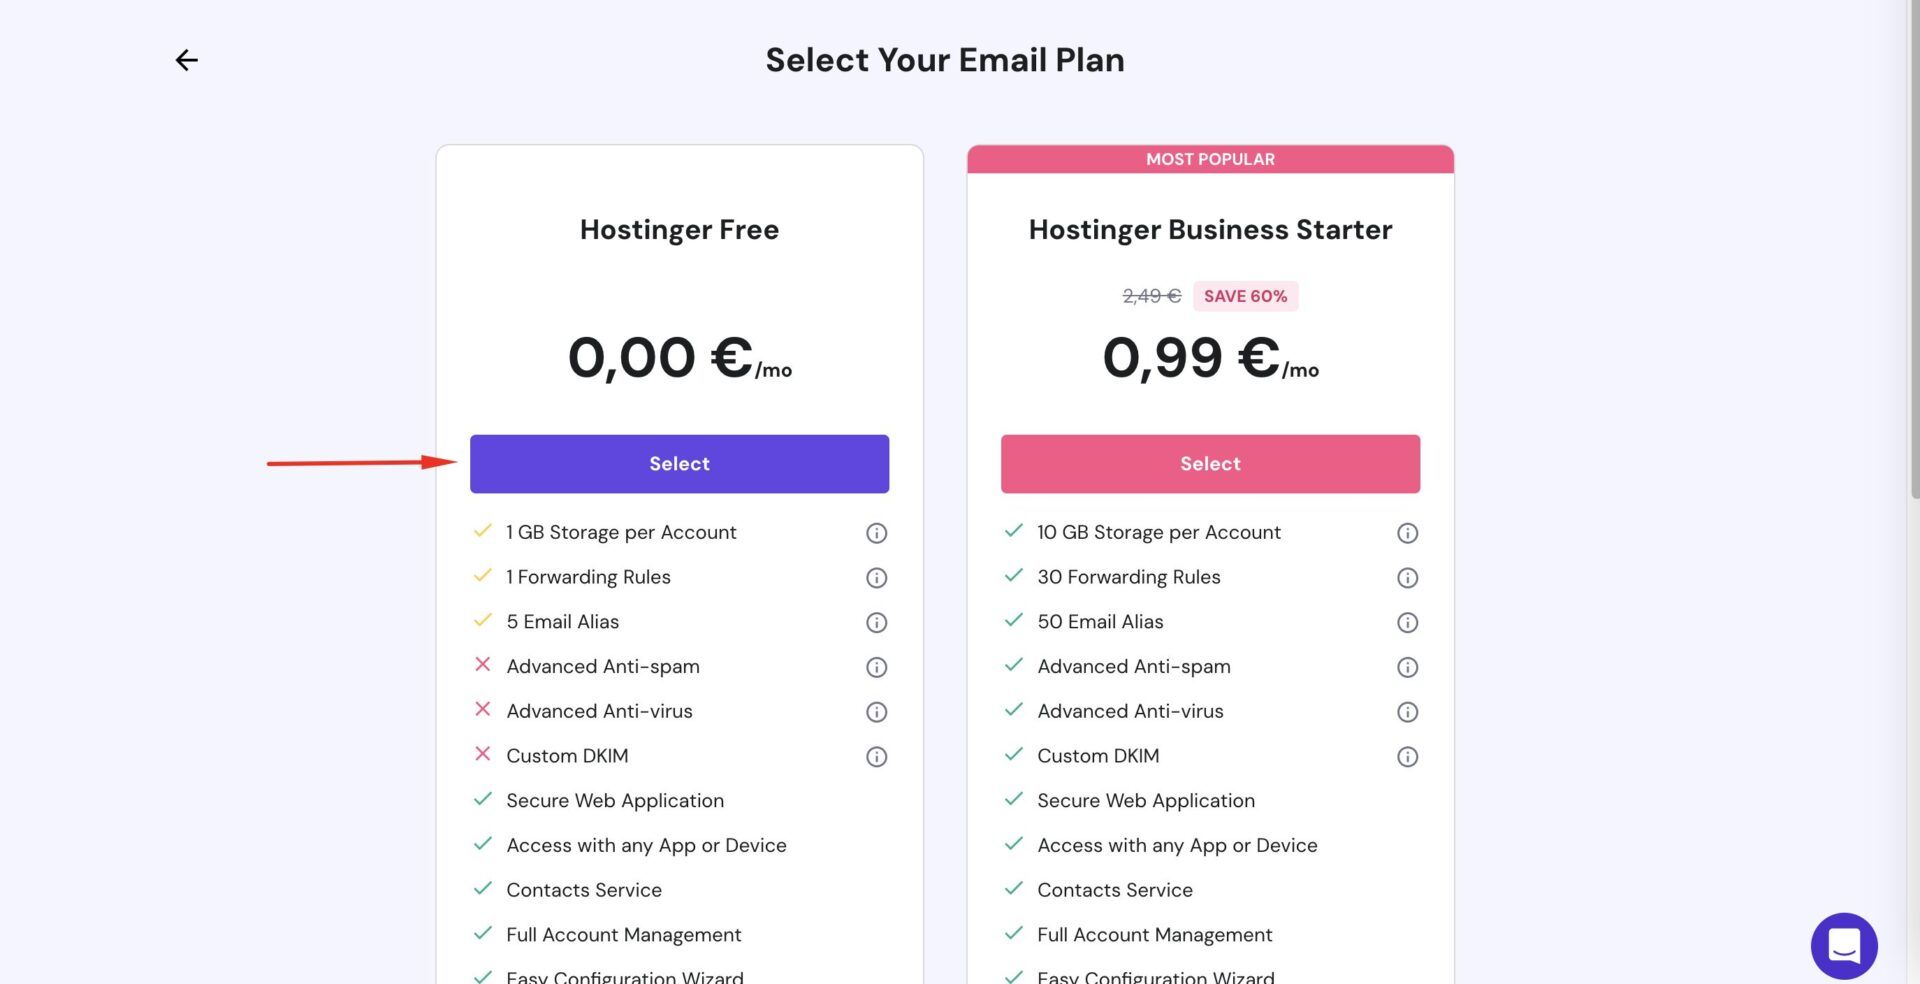
Since we want to use the free email hosting offer Hostinger gives, click the Select button under the Hostinger Free plan. You should, however, ensure that the size of each email account you want to move to Hostinger is less than 1 GB. Otherwise, you will have to choose the Hostinger Business Starter plan which gives 10 GB storage space per account. Note that the price is $0.99 monthly per email account and not for 100 email accounts.
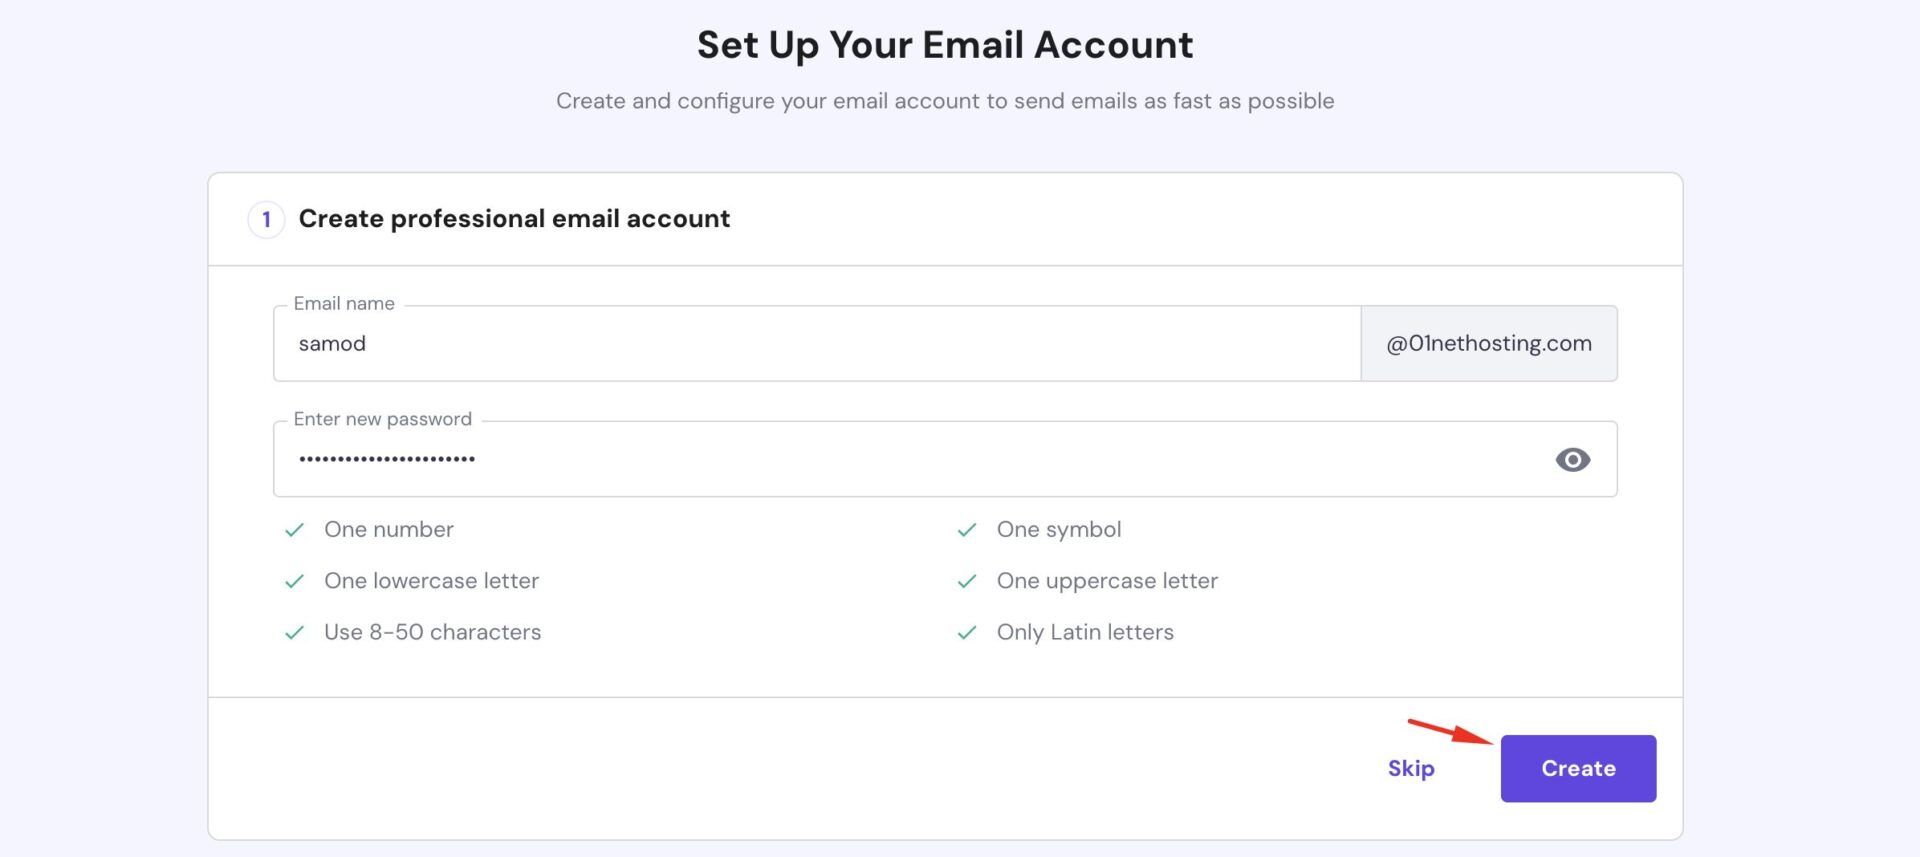
Now, create the same email address that you had with your former provider and choose a different password. Click the Create button once you are done.
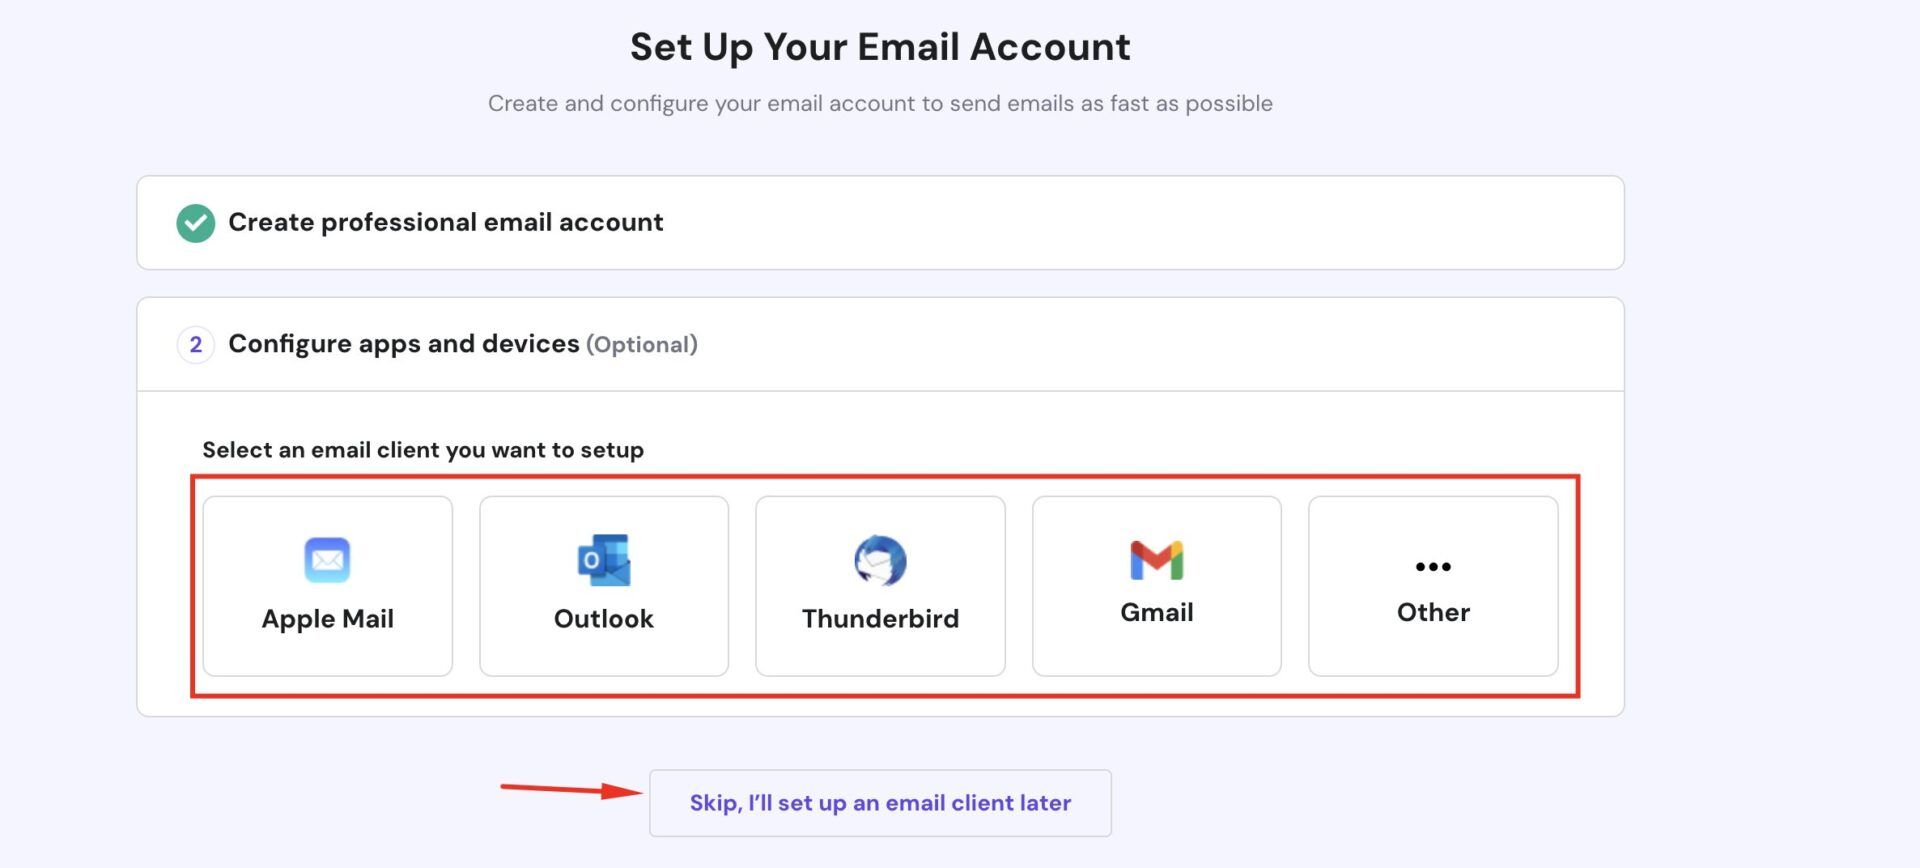
If you want to set up your email account for any mail app, choose it so that you can get the configuration for a successful setup. Otherwise, click the Skip, I’ll set up an email client later link.
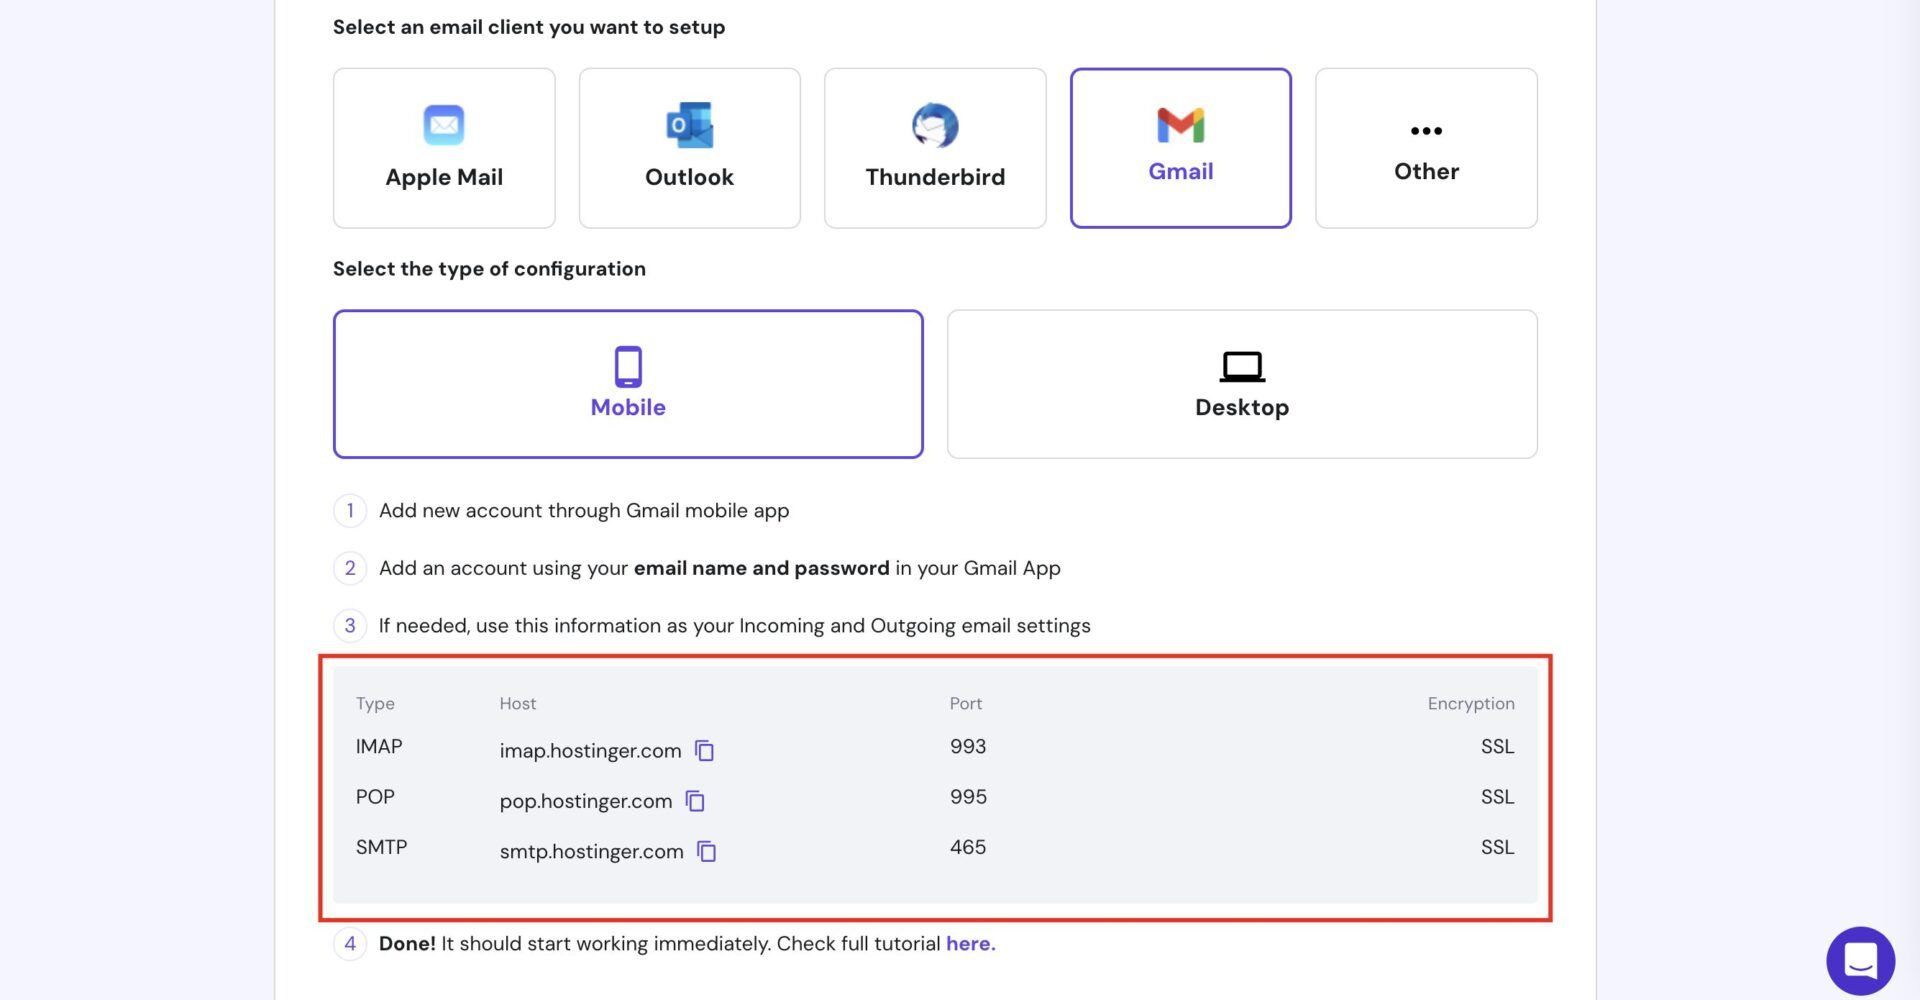
If you choose the set up a mail app, the settings will look as shown below. Once done, click the Complete, I’ve set up my client button.
On the next page, click the Email Import link at the left sidebar.
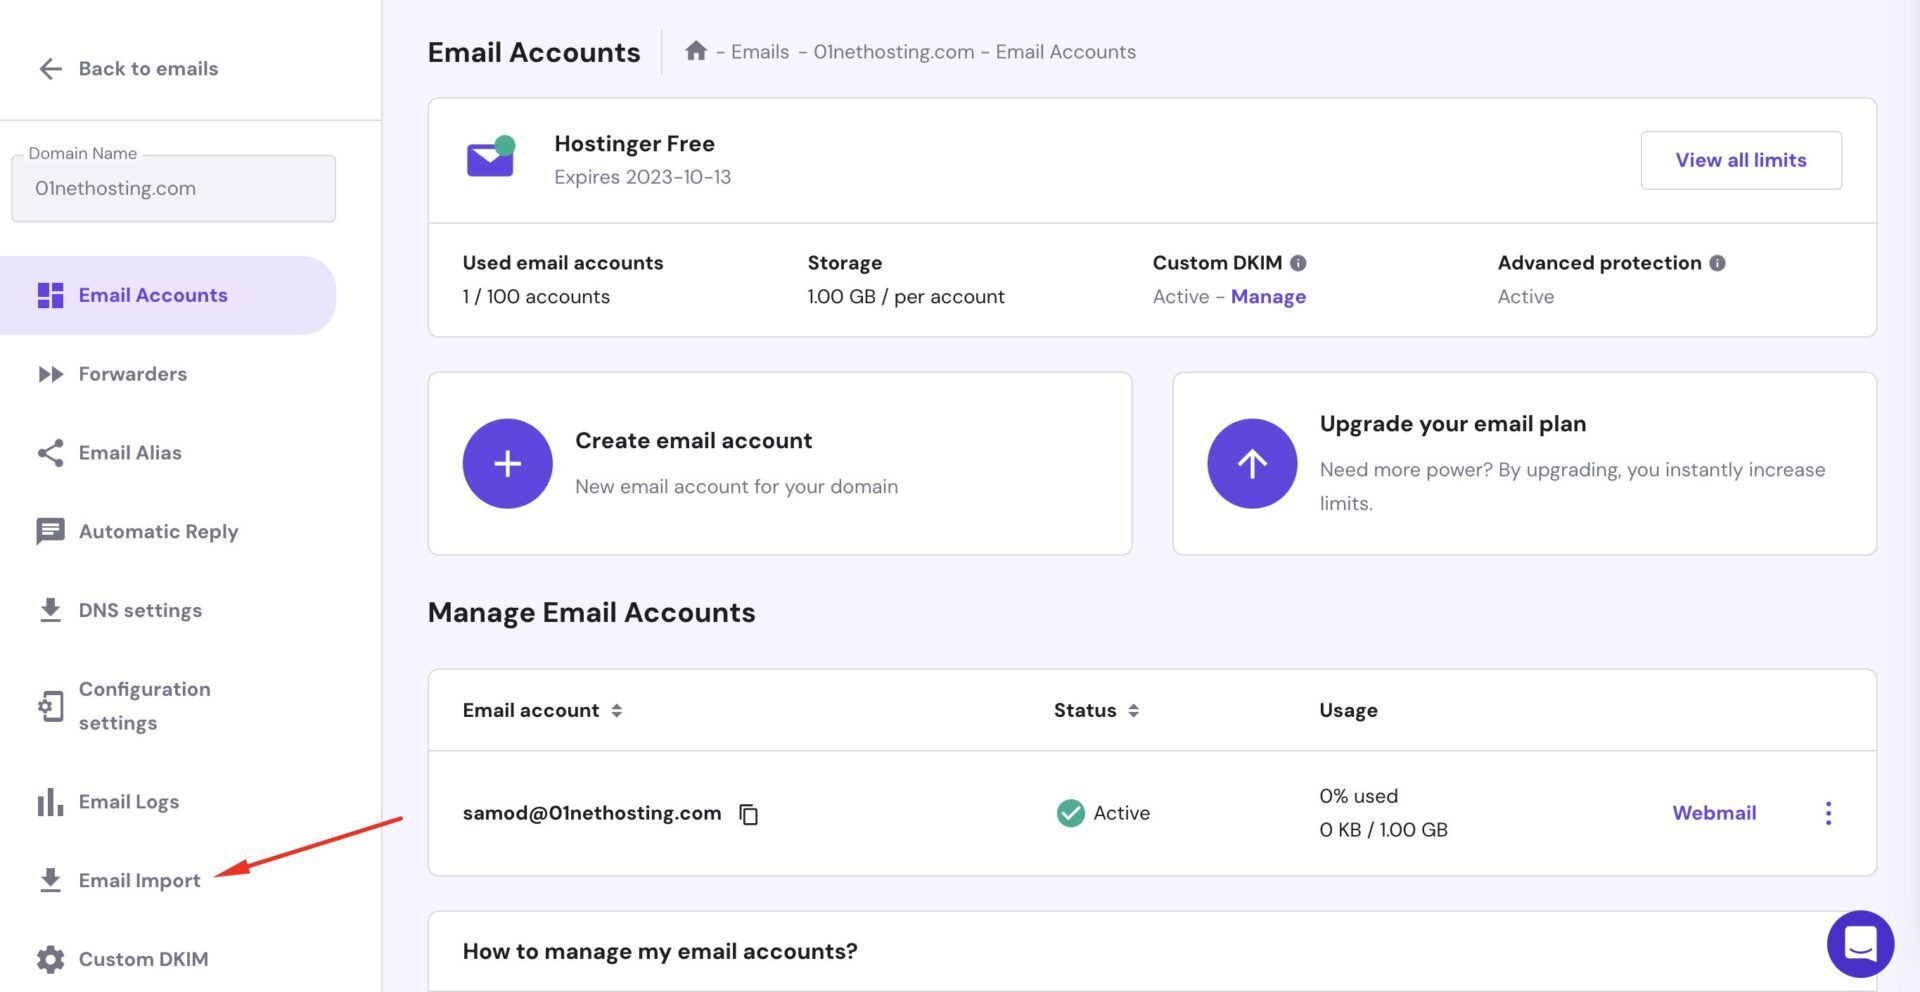
Click the New email import request button.

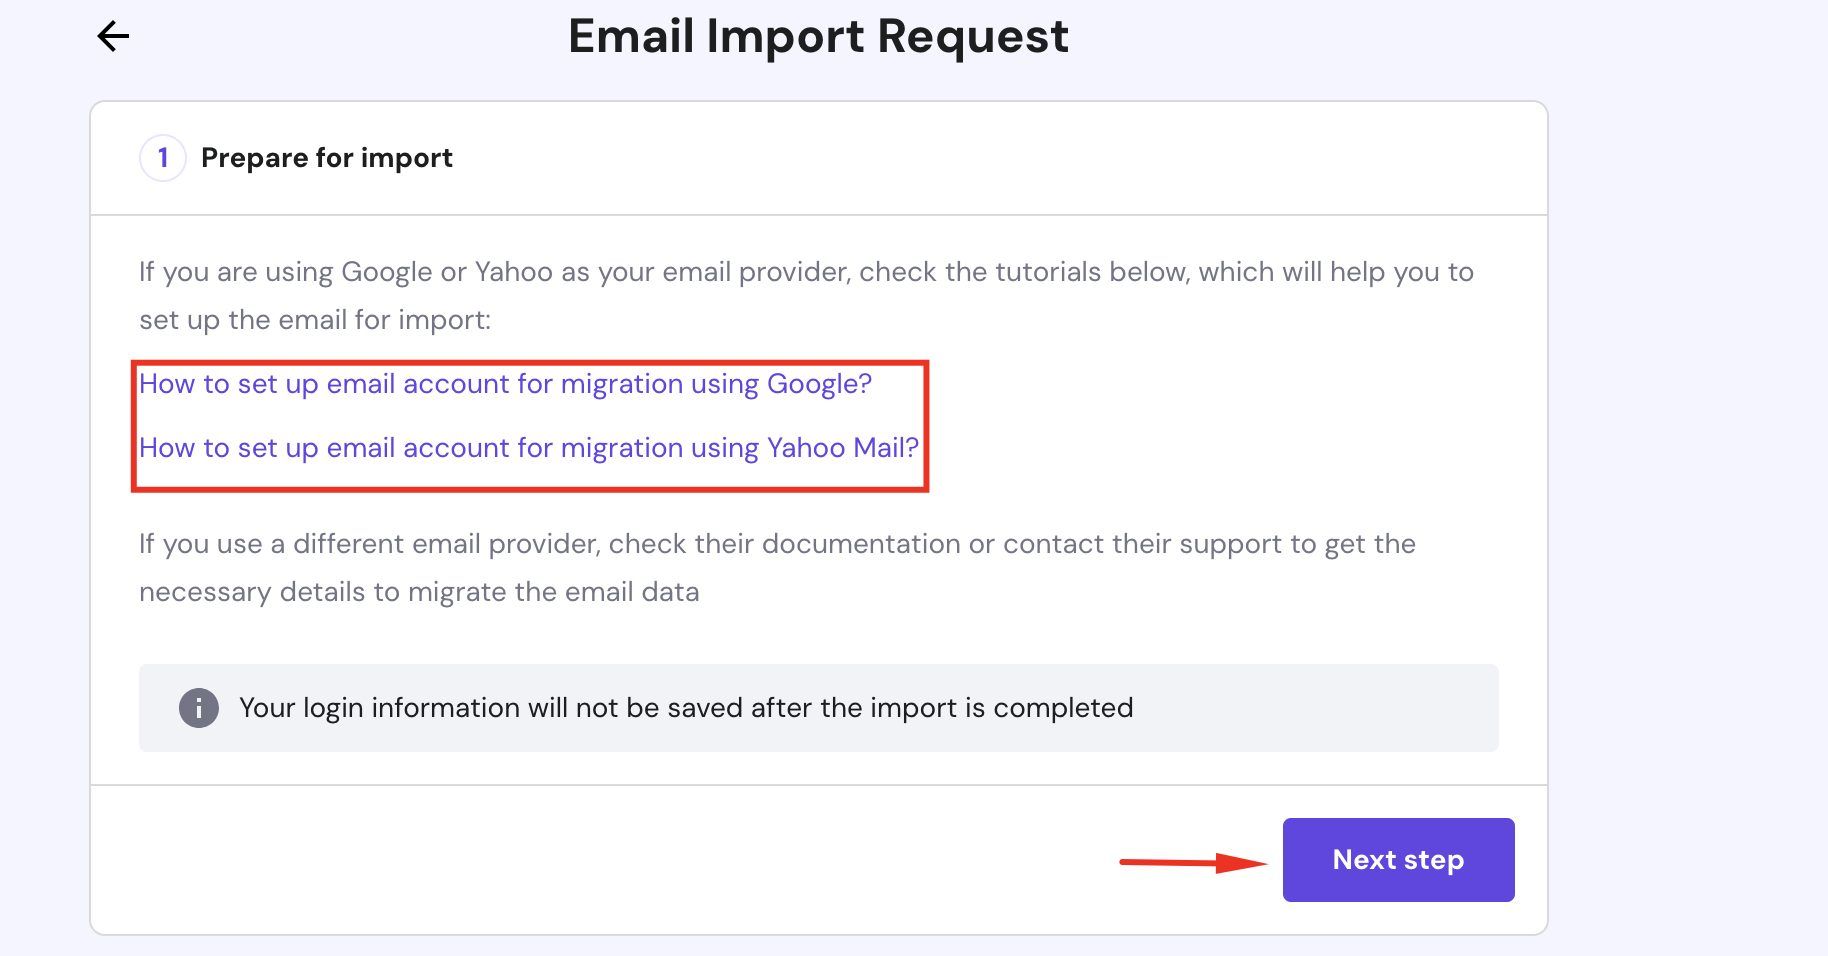
If you are using Google or Yahoo Mail, you can check Hostinger’s guides on setting them up for migration. If you use another provider, check their guide on their website. Click the Next step button afterward.
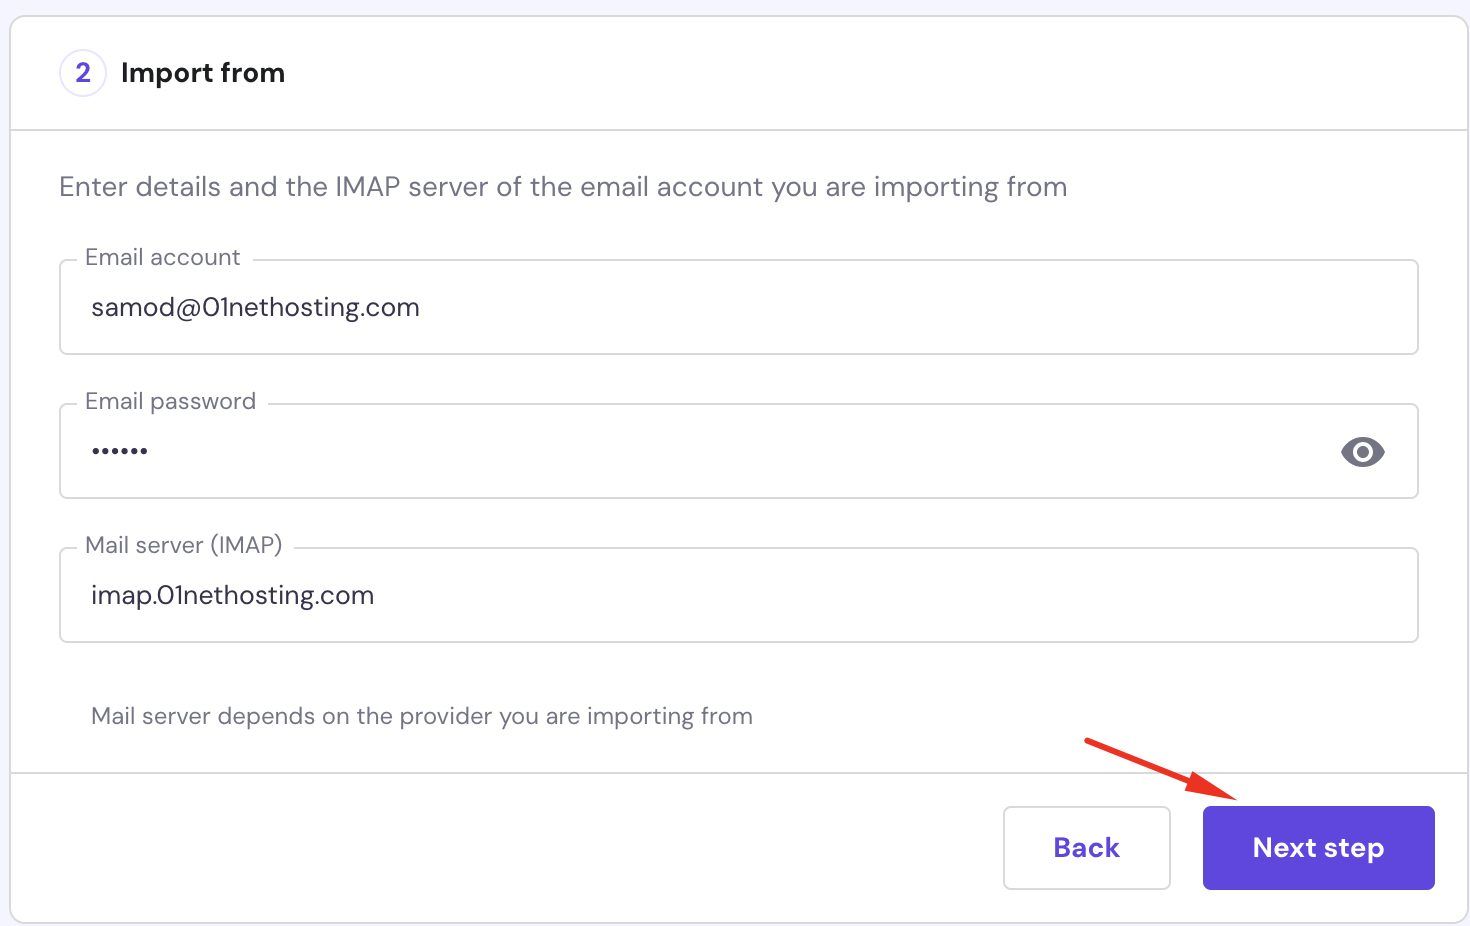
Enter the email address you want to import, the password (the one used when with your former provider), and the IMAP. You can contact your former provider for the IMAP if you don’t know it. Click the Next step button when done.
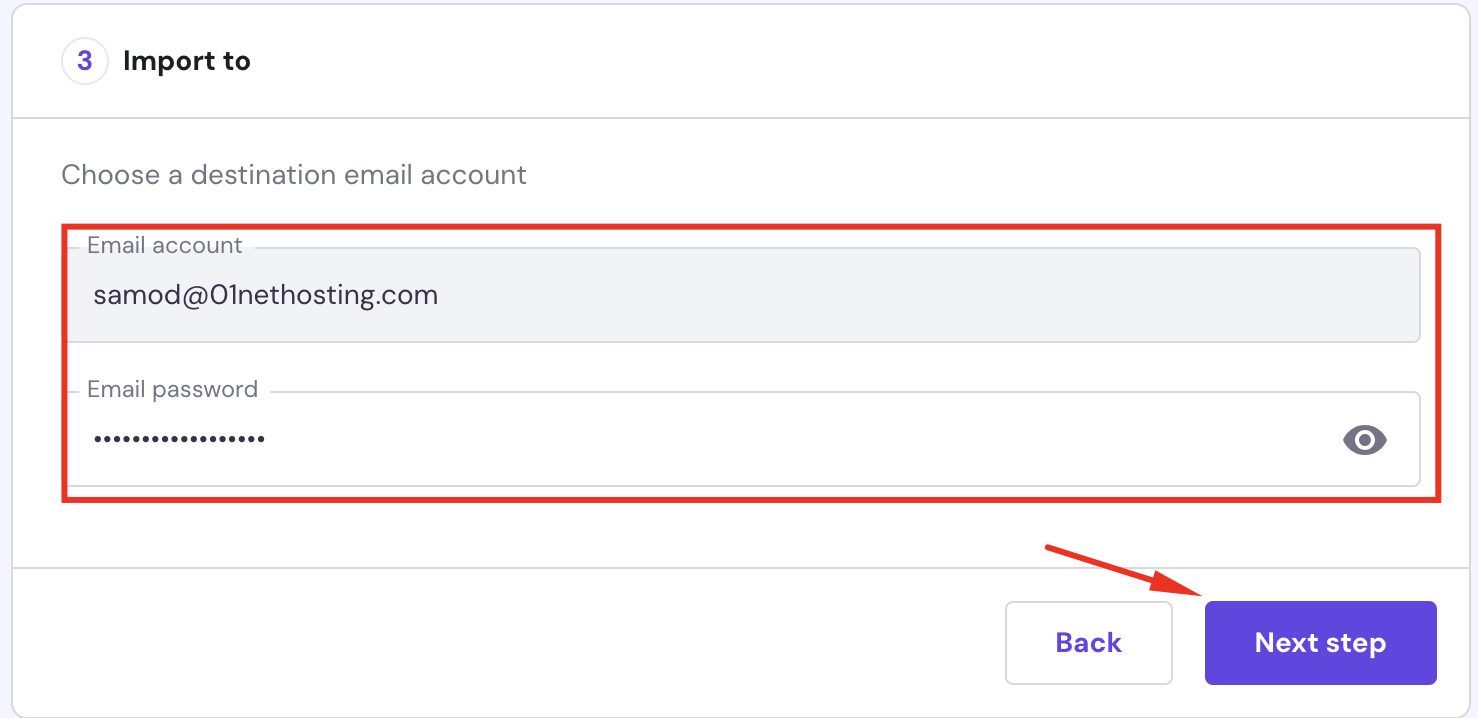
Now choose the email account you want to import the emails to, from the drop-down. Provide the password and click the Next step button afterward.
Now, click the Start button and the import will commence.
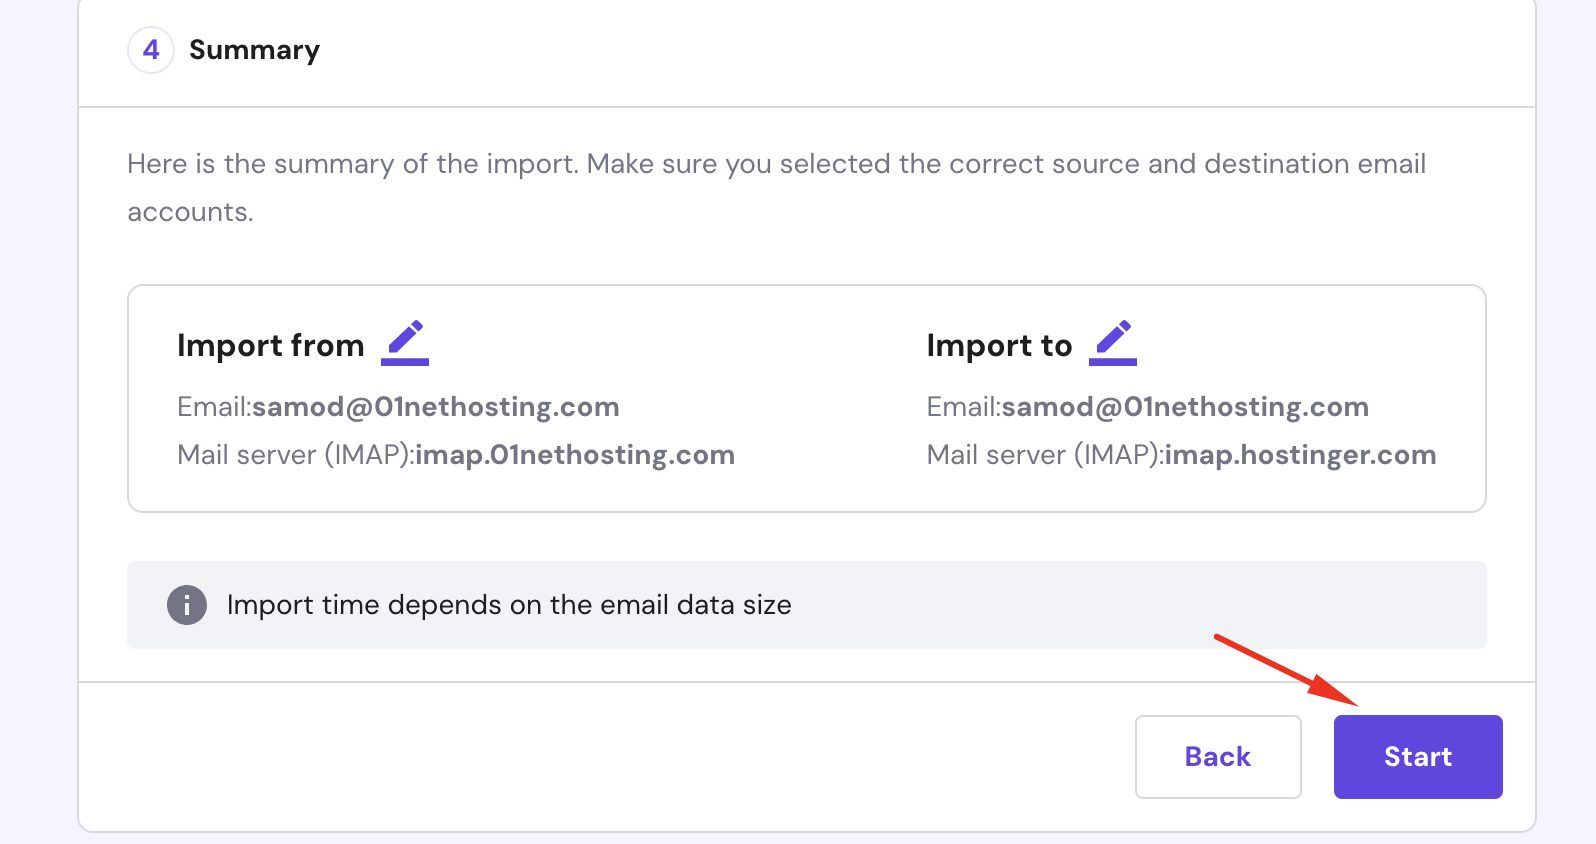
Importing will take some time and it depends on the size of the account. You can always check the status by going to the Email Import page from your left sidebar.

Repeat the process for every email account that you want to migrate to Hostinger.
You can now change your name servers to Hostinger’s name servers (ns1.dns-parking.com & ns2.dns-parking.com) if your domain is registered elsewhere. This automatically updates your Email DNS records too.
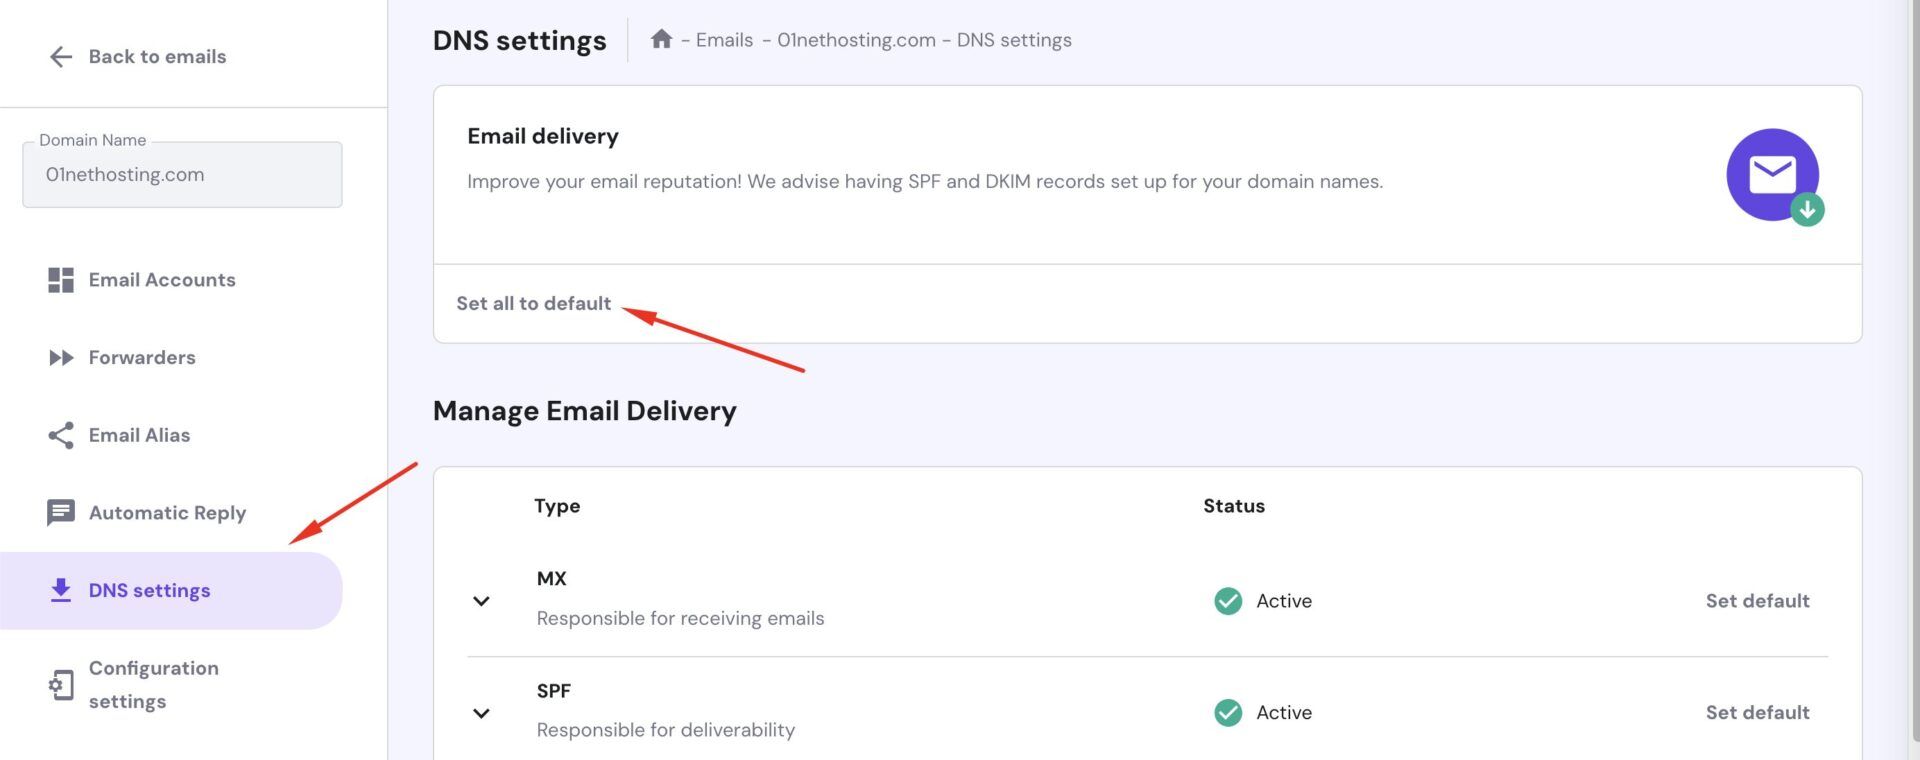
If your domain is registered with Hostinger, but your Email DNS records were pointing to your former provider, click the DNS Settings link from your left sidebar. Now click on the Set all to default link under the Email delivery tile.
All is set now!
Why You Should Migrate Your Website to Hostinger
There are several reasons why you should transfer your site to Hostinger today. Some of them are:
- Affordability: Hostinger is extremely affordable for beginners and small businesses with a low budget. You can get a hosting plan for as low as $2 per month, and the renewal fees do not skyrocket like most web hosts. It’s no coincidence that many consider it an excellent low-cost web hosting.
- Great Value for Money: It offers great value for your money. Despite the affordability of its hosting packages, the features you will enjoy are worth more than your money, to be honest. The hosting packages have many freebies and advanced features you will hardly find elsewhere, like a top-notch website builder. Regarding performance, it also delivers the best loading speeds and uptime that will help your traffic and SEO. Check out our Hostinger full tests and review to see for yourself.
- Free Migration: It also offers free professional migration services. You can migrate an unlimited number of websites to Hostinger. There is no hidden cost to worry about at all.
- Easy Migration Process: Moreover, the migration process is quite easy, as illustrated in this step-by-step guide. By following these steps, you can have your site ready in less than 30 minutes, give or take.
With all this in mind, we hope this guide on how to migrate a site to Hostinger has been helpful. If you have any doubts or problems, do not hesitate to contact the company’s customer support.